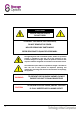
CAUTION RISK OF ELECTRIC SHOCK DO NOT OPEN TO REDUCE THE RISK OF ELECTRIC SHOCK, DO NOT REMOVE THE COVER. NO USER SERVICABLE PARTS INSIDE. REFER SERVICING TO QUALIFIED PERSONNEL. The lightning flash with arrowhead symbol, within an equilateral triangle, is intended to alert the user to the presence of noninsulated “dangerous voltage” within the product’s enclosure that may be of sufficient magnitude to constitute a risk of electric shock.
IMPORTANT SAFEGUARD All lead-free products offered by the company comply with the requirements of the European law of the Restriction of Hazardous Substances (RoHS) directive, which means our manufacturing processes and products are strictly “lead-free” and without the hazardous substances cited in the directive. The crossed-out wheeled bin mark symbolizes that within the European Union the product must be collected separately at the product’s end-of-life.
TABLE OF CONTENTS QUICK START GUIDE 6 OVERVIEW 6 CONVENTIONS USED IN THIS MANUAL 7 PURPOSE OF THIS MANUAL 7 PACKAGE CONTENTS 7 BASIC OPERATION 6.1 – Buttons & Connections 6.2 – Power On / Off 6.3 – Using The Touch Screen 6.4 – Unlock The Screen 6.5 – Camera Shortcut 8 8 9 9 9 9 CHARGE THE BATTERY 10 HOME SCREEN 11 DISPLAY ORIENTATION 12 SETTINGS MENU 13 NETWORK CONNECTIVITY 11.1 – Connect To A Wireless Access Point 11.2 – Connect To A 3G Network 14 14 15 APPLICATIONS 12.
TABLE OF CONTENTS (CONTINUED) WEB BROWSER 20 VIDEO PLAYBACK 21 SOCIAL NETWORKING 18.1 – Facebook 18.
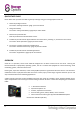
QUICK START GUIDE Please follow this quick start checklist to guide you through using your Storage Options Scroll 7D: 1. Check the package contents. See section “Package Contents” (page 7) for more details. 2. Charge the battery. See section “Charge The Battery” (page 10) for more details. 3. Remove the protective film. Peel the protective film off the tablet’s screen. 4. Familiarise yourself with the physical buttons and connections, powering on, and touch screen control.
CONVENTIONS USED IN THIS MANUAL At various points in this manual you will see highlighted text. Please refer here for an explanation: NOTE TIP Important notes are highlighted in blue. Tips on best practice are highlighted in green. CAUTION Important cautions and warnings are highlighted in red. PURPOSE OF THIS MANUAL This manual is intended to give you a quick overview of the Scroll 7D hardware and very basic functionality of the AndroidTM 4.2 operating system.
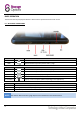
BASIC OPERATION The Scroll 7D has very few physical buttons. Most control is performed via the touch screen. 6.
6.2 – POWER ON / OFF Press and hold the button until the tablet switches on. It will boot into the AndroidTM 4.2 operating system. This will take approximately one minute. To turn the tablet off, press and hold the button for approximately 3 seconds. A “Power Off” menu will appear on screen. Choose “OK” to complete shutdown or “Cancel” to resume use. 6.3 – USING THE TOUCH SCREEN Scroll 7D features a capacitive touch screen. To use it, simply touch any area on the screen – no pressure is required.
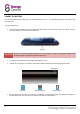
CHARGE THE BATTERY It is recommended to fully charge Scroll 7D overnight before first use. This will help prolong the useful life of the built-in battery. To charge the battery: Insert the mains charger plug into the Micro USB socket which is also the DC5V input on Scroll 7D. Connect the mains adapter to a UK 3-pin electrical socket. CAUTION Do not use any mains adapter other than the one supplied. Using an incompatible adapter could damage the tablet and poses the potential risk of fire.
HOME SCREEN The Home screen will look similar to the picture below. It is actually five screens, each of which can have a different layout of icons. To switch between screens, simply slide your finger left or right across the display. The status bar and navigation buttons are always visible, no matter which Home screen you are currently viewing. The Desktop can contain shortcuts to your most-used applications and widgets. Touch the Search icon to quickly search the World Wide Web using Google.
DISPLAY ORIENTATION Scroll 7D features a built-in G-Sensor which monitors the tablet’s current orientation and automatically adjusts the display to match. To re-orientate the display: NOTE 12 Simply turn Scroll 7D to portrait or landscape position, and the display will rotate to match. Some applications will lock screen orientation. Normal rotation functionality will resume once the application is closed.
SETTINGS MENU The Settings menu allows you to adjust Scroll 7D’s system configuration. To change settings: 1. Touch the “Settings” menu icon on the Applications menu. The Settings menu will open. 2. Glide your finger up or down the left side of the screen to scroll through the list of available categories. 3. Touch a category title to view further options on the right side of the screen.
NETWORK CONNECTIVITY The vast majority of applications support some kind of networking / Internet functionality. There are two ways to connect to the Internet using Scroll 7D; either through your wireless router (access point) or by plugging in a 3G network dongle. 11.1 – CONNECT TO A WIRELESS ACCESS POINT Scroll 7D features standard wireless B / G / N capabilities, meaning it can connect to any router which is compatible with the 802.11b/g/n standard.
11.2 – CONNECT TO A 3G NETWORK Scroll 7D supports a variety of 3G dongles from various manufacturers. To view the list of supported 3G dongles, please do the following: 1. Go to “Settings” “Wireless & Networks” “More”. 2. Select “3G Support Information” to display a list of compatible 3G dongles. To use a 3G dongle, simply connect it to the USB port on Scroll 7D. It will automatically dial its Internet connection.
APPLICATIONS Scroll 7D supports a wide variety of applications. A small selection is pre-installed on the tablet and available from the applications menu, but many more can be downloaded from various websites. 12.1 – THE APPLICATIONS MENU To open the Applications menu, touch the icon at the top right of the Home screen. Use the selection menu to choose between viewing installed applications and widgets.
12.2 – APPLICATIONS & WIDGETS Applications: Applications provide expanded functionality to Scroll 7D. A selection of applications is pre-loaded onto your Scroll 7D tablet, and more can be downloaded from various websites. Applications usually take over the full screen when in use. Widgets: Widgets give enhanced functionality to Scroll 7D’s desktop by providing live updates such as news headlines, e-mail notifications, current time, and more.
12.5 – ADD A SHORTCUT TO THE DESKTOP You can add shortcuts onto the desktop for quick access to your favourite applications. Shortcuts can be placed anywhere on the desktop grid, so you can organise them in whichever manner you like. To place a shortcut on the desktop: 1. Open the Applications menu by touching the icon at the top right of the Home screen. 2. Touch and hold your desired application’s icon. 3. The Applications menu will close and you will be returned to the desktop on the Home screen.
GOOGLE PLAY STORE Scroll Plus features access to the Google Play Store*, the official marketplace for new applications, music, books, movies and games for Android. NOTE A Google account is required to use the Play Store. You can sign in using your existing gmail account, or sign up for a new one if you do not already have one. To use Google Play Store: 1. Open the Applications menu by touching the Play Store icon to launch Google Play Store.
WEB BROWSER Scroll 7D has a built-in browser which can be used to browse the World Wide Web, in the same way you would use a browser on a desktop computer or laptop. To use the browser: 1. Touch the “Browser” icon on the Applications menu. The browser will open. 2. By default, the browser will automatically load Google. NOTE 20 Make sure you are connected to your wireless network before opening the browser. Use tabs to load multiple websites and switch between them.
VIDEO PLAYBACK Scroll 7D is a powerful portable media player. The “Gallery” application can play video and display photos that are stored on either internal memory or a Micro SD card. To use the Video Player: 1. Touch the “Gallery” icon on the Applications menu. The Gallery application will open. 2. The Gallery will automatically find your media and arrange it in a thumbnails view. If you have multiple folders, it will show them first.
SOCIAL NETWORKING Scroll 7D is capable of connecting to your favourite social networking systems. You can either do this via the built-in web browser (see section “Web Browser”, page 20) or via dedicated applications. These applications are pre-loaded onto the device. 18.1 – FACEBOOK Facebook is the most popular social networking experience. Keep in touch with your friends, share photo albums and use instant messaging.
BUILT-IN CAMERA The Camera application lets you take photographs and record video clips using the built-in camera. Launch the “Camera” Use the Viewport to align the scene you would like to capture. Pinch with finger and thumb inwards or outwards to zoom in or out. Touch Options in the top right corner to change white balance, exposure and other settings. Touch the Capture button to record.
MEMORY EXPANSION WITH MICRO SD CARD Scroll 7D features built-in flash memory, which can be expanded using a Micro SD card (not included). You may use any Micro SD, Micro SDHC or Micro SDXC card, up to 64GB capacity. The best way to use a Micro SD card is to treat it as media storage; transfer media files (videos, music and photos) from your computer to your Micro SD card in the usual manner, then insert it into Scroll 7D as shown. To insert and use a Micro SD card: 1.
CONNECT TO A COMPUTER Scroll 7D can be connected to a computer running Microsoft Windows for file transfer via USB cable. To connect to a computer: 1. Using a “micro USB” to “USB A” type USB cable, (not supplied), plug the “micro USB” connector into Scroll 7D’s USB socket, and plug the full-size “USB A” plug into an available USB socket on your computer. 2. Windows may present you with a “New Hardware Wizard”. Please click the “Cancel” option to close this. 3.
SYSTEM RESET A system reset allows you to return the tablet back to factory default settings. CAUTION Resetting to factory defaults will erase all data from the tablet’s internal storage. You must do a back up of any important data before performing this procedure. To reset your tablet to factory defaults: 1. Touch the “Settings” 2. Scroll down to the “ menu icon on the Applications menu. The Settings menu will open. Backup & reset” menu item, and touch to select it. 3. Select “Factory data reset”.
PRODUCT SPECIFICATION Scroll 7D Hardware Unit Size (mm): 116 (W) x 191 (H) x 11 (D) Unit Weight: 300 g CPU: A20 Dual Core Cortex A7 1.2GHz RAM: 1 GB GPU: Mali 400MP 2D / 3D graphics processor Built-in Storage: 8 GB Storage Expansion: Micro SD card, up to 64 GB Display: 7” capacitive multi-touch Resolution: 1024 x 600 Battery Type: Rechargeable lithium ion Battery Capacity: 2800mAH USB Port: 1x USB Speaker: 8 Ω / 1W Wireless Connectivity: 802.
WARRANTY AND PRODUCT SUPPORT If you are experiencing difficulties with your product, or have questions which are not answered in this instruction manual, our dedicated support site offers a wide range of clearly written FAQs, manuals and user guides which are designed to help you get the most from your purchase. Visit our dedicated support site at storageoptions.
BATTERY STATEMENT CMS Distribution Limited is registered as a producer under The Waste Batteries and Accumulator Regulations 2009. The battery in this device is not intended to be removed by the individual or end user.
NOTES 30
NOTES 31