
Operation Manual


storageoptions.com/support 9
3 Installing the IP Camera for Use with a Computer
The Homeguard IP camera is designed to be connected to a network, either wired or wireless. It can then be
accessed from anywhere using either a smartphone or a computer connected to the internet.
3.1 Wired connection to a network
To setup the IP camera, please follow these steps:
Connect the IP camera to your router with a network cable, install the removable wireless antenna, then power
on the IP camera using the supplied 5V adapter.
The lens will move up and down and side to side while the camera performs its starting test.
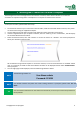
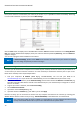
Insert the supplied CD into your computer’s CD drive, then run “LSearch_en.exe”. Click “Search”, this will display
all connected HomeGuard IP cameras.
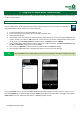
Select the desired camera, then click “Browse” to access the camera in a browser. You will be prompted to
select your desired connection mode.
We recommend using Internet Explorer to access the cameras, to ensure all the features are available. Please
note, it is necessary to install an OCX control before the video can be displayed. Please select “Download OCX”
when prompted.
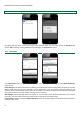
The user login page will be displayed, enter the default login details as below:
NOTE
The default login details are:
User Name: admin
Password: 123456
NOTE
Your firewall software may block the camera finding software. If prompted, please select “Do not
block”.
TIP
You can hold the reset button on the camera for 10 seconds, to restore your camera and password to
factory default.