
Operation Manual


storageoptions.com/support 13
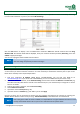
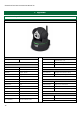
4.1.2 Control the camera
The icons on the left hand side of the screen allow you to control the camera’s movements, reverse or mirror the
image (e.g. if the camera is mounted on the ceiling), and adjust video parameters, such as resolution, brightness, etc.
The camera supports 16 preset points. When the camera is in a position you often check (e.g. pointing at a
doorway), you can Set this as a preset point. When the camera is pointing to a different place, you can then Call this
preset for the camera to point in the desired direction automatically.
Click to control the IR LEDs mode. In Auto mode, they will turn on automatically when the ambient light is low.
In some instances, this can lead to a poor picture as the ambient light is not low enough for the camera’s night vision
to be fully effective. If this is the case, you can switch the LEDs to Forced Closed mode.
4.1.3 Split screen Display
You can add several cameras to your system, as per section 3.5.1. Using the icons on the right hand side of the
screen, you can choose to display 1, 4 or 9 cameras at once. By selecting the desired area, you can then apply all the
controls to that camera.
4.1.4 Setting device parameters
Click to enter the camera’s settings. You can adjust all the settings described in the following sections. Only the
administrator can login to set these parameters.
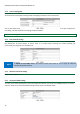
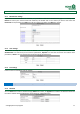
4.2 Device information
4.2.1 Device status
Displays the camera’s Firmware version, Web UI Version, Alias, AP MAC, etc
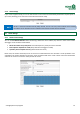
4.2.2 Device alias setting
Use this to give your IP camera a recognisable name (e.g. Office, Kitchen, etc). This will be displayed when accessing
the camera from a browser.
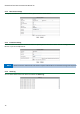
4.2.3 Device date and time setting
You can select to synchronise the camera’s time and date with an external time server, or synchronise it with your
PC’s time and date. Please ensure the Time zone selected is correct.