
Operation Manual


Page 27
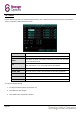
7.10 – DATE / TIME
It is highly recommended to set the date and time immediately when first setting up the system.
To set the date and time:
1. Click DATE / TIME and configure the following options:
DATE: Enter the day, month, and year
DATE FORMAT: Select DD/MM/YYYY, MM/DD/YYYY, or YYYY/MM/DD
TIME: Enter the time
TIME FORMAT: Use the drop-down menu and select 12HOURS or 24HOURS
DST: Use the drop-down menu to select ON/OFF to enable/disable Daylight Savings Time
2. Click MODIFY DATE AND TIME, then click CLOSE in the confirmation window.
3. Click APPLY to save the new date and time.
7.11 – DAYLIGHT SAVING TIME
To set daylight saving time:
1. Under DST, select ON. DST options will appear.
2. Under DST MODE select one of the following:
CUSTOM: Set customized start and end times for DST (go to step 4)
DEFAULT: Applies DST from second Sunday in March to second Sunday in November (go to step 3)
3. If using DEFAULT, simply click APPLY.
4. If setting a CUSTOM DST, use the drop-down menus to select a week and month for the start and end times.
5. Click APPLY, then click CLOSE in the confirmation window.
6. Click EXIT in each menu until all windows are closed.