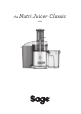
the Nutri Juicer™ Classic SJE95
Contents 2 5 6 8 9 10 Sage® Recommends Safety First Components Assembly Functions Care & Cleaning Troubleshooting SAGE® RECOMMENDS SAFETY FIRST At Sage® we are very safety conscious. We design and manufacture consumer products with the safety of you, our valued customer, foremost in mind. In addition we ask that you exercise a degree of care when using any electrical appliance and adhere to the following precautions.
EN • Always turn the appliance to the off position, switch off at the power outlet and unplug at the power outlet when the appliance is not in use. • Do not use the appliance if the power cord, plug, or appliance becomes damaged in any way. If damaged or maintenance other than cleaning is required, please contact Sage Customer Service or go to sageappliances.com • Any maintenance other than cleaning should be performed by an authorised Sage® service centre. • Children should not play with the appliance.
• Allow the motor to rest for 1 minute between each use. • Do not push food into the feed chute with your fingers or other utensils. Always use the food pusher provided. Do not place hand or fingers into the food chute when it is attached to the appliance. • Do not juice stone fruit unless seeds and/or stones have been removed.
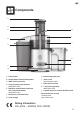
EN Components A B C H I D J E K L F G A. Food pusher B. Unique Direct Central Feed System C. Wide 75mm feed chute D. Large capacity pulp container (dishwasher safe). E. Stainless steel titanium reinforced micro mesh filter basket (dishwasher safe). F. Heavy duty 1200 watt motor G. Cord storage H. Interlocking safety arm I. Juicer cover (not dishwasher safe). J. Filter bowl surround K. 1 litre juice jug and lid (dishwasher safe). L.
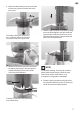
Assembly 3. Align the arrows at the base of the stainless steel filter basket with the arrows on the motor drive coupling and push down until it clicks into place. Ensure the stainless steel filter basket is fitted securely inside the filter bowl surround and onto the motor base. Before first use Before using your juicer for the first time, remove and safely discard any packaging materials and promotional stickers and labels.
EN 5. Raise the safety locking arm up and locate into the two grooves on either side of the juice cover. The safety locking arm should now be in a vertical position and locked into place on top of the juice cover. 6. Slide the food pusher down the food chute by aligning the groove in the food pusher, with the small protrusion on the inside of the top of the feed tube. 7. Place the pulp container into position by tilting the motor base slightly to the right.
Functions 1. Wash your selection of fruit and vegetables to be juiced. 2. Ensure the juicer is correctly assembled. Refer to Assembling your Sage product. Ensure the juicer jug is placed under the juice spout and pulp container is in position before commencing juicing. 3. Plug the power cord into a 220–240V power outlet. Turn the power ON at the power outlet. Adjust the speed to the desired setting.
EN Care & Cleaning Ensure the juicer is turned off by switching the ON/OFF button on the control panel to OFF. Then switch the appliance off at the power outlet and unplug the power cord. FOR EASY CLEANING: Clean as you go and avoid dried on juice or pulp residue. • Immediately after each use, rinse removable parts in hot water to remove wet pulp. Allow parts to air dry. Do not use abrasive scouring pads or cleaners when cleaning the parts or motor base as they may scratch the surface.
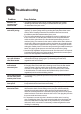
Troubleshooting Problem Easy Solution Machine will not work when switched ON. • The safety locking arm may not be correctly engaged in the vertical operating position with the locking arm located into the two grooves on either side of the juicer cover. Motor appears to stall when juicing. • Wet pulp can build up under the juicer cover if the juicing action is too vigorous. Try slower juicing action by pushing the food pusher down more slowly.
EN Notes 11