
User Manual
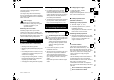

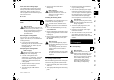
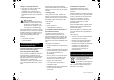
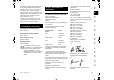
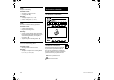
Table Of Contents
- 1. Inhaltsverzeichnis
- 2. Zu dieser Gebrauchsanleitung
- 3. Gerätebeschreibung
- 4. Zu Ihrer Sicherheit
- 5. Symbolbeschreibung
- 6. Lieferumfang
- 7. Gerät betriebsbereit machen
- 8. Sicherheitseinrichtungen
- 9. Hinweise zum Arbeiten
- 10. Gerät in Betrieb nehmen
- 11. Wartung
- 12. Transport
- 13. Verschleiß minimieren und Schäden vermeiden
- 14. Umweltschutz
- 15. Übliche Ersatzteile
- 16. EU- Konformitätserklärung
- 17. Technische Daten
- 18. Fehlersuche
- 19. Serviceplan
- 1. Table of contents
- 2. Notes on the instruction manual
- 3. Machine overview
- 4. For your safety
- 5. Description of symbols
- 6. Standard equipment
- 7. Preparing the machine for operation
- 8. Safety devices
- 9. Notes on working with the machine
- 10. Operating the machine
- 11. Maintenance
- 12. Transport
- 13. Minimising wear and preventing damage
- 14. Environmental protection
- 15. Standard spare parts
- 16. EU - Declaration of conformity
- 17. Technical specifications
- 18. Troubleshooting
- 19. Service schedule
- 1. Sommaire
- 2. À propos de ce manuel d’utilisation
- 3. Description de l’appareil
- 4. Consignes de sécurité
- 5. Signification des pictogrammes
- 6. Contenu de l’emballage
- 7. Préparation de l’appareil
- 7.1 Généralités
- 7.2 Montage du guidon
- 7.3 Accrochage et décrochage du câble de démarrage
- 7.4 Basculement de la partie supérieure du guidon
- 7.5 Assemblage du bac de ramassage
- 7.6 Décrochage et accrochage du bac de ramassage
- 7.7 Réglage centralisé de la hauteur de coupe
- 7.8 Carburant et huile moteur utilisés
- 8. Dispositifs de sécurité
- 9. Conseils d’utilisation
- 10. Mise en service de l’appareil
- 11. Entretien
- 12. Transport
- 13. Comment limiter l’usure et éviter les dommages
- 14. Protection de l’environnement
- 15. Pièces de rechange courantes
- 16. Déclaration de conformité UE
- 17. Caractéristiques techniques
- 18. Recherche des pannes
- 19. Feuille d’entretien
- 1. Inhoudsopgave
- 2. Over deze gebruiksaanwijzing
- 3. Beschrijving van het apparaat
- 4. Voor uw veiligheid
- 5. Toelichting van de symbolen
- 6. Leveringsomvang
- 7. Apparaat klaarmaken voor gebruik
- 8. Veiligheidsvoorzieningen
- 9. Aanwijzingen voor werken
- 10. Apparaat in gebruik nemen
- 11. Onderhoud
- 12. Transport
- 13. Slijtage minimaliseren en schade voorkomen
- 14. Milieubescherming
- 15. Standaard reserveonderdelen
- 16. EU- conformiteitsverklaring
- 17. Technische gegevens
- 18. Defectopsporing
- 19. Onderhoudsschema
- 1. Indice
- 2. Avvertenze sulle istruzioni per l’uso
- 3. Descrizione dell’apparecchio
- 4. Per la vostra sicurezza
- 5. Descrizione dei simboli
- 6. Equipaggiamento fornito
- 7. Preparazione per la messa in servizio dell'apparecchio
- 7.1 Informazioni generali
- 7.2 Montaggio del manubrio
- 7.3 Aggancio e sgancio del cavo di avviamento
- 7.4 Chiusura della parte superiore del manubrio
- 7.5 Assemblaggio del cesto raccolta erba
- 7.6 Sgancio e aggancio del cesto di raccolta erba
- 7.7 Regolazione centralizzata altezza di taglio
- 7.8 Carburante e olio motore
- 8. Dispositivi per la sicurezza
- 9. Istruzioni di lavoro
- 10. Messa in servizio dell'apparecchio
- 11. Manutenzione
- 12. Trasporto
- 13. Minimizzare l’usura ed evitare danni
- 14. Tutela dell’ambiente
- 15. Ricambi standard
- 16. Dichiarazione di conformità EU
- 17. Dati tecnici
- 18. Risoluzione guasti
- 19. Programma Assistenza Tecnica
- 1. Índice
- 2. Acerca de este manual de instrucciones
- 3. Descripción del equipo
- 4. Para su seguridad
- 5. Descripción de los símbolos
- 6. Contenido del suministro
- 7. Preparar el equipo para el servicio
- 8. Dispositivos de seguridad
- 9. Indicaciones para el trabajo
- 10. Poner el equipo en servicio
- 11. Mantenimiento
- 12. Transporte
- 13. Reducir el desgaste y prevenir daños
- 14. Protección del medio ambiente
- 15. Piezas de recambio habituales
- 16. Declaración de conformidad de la UE
- 17. Datos técnicos
- 18. Localización de anomalías
- 19. Plan de mantenimiento
- 1. Índice
- 2. Sobre este manual de utilização
- 3. Descrição do aparelho
- 4. Para sua segurança
- 5. Descrição de símbolos
- 6. Fornecimento
- 7. Preparar o aparelho para o funcionamento
- 8. Dispositivos de segurança
- 9. Instruções para trabalhar
- 10. Colocar o aparelho em funcionamento
- 11. Manutenção
- 12. Transporte
- 13. Minimização do desgaste e prevenção de danos
- 14. Proteção do meio ambiente
- 15. Peças de reposição comuns
- 16. Declaração de conformidade UE
- 17. Dados técnicos
- 18. Localização de falhas
- 19. Plano de manutenção
- 1. Innholdsfortegnelse
- 2. Om denne bruksanvisningen
- 3. Maskinbeskrivelse
- 4. For din egen sikkerhet
- 5. Symbolforklaring
- 6. Produktkomponenter
- 7. Gjøre maskinen klar for bruk
- 8. Sikkerhetsutstyr
- 9. Informasjon om arbeid
- 10. Ta maskinen i bruk
- 11. Vedlikehold
- 12. Transport
- 13. Minimere slitasjen og unngå skader
- 14. Miljøvern
- 15. Vanlige reservedeler
- 16. EU-samsvarserklæring
- 17. Tekniske data
- 18. Feilsøking
- 19. Serviceplan
- 1. Innehållsförteckning
- 2. Information om denna bruksanvisning
- 3. Maskinbeskrivning
- 4. För din säkerhet
- 5. Symbolbeskrivning
- 6. Leveransens omfattning
- 7. Göra maskinen klar för användning
- 8. Säkerhetsanordningar
- 9. Arbetsanvisningar
- 10. Ta maskinen i bruk
- 11. Underhåll
- 12. Transport
- 13. Minimera slitage och förhindra skador
- 14. Miljöskydd
- 15. Vanliga reservdelar
- 16. EU- konformitetsdeklaration
- 17. Tekniska data
- 18. Felsökning
- 19. Serviceschema
- 1. Sisällysluettelo
- 2. Tätä käyttöopasta koskevia tietoja
- 3. Laitekuvaus
- 4. Turvallisuutesi vuoksi
- 5. Kuvasymbolien selitykset
- 6. Toimitussisältö
- 7. Laitteen valmistelu käyttöä varten
- 8. Turvalaitteet
- 9. Työskentelyohjeita
- 10. Laitteen käyttöönotto
- 11. Huolto
- 12. Kuljetus
- 13. Kulumisen minimointi ja vaurioiden ehkäisy
- 14. Ympäristönsuojelu
- 15. Varaosat
- 16. EU- vaatimustenmukaisuusvaku utus
- 17. Tekniset tiedot
- 18. Vianetsintä
- 19. Huolto-ohjelma
- 1. Indholdsfortegnelse
- 2. Om denne betjeningsvejledning
- 3. Beskrivelse af maskinen
- 4. Sikkerhed
- 5. Symbolforklaring
- 6. Medfølgende dele
- 7. Klargøring af maskinen
- 8. Sikkerhedsanordninger
- 9. Arbejdsanvisninger
- 10. Tag maskinen i brug
- 11. Vedligeholdelse
- 12. Transport
- 13. Sådan minimerer du slid og undgår skader
- 14. Miljøbeskyttelse
- 15. Standardreservedele
- 16. EC- overensstemmelseserklærin g
- 17. Tekniske data
- 18. Fejlsøgning
- 19. Serviceplan
- 1. Obsah
- 2. O tomto návode na obsluhu
- 3. Popis stroja
- 4. Pre vašu bezpečnosť
- 5. Popis symbolov
- 6. Rozsah dodávky
- 7. Príprava stroja na prevádzku
- 8. Bezpečnostné zariadenia
- 9. Pokyny pre prácu
- 10. Uvedenie stroja do prevádzky
- 11. Údržba
- 12. Preprava stroja
- 13. Opatrenia na minimalizovanie opotrebovania a na zabránenie vzniku škôd
- 14. Ochrana životného prostredia
- 15. Bežné náhradné diely
- 16. Prehlásenie o zhode výrobcom - EÚ
- 17. Technické údaje
- 18. Hľadanie porúch
- 19. Servisný plán
- 1. Obsah
- 2. O tomto návodu k použití
- 3. Popis stroje
- 4. Pro vaši bezpečnost
- 5. Popis symbolů
- 6. Rozsah dodávky
- 7. Příprava stroje k provozu
- 8. Bezpečnostní zařízení
- 9. Pokyny pro práci
- 10. Uvedení stroje do provozu
- 11. Údržba
- 12. Přeprava stroje
- 13. Opatření pro minimalizování opotřebení a zabránění vzniku škod
- 14. Ochrana životního prostředí
- 15. Běžné náhradní díly
- 16. Prohlášení o shodnosti výroby EU
- 17. Technické údaje
- 18. Hledání závad
- 19. Servisní plán
- 1. Περιεχόμενα
- 2. Σχετικά με αυτές τις οδηγίες χρήσης
- 3. Περιγραφή εργαλείου
- 4. Για τη δική σας ασφάλεια
- 5. Περιγραφή συμβόλων
- 6. Περιεχόμενα συσκευασίας
- 7. Προετοιμασία του εργαλείου για χρήση
- 8. Συστήματα ασφαλείας
- 9. Υποδείξεις για την εργασία
- 10. Θέση του εργαλείου σε λειτουργία
- 11. Συντήρηση
- 12. Μεταφορά
- 13. Ελαχιστοποίηση φθορών και αποφυγή βλαβών
- 14. Προστασία περιβάλλοντος
- 15. Συνηθισμένα ανταλλακτικά
- 16. Πιστοποιητικό συμβατότητας ΕΕ
- 17. Τεχνικά στοιχεία
- 18. Εντοπισμός βλαβών
- 19. Πρόγραμμα συντήρησης

39
DEFRNLITESPTNOSVFIDASKCSEL EN
0478 111 9939 B - EN
8.2 Motorstop lever
The lawn mower is equipped with a
motorstop device.
The engine stops when the motorstop
lever is released during running operation.
The engine and blade come to a standstill
within 3 seconds.
Measuring the run-on time
Following engine start-up, the blade
rotates and a wind noise is audible. The
run-on time corresponds to the duration of
the wind noise after the engine stops. This
can be measured using a stopwatch.
A perfect, thick lawn is achieved by
– Mowing at low driving speeds.
– Mowing regularly and keeping the grass
short.
– Not cutting the lawn too short in hot, dry
conditions as it will be burnt by the sun
and become unsightly.
– Using a sharp mowing blade – mowing
blade should therefore be sharpened
regularly (specialist dealer).
– Changing the cutting direction regularly.
9.1 Working area for operator
● For safety reasons, the operator
must stay within the working area
behind the handlebar when starting the
engine and when the engine is running.
Always observe the safety distance
provided by the handlebar.
● The lawn mower must only be operated
by one person. Other persons must
keep out of the danger area. (Ö 4.)
10.1 Starting the engine
● Press motorstop lever (1) to the
handlebar and hold.
● Slowly pull out recoil starter rope (2) to
the point of compression resistance.
Then pull vigorously and quickly to
arm’s length. Slowly return recoil starter
rope (2) again so that it is rolled up
again.
Repeat the procedure until the engine
starts.
10.2 Stopping the engine
To stop the engine, release
motorstop lever (1).
Engine and mowing blade come to a stop
after a short run-down time.
10.3 Self-propulsion lever
(RM 248 T, RM 253 T)
Switching on self-propulsion:
● Start the engine. (Ö 10.1)
● Pull self-propulsion lever (1) to the
handlebar and hold.
Self-propulsion is switched on and the
lawn mower moves forwards.
Switching off self-propulsion:
● Release self-propulsion lever (1). Self-
propulsion is switched off and the lawn
mower comes to a standstill. The
engine continues to run.
10.4 Level indicator
The flow of air generated by the
blade raises level indicator (1). The
flow of air stops when the grass catcher
box is full. If the flow of air is too low, level
indicator (1) returns to its resting state.
This is a prompt to empty the grass
catcher box.
The functionality of the level indicator is
restricted if the flow of air is impaired.
External influences such as wet, dense or
high grass, low cutting levels,
contamination or the like can impair the
flow of air and the functionality of the level
indicator.
A Grass catcher box is being filled
B Grass catcher box is filled
Risk of injury!
If the run-on time of the blade
exceeds this delay, stop using the
machine and take it to your
specialist dealer.
9. Notes on working with the
machine
10. Operating the machine
Avoid damage to the machine!
Do not start the engine in tall grass
or at the lowest cutting height. This
makes starting difficult.
Thanks to the fixed throttle setting,
the engine always operates at the
optimum working speed after
starting.
18
9
10
11
12