
Instruction Manual

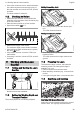
Table Of Contents
- STIHL RLE 240
- 1 Vorwort
- 2 Informationen zu dieser Gebrauchsanleitung
- 3 Übersicht
- 4 Sicherheitshinweise
- 5 Rasenlüfter einsatzbereit machen
- 6 Rasenlüfter zusammenbauen
- 7 Rasenlüfter für den Benutzer einstellen
- 8 Rasenlüfter elektrisch anschließen
- 9 Rasenlüfter einschalten und ausschalten
- 10 Rasenlüfter prüfen
- 11 Mit dem Rasenlüfter arbeiten
- 12 Nach dem Arbeiten
- 13 Transportieren
- 14 Aufbewahren
- 15 Reinigen
- 16 Warten
- 17 Reparieren
- 18 Störungen beheben
- 19 Technische Daten
- 20 Ersatzteile und Zubehör
- 21 Entsorgen
- 22 EU-Konformitätserklärung
- 23 Anschriften
- 24 Sicherheitstechnische Hinweise für Rasenlüfter
- 1 Introduction
- 2 Guide to Using this Manual
- 3 Overview
- 4 Safety Precautions
- 5 Preparing the Lawn Scarifier for Operation
- 6 Assembling the Lawn Scarifier
- 7 Adjusting the Lawn Scarifier for the User
- 8 Connecting the Lawn Scarifier to the Mains
- 9 Switching the Lawn Scarifier On and Off
- 10 Checking the Lawn Scarifier
- 11 Working with the Lawn Scarifier
- 12 After Finishing Work
- 13 Transporting
- 14 Storing
- 15 Cleaning
- 16 Maintenance
- 17 Repairing
- 18 Troubleshooting
- 19 Specifications
- 20 Spare Parts and Accessories
- 21 Disposal
- 22 EC Declaration of Conformity
- 23 Safety Information for Lawn Scarifiers
- 1 Préface
- 2 Informations concernant la présente Notice d'emploi
- 3 Vue d'ensemble
- 4 Prescriptions de sécurité
- 4.1 Symboles d'avertissement
- 4.2 Utilisation conforme du produit
- 4.3 Exigences concernant l'utilisateur
- 4.4 Vêtements et équipement
- 4.5 Zone de travail et environnement
- 4.6 Bon état pour une utilisation en toute sécurité
- 4.7 Branchement électrique
- 4.8 Utilisation
- 4.9 Transport
- 4.10 Remisage
- 4.11 Nettoyage, entretien et réparation
- 5 Préparation du scarificateur
- 6 Assemblage du scarificateur
- 7 Réglage du scarificateur pour l'utilisateur
- 8 Branchement électrique du scarificateur
- 9 Mise en marche et arrêt du scarificateur
- 10 Contrôle du scarificateur
- 11 Utilisation du scarificateur
- 12 Après le travail
- 13 Transport
- 14 Rangement
- 15 Nettoyage
- 16 Maintenance
- 17 Réparation
- 18 Dépannage
- 19 Caractéristiques techniques
- 20 Pièces de rechange et accessoires
- 21 Mise au rebut
- 22 Déclaration de conformité UE
- 23 Adresses
- 24 Consignes de sécurité pour les scarificateurs
- 1 Prólogo
- 2 Informaciones relativas a estas instrucciones para la reparación
- 3 Sinopsis
- 4 Indicaciones relativas a la seguridad
- 5 Preparar el escarificador para el trabajo
- 6 Ensamblar el escarificador
- 7 Ajustar el escarificador para el usuario
- 8 Conectar el escarificador a la red eléctrica
- 9 Conectar y desconectar el escarificador
- 10 Comprobar el escarificador
- 11 Trabajar con el escarificador
- 12 Después del trabajo
- 13 Transporte
- 14 Almacenamiento
- 15 Limpiar
- 16 Mantenimiento
- 17 Reparación
- 18 Subsanar las perturbaciones
- 19 Datos técnicos
- 20 Piezas de repuesto y accesorios
- 21 Gestión de residuos
- 22 Declaración de conformidad UE
- 23 Indicaciones técnicas de seguridad para escarificadores
- 1 Förord
- 2 Information bruksanvisningen
- 3 Översikt
- 4 Säkerhetsanvisningar
- 5 Göra vertikalskäraren klar att användas
- 6 Sätta ihop vertikalskärare
- 7 Ställa in vertikalskärare för användaren
- 8 Ansluta vertikalskäraren till elnätet
- 9 Starta och stänga av vertikalskärare
- 10 Kontrollera vertikalskärare
- 11 Använda vertikalskärare
- 12 Efter arbetet
- 13 Transport
- 14 Förvaring
- 15 Rengöring
- 16 Underhåll
- 17 Reparera
- 18 Felavhjälpning
- 19 Tekniska data
- 20 Reservdelar och tillbehör
- 21 Kassering
- 22 EU-försäkran om överensstämmelse
- 23 Säkerhetstekniska anvisningar för vertikalskärare
- 1 Alkusanat
- 2 Tietoja tästä käyttöohjeesta
- 3 Yleiskuva
- 4 Turvallisuusohjeet
- 5 Pystyleikkurin valmisteleminen käyttöä varten
- 6 Pystyleikkurin kokoaminen
- 7 Pystyleikkurin säätäminen käyttäjälle
- 8 Pystyleikkurin kytkeminen verkkovirtaan
- 9 Pystyleikkurin kytkeminen päälle ja pois
- 10 Pystyleikkurin tarkastaminen
- 11 Pystyleikkurin käyttö
- 12 Työskentelyn jälkeen
- 13 Kuljettaminen
- 14 Säilytys
- 15 Puhdistaminen
- 16 Huoltaminen
- 17 Korjaaminen
- 18 Häiriöiden poistaminen
- 19 Tekniset tiedot
- 20 Varaosat ja varusteet
- 21 Hävittäminen
- 22 EU-vaatimustenmukaisuusvakuutus
- 23 Pystyleikkurin turvatekniset ohjeet
- 1 Premessa
- 2 Informazioni sulle presenti Istruzioni d’uso
- 3 Sommario
- 4 Avvertenze di sicurezza
- 5 Preparazione per l'uso dell'arieggiatore
- 6 Assemblaggio dell'arieggiatore
- 7 Regolazione dell'arieggiatore da parte dell'utente
- 8 Collegare l'arieggiatore alla rete elettrica
- 9 Accensione e spegnimento dell'arieggiatore
- 10 Controllo dell'arieggiatore
- 11 Lavoro con l'arieggiatore
- 12 Dopo il lavoro
- 13 Trasporto
- 14 Conservazione
- 15 Pulizia
- 16 Manutenzione
- 17 Riparazione
- 18 Eliminazione dei guasti
- 19 Dati tecnici
- 20 Ricambi e accessori
- 21 Smaltimento
- 22 Dichiarazione di conformità UE
- 23 Indirizzi
- 24 Avvertenze di sicurezza per l'arieggiatore
- 1 Forord
- 2 Oplysninger om denne brugsvejledning
- 3 Oversigt
- 4 Sikkerhedshenvisninger
- 5 Klargøring af plænelufteren
- 6 Samling af plænelufteren
- 7 Indstilling af plænelufteren til brugeren
- 8 Slut plænelufteren til strømmen
- 9 Til- og frakobling af plænelufteren
- 10 Kontrol af plænelufteren
- 11 Arbejde med plænelufteren
- 12 Efter arbejdet
- 13 Transport
- 14 Opbevaring
- 15 Rengøring
- 16 Vedligeholdelse
- 17 Reparation
- 18 Afhjælpning af fejl
- 19 Tekniske data
- 20 Reservedele og tilbehør
- 21 Bortskaffelse
- 22 EU-overensstemmelseserklæring
- 23 Sikkerhedstekniske henvisninger vedrørende plænelufteren
- 1 Forord
- 2 Informasjon om denne bruksanvisningen
- 3 Oversikt
- 4 Sikkerhetsforskrifter
- 5 Gjøre plenlufteren klar til bruk
- 6 Sette sammen plenlufteren
- 7 Stille inn plenlufteren for brukeren
- 8 Koble plenlufteren til strømnettet
- 9 Slå på og av plenlufteren
- 10 Kontrollere plenlufteren
- 11 Arbeide med plenlufteren
- 12 Etter arbeidet
- 13 Transport
- 14 Oppbevaring
- 15 Rengjøring
- 16 Vedlikeholde
- 17 Reparere
- 18 Utbedre feil
- 19 Tekniske data
- 20 Reservedeler og tilbehør
- 21 Kassering
- 22 EU-samsvarserklæring
- 23 Sikkerhetsanvisninger for plenlufteren
- 1 Prefácio
- 2 Informações relativas a este manual de instruções
- 3 Vista geral
- 4 Indicações de segurança
- 4.1 Símbolos de aviso
- 4.2 Utilização recomendada
- 4.3 Requisitos ao nível do utilizador
- 4.4 Vestuário e equipamento
- 4.5 Área de trabalho e ambiente envolvente
- 4.6 Estado de acordo com as exigências de segurança
- 4.7 Ligações elétricas
- 4.8 Trabalhos
- 4.9 Transporte
- 4.10 Arrumação
- 4.11 Limpeza, manutenção e reparação
- 5 Colocar o arejador de relva operacional
- 6 Armar o arejador de relva
- 7 Ajustar o arejador de relva ao utilizador
- 8 Ligar o arejador de relva à corrente elétrica
- 9 Ligar e desligar o arejador de relva
- 10 Verificar o arejador de relva
- 11 Trabalhar com o arejador de relva
- 12 Após o trabalho
- 13 Transporte
- 14 Armazenamento
- 15 Limpeza
- 16 Fazer a manutenção
- 17 Reparar
- 18 Eliminação de avarias
- 19 Dados técnicos
- 20 Peças de reposição e acessórios
- 21 Eliminar
- 22 Declaração de conformidade CE
- 23 Instruções técnicas de segurança sobre o arejador de relva
- 1 Voorwoord
- 2 Informatie met betrekking tot deze handleiding
- 3 Overzicht
- 4 Veiligheidsinstructies
- 5 Verticuteermachine bedrijfsklaar maken
- 6 Verticuteermachine in elkaar zetten
- 7 Verticuteermachine voor de gebruiker instellen
- 8 Verticuteermachine elektrisch aansluiten
- 9 Verticuteermachine inschakelen en uitschakelen
- 10 Verticuteermachine controleren
- 11 Met de verticuteermachine werken
- 12 Na de werkzaamheden
- 13 Vervoeren
- 14 Opslaan
- 15 Reinigen
- 16 Onderhoud
- 17 Repareren
- 18 Storingen opheffen
- 19 Technische gegevens
- 20 Onderdelen en toebehoren
- 21 Milieuverantwoord afvoeren
- 22 EU-conformiteitsverklaring
- 23 Veiligheidsinstructies voor verticuteermachines
- 1 Przedmowa
- 2 Informacje o instrukcji użytkowania
- 3 Przegląd
- 4 Wskazówki dotyczące bezpieczeństwa pracy
- 4.1 Symbole ostrzegawcze
- 4.2 Użytkowanie zgodne z przeznaczeniem
- 4.3 Wymagania dotyczące użytkownika
- 4.4 Odzież robocza i sprzęt ochronny
- 4.5 Obszar roboczy i środowisko
- 4.6 Bezpieczny stan
- 4.7 Podłączanie do zasilania elektrycznego
- 4.8 Praca
- 4.9 Transport
- 4.10 Przechowywanie
- 4.11 Czyszczenie, konserwacja i naprawa
- 5 Przygotowanie wertykulatora do pracy
- 6 Składanie wertykulatora
- 7 Dostosowywanie wertykulatora do użytkownika
- 8 Podłączanie wertykulatora do zasilania elektrycznego
- 9 Włączanie i wyłączanie wertykulatora
- 10 Sprawdzanie wertykulatora
- 11 Praca przy użyciu wertykulatora
- 12 Po zakończeniu pracy
- 13 Transport
- 14 Przechowywanie
- 15 Czyszczenie
- 16 Konserwacja
- 17 Naprawa
- 18 Rozwiązywanie problemów
- 19 Dane techniczne
- 20 Części zamienne i akcesoria
- 21 Utylizacja
- 22 Deklaracja zgodności UE
- 23 Wskazówki bezpieczeństwa dotyczące wertykulatora
► Set the working depth.
► Place the roller in the highest position
before starting.
► Slowly lower the roller so it is just scratching
the ground. The ideal scarifying depth is
between 2 to 3 mm.
The grass roots are not damaged.
► Ensure that the extension cable is routed in
such a way that it is visible and always behind
the lawn scarifier.
► Push the lawn scarifier forwards slowly and in
a controlled manner.
► Avoid staying stationary in one place for any
duration.
Combing with the combing roller
Combing involves carefully removing lawn thatch
and excess moss previously loosened by scarify‐
ing from the lawn.
In addition, it counteracts soil compaction and
the resulting lack of oxygen in the soil.
► Set the working depth.
► Place the roller in the highest position
before starting.
► Slowly lower the roller until the spring-tines
touch the ground.
► Ensure that the extension cable is routed in
such a way that it is visible and always behind
the lawn scarifier.
► Push the lawn scarifier forwards slowly and in
a controlled manner.
► Avoid staying stationary in one place for any
duration.
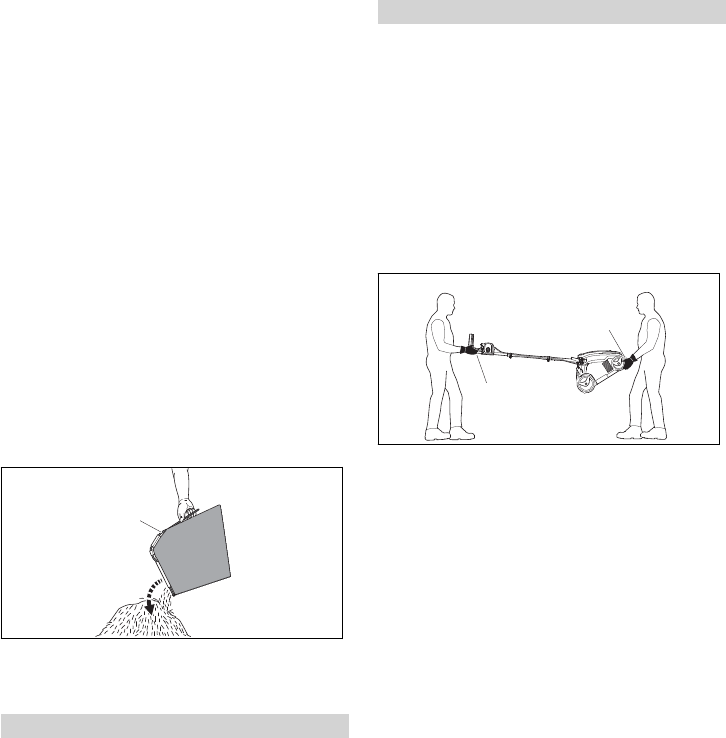
11.5 Emptying the Grass Catcher
Box
1
0000-GXX-B380-A0
► Remove grass catcher box (1) upwards by the
handle.
► Empty grass catcher box (1).
12 After Finishing Work
12.1 After Finishing Work
► Switch the lawn scarifier off and detach the
extension cable connector from the mains plug
of the lawn scarifier.
► Place the lawn scarifier on a level surface.
► If the lawn scarifier is wet: allow the lawn
scarifier to dry.
► Clean the lawn scarifier.
Caring for the lawn after scarifying
► Remove all scarified material from the lawn.
► Fertilise the lawn and re-seed bare patches.
► Water the lawn thoroughly.
Caring for the lawn after combing
► Remove all plant trimmings from the lawn.
► Water the lawn thoroughly.
13 Transporting
13.1 Transporting the Lawn Scarifier
► Switch the lawn scarifier off and detach the
extension cable connector from the mains plug
of the lawn scarifier.
► Place the lawn scarifier on a level surface.
► Detach the grass catcher box.
► Set the transport position.
► Push the lawn scarifier forwards slowly and in
a controlled manner.
Carrying the lawn scarifier with someone else
with the handlebar unfolded
2
1
0000-GXX-B682-A0
► One person holds the lawn scarifier by lower
carrying handle (1) using both hands and
another person holds handlebar (2) using both
hands.
► The lawn scarifier must be lifted and carried by
two people.
► Wear work gloves made from resistant mate‐
rial.
English 12 After Finishing Work
30 0478-670-9910-B