
Instruction Manual
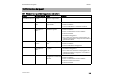


Table Of Contents
- 1 Vorwort
- 2 Informationen zu dieser Gebrauchsanleitung
- 3 Übersicht
- 4 Sicherheitshinweise
- 5 Rasenlüfter einsatzbereit machen
- 6 Akku laden und LEDs
- 7 Rasenlüfter zusammenbauen
- 8 Rasenlüfter für den Benutzer einstellen
- 9 Akku einsetzen und herausnehmen
- 10 Sicherungsschlüssel einstecken und abziehen
- 11 Rasenlüfter einschalten und ausschalten
- 12 Rasenlüfter und Akku prüfen
- 13 Mit dem Rasenlüfter arbeiten
- 14 Nach dem Arbeiten
- 15 Transportieren
- 16 Aufbewahren
- 17 Reinigen
- 18 Warten
- 19 Reparieren
- 20 Störungen beheben
- 21 Technische Daten
- 22 Ersatzteile und Zubehör
- 23 Entsorgen
- 24 EU-Konformitätserklärung
- 25 Anschriften
- 26 Sicherheitstechnische Hinweise für Rasenlüfter
- 1 Introduction
- 2 Guide to Using this Manual
- 3 Overview
- 4 Safety Precautions
- 5 Preparing the Lawn Scarifier for Operation
- 6 Charging the Battery, LEDs
- 7 Assembling the Lawn Scarifier
- 8 Adjusting the Lawn Scarifier for the User
- 9 Removing and Fitting the Battery
- 10 Inserting and Removing the Activation Key
- 11 Switching the Lawn Scarifier On and Off
- 12 Checking the Lawn Scarifier and Battery
- 13 Working with the Lawn Scarifier
- 14 After Finishing Work
- 15 Transporting
- 16 Storing
- 17 Cleaning
- 18 Maintenance
- 19 Repairing
- 20 Troubleshooting
- 21 Specifications
- 22 Spare Parts and Accessories
- 23 Disposal
- 24 EC Declaration of Conformity
- 25 Safety Information for Lawn Scarifiers
- 1 Préface
- 2 Informations concernant la présente Notice d'emploi
- 3 Vue d'ensemble
- 4 Prescriptions de sécurité
- 5 Préparation du scarificateur
- 6 Recharge de la batterie et DEL
- 7 Assemblage du scarificateur
- 8 Réglage du scarificateur pour l'utilisateur
- 9 Introduction et extraction de la batterie
- 10 Insertion et retrait de la clé de sécurité
- 11 Mise en marche et arrêt du scarificateur
- 12 Contrôle du scarificateur et de la batterie
- 13 Utilisation du scarificateur
- 14 Après le travail
- 15 Transport
- 16 Rangement
- 17 Nettoyage
- 18 Maintenance
- 19 Réparation
- 20 Dépannage
- 21 Caractéristiques techniques
- 22 Pièces de rechange et accessoires
- 23 Mise au rebut
- 24 Déclaration de conformité UE
- 25 Adresses
- 26 Consignes de sécurité pour les scarificateurs
- 1 Premessa
- 2 Informazioni sulle presenti Istruzioni d’uso
- 3 Sommario
- 4 Avvertenze di sicurezza
- 5 Preparazione per l'uso dell'arieggiatore
- 6 Carica della batteria e LED
- 7 Assemblaggio dell'arieggiatore
- 8 Regolazione dell'arieggiatore da parte dell'utente
- 9 Inserire e togliere la batteria
- 10 Inserimento e rimozione della chiave di sicurezza
- 11 Accensione e spegnimento dell'arieggiatore
- 12 Controllo di arieggiatore e batteria
- 13 Lavoro con l'arieggiatore
- 14 Dopo il lavoro
- 15 Trasporto
- 16 Conservazione
- 17 Pulizia
- 18 Manutenzione
- 19 Riparazione
- 20 Eliminazione dei guasti
- 21 Dati tecnici
- 22 Ricambi e accessori
- 23 Smaltimento
- 24 Dichiarazione di conformità UE
- 25 Indirizzi
- 26 Avvertenze di sicurezza per l'arieggiatore
- 1 Voorwoord
- 2 Informatie met betrekking tot deze handleiding
- 3 Overzicht
- 4 Veiligheidsinstructies
- 5 Verticuteermachine bedrijfsklaar maken
- 6 Accu laden en leds
- 7 Verticuteermachine in elkaar zetten
- 8 Verticuteermachine voor de gebruiker instellen
- 9 Accu aanbrengen en wegnemen
- 10 Veiligheidssleutel insteken en uittrekken
- 11 Verticuteermachine inschakelen en uitschakelen
- 12 Verticuteermachine en accu controleren
- 13 Met de verticuteermachine werken
- 14 Na de werkzaamheden
- 15 Vervoeren
- 16 Opslaan
- 17 Reinigen
- 18 Onderhoud
- 19 Repareren
- 20 Storingen opheffen
- 21 Technische gegevens
- 22 Onderdelen en toebehoren
- 23 Milieuverantwoord afvoeren
- 24 EU-conformiteitsverklaring
- 25 Veiligheidsinstructies voor verticuteermachines

0478-670-9909-A
120
italiano
20 Eliminazione dei guasti
L'arieggiatore o la batteria
sono umidi.
► Rimuovere la chiave di sicurezza.
► Estrarre la batteria.
► Pulire l'arieggiatore.
► Lasciare asciugare l'arieggiatore o la batteria.
La resistenza sul rullo è
troppo elevata.
► Ridurre la profondità di lavoro.
► Controllare l'altezza dell'erba ed eventualmente
tagliarla.
L'area intorno al rullo è
ostruita.
► Pulire l'arieggiatore.
L'arieggiatore si
spegne durante il
funzionamento.
3 LED si illuminano
in rosso.
L'arieggiatore è troppo
caldo.
► Rimuovere la chiave di sicurezza.
► Estrarre la batteria.
► Lasciare raffreddare l'arieggiatore.
► Pulire l'arieggiatore.
► Non avviare l'arieggiatore ripetutamente in breve
tempo.
► Ridurre la profondità di lavoro.
► Arieggiare o sfeltrare l'erba bassa.
Il rullo è bloccato. ► Rimuovere la chiave di sicurezza.
► Estrarre la batteria.
► Pulire l'arieggiatore.
È presente un guasto
elettrico.
► Estrarre e inserire di nuovo la batteria.
► Accendere l'arieggiatore.
L'arieggiatore vibra
fortemente durante il
funzionamento.
Le viti sul supporto del rullo
sono allentate.
► Serrare le viti.
Il rullo non è equilibrato
correttamente.
► rivolgersi a un rivenditore specializzato STIHL.
Il tempo di
funzionamento
dell'arieggiatore è
troppo ridotto.
La batteria non è
completamente carica.
► Caricare completamente la batteria.
La durata operativa della
batteria è stata superata.
► Sostituire la batteria.
Guasto LED sulla batteria Causa Rimedio