STIHL MS 661 C-M 2 - 30 Instruction Manual
English Guide to Using this Manual 2.1 Symbols used with warnings in the text WARNING ■ This symbol indicates dangers that can cause serious injuries or death. ► The measures indicated can avoid serious injuries or death. NOTICE ■ This symbol indicates dangers that can cause damage to property. ► The measures indicated can avoid damage to property. 2.2 Symbols in Text This symbol refers to a chapter in this instruction manual. 3 Overview 3.
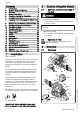
Overview English 1 Front Hand Guard Helps protect operator’s left hand from con‐ tact with the saw chain, serves to engage the chain brake and activates the chain brake by inertia in certain kickback situations. 21 Rear Handle For operating, holding and controlling the chainsaw. 2 Muffler Reduces chainsaw noise emissions. 23 Air Filter Filters the air entering the engine. 3 Guide Bar Supports and guides the saw chain. 4 Saw Chain Cuts the wood.
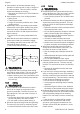
English 4 Safety Precautions The chain brake is engaged and disen‐ gaged in this direction. This symbol shows the direction of rotation of the chain. This symbol marks the oil pump adjust‐ ing screw and the chain oil feed rate. Rotate in this direction to increase chain tension. Shutter is in winter mode in this position. Shutter is in summer mode in this position. This symbol marks the handle heating switch. This symbol marks the decompression valve.
4 Safety Precautions 4.4 Clothing and Equipment WARNING ■ Long hair can become entangled in the saw during operation. This can result in serious injuries. ► Tie up long hair so that it is above shoulder level. ■ Objects can be thrown through the air at high speed during operation. This can result in per‐ sonal injury. ► Wear close-fitting safety glasses. Suitable safety glasses that have been tested and labeled in accord‐ ance with EN 166 or national stand‐ ards are available from retailers.
English ► Work only with property fitted and undam‐ aged chain catcher. ► Never modify your chainsaw. Exception: Mounting a combination of guide bar and saw chain recommended in this User Man‐ ual. ► If the controls do not function properly: Do not use your chainsaw. ► Only fit original STIHL accessories designed for this chainsaw model. ► Mount the guide bar and saw chain as described in this User Manual. ► Attach accessories as described in this User Manual or in the User Manual for the acces‐ sories.
4 Safety Precautions ■ ■ ■ ■ ► Dispose of fuel mix, gasoline and two-stroke engine oil in accordance with local regula‐ tions and environmental requirements. Fuel, gasoline or two-stroke engine oil can cause irritation if they come into direct contact with the skin or eyes. ► Avoid contact with fuel, gasoline and twostroke engine oil. ► In case of contact with the skin: Wash affec‐ ted areas with plenty of water and soap.
English 4 Safety Precautions 1 2 2 1 0000-GXX-1245-A0 ■ If the behavior of the saw changes during operation or feels unusual, it may no longer be in a safe condition. This can result in serious injuries and damage to property. ► Stop work and contact your STIHL dealer for assistance. ■ Saw vibrations may occur during operation. ► Wear gloves. ► Take regular breaks. ► If signs of circulation problems occur: Seek medical advice. ■ Sparks may occur if the rotating chain makes contact with a hard object.
4 Safety Precautions English 4.9.2 ► Stop the felling operation and use a cable winch or suitable vehicle to pull the tree to the ground. 4.9 Pull-in Reactive Forces Kickback 0000-GXX-2732-A0 0000-GXX-1348-A0 4.9.1 Kickback can be caused for the following rea‐ sons: – The rotating saw chain in the upper quadrant of the bar nose makes contact with a hard object and is suddenly braked. – The rotating saw chain is pinched at the bar nose. The chain brake cannot prevent kickback.
English 4.10 5 Preparing the Saw for Operation Transporting WARNING 0000-GXX-2733-A0 ■ The saw may turn over or shift during trans‐ port. This can result in serious injuries and damage to property. ► Shut off the engine. ► Engage the chain brake. ► Fit the scabbard so that it completely covers the guide bar. ► Secure the chainsaw with lashing straps or a net to prevent it turning over and moving. ■ The muffler and engine may be hot after a period of operation. There is a risk of burn injuries.
6 Assembling the Saw English ► If you cannot carry out these steps: Do not use your chainsaw and contact your STIHL servic‐ ing dealer for assistance. 6 ► Fit the guide bar and chain on the saw and check the following points: – Chain drive links are seated in teeth of chain sprocket (7). – Collar studs (5) are located in slot in tail of guide bar (6). – Peg of tensioner slide (4) engages hole (8) in guide bar (6). Assembling the Saw 6.1 Mounting and Removing the Bar and Chain 6.1.
English 7 Engaging and Disengaging the Chain Brake 1 1 a ► Loosen the nuts (1). ► Disengage the chain brake. ► Hold the bar nose up and turn the tensioning screw (2) clockwise until the following points apply: – Chain sag ‘a’ in the center of the bar is 1 - 2 mm. – The chain can still be pulled easily along the bar with two fingers. ► Keep holding the bar nose up and tighten down the nuts (1) firmly. ► If chain sag ‘a’ in the center of the bar is not 1 - 2 mm: Readjust chain tension. 6.
English 0000-GXX-2932-A0 8 Mixing Fuel and Refueling the Chainsaw ► Push the hand guard away from the front han‐ dle with your left hand. The hand guard engages with an audible click. The chain brake is engaged. Disengaging the Chain Brake 0000-GXX-2933-A0 7.2 ► Depending on the required amount of fuel, determine the correct amounts of two-stroke engine oil and gasoline in a mix ratio of 50:1.
English 9 Starting and Stopping the Engine ► Remove the fuel tank cap. ► Press the cap down and rotate it counterclock‐ wise until mark (1) points to mark (2). ► Now try again to close the fuel tank. ► If the fuel tank still cannot be closed properly: Do not use the chainsaw and contact a STIHL dealer for assistance. The chainsaw is not in a safe condition. 9 ► Fill the tank to within no more than 15 mm of the brim, taking care not to spill any fuel.
10 Checking the Saw English 10 ► Pull the starter grip slowly with your right hand until you feel it engage. ► Pull the starter grip quickly and allow the starter rope to rewind several times until the engine runs. ► If the Master Control lever (3) is in position . Briefly depress the lockout lever (4) and blip the throttle trigger (5). The Master Control lever springs to position . The engine runs at idling speed.
English 11 Operating the Saw 10.5 1 0000-GXX-1218-A0 2 ► Use a STIHL filing gauge (2) to check the height of the depth gauges (1). The STIHL fil‐ ing gauge must match the chain pitch. ► If a depth gauge (1) projects from the filing gauge (2): Lower the depth gauge (1), 16.3. 1 2 4 ► Make sure the service marks (1 to 4) on the cutters are visible. ► If one of the service marks is not visible on a cutter: Do not use your chainsaw and contact your STIHL servicing dealer for assistance.
11 Operating the Saw English NOTICE ■ The engine may overheat if is operated in win‐ ter mode at temperatures above +10 °C. ► Change setting to summer mode. 1 3 3 0000-GXX-A382-A0 3 ► Push the shutter (2) into the guides (3) as far as it will go. You will feel it engage. ► Fit the filter cover (1). ► Push the shutter (2) into the guides (3) as far as it will go. You will feel it engage. ► Fit the filter cover (1). 11.
English 11 Operating the Saw ► Shut off the engine and engage the chain brake. ► Turn the oil pump adjusting screw (1) clock‐ wise. NOTICE ■ The calibration process is aborted if the throt‐ tle trigger is released before the saw is prop‐ erly calibrated. It is then necessary to restart the calibration process. ► Keep the throttle trigger fully depressed. To increase oil feed rate still further ► Shut off the engine and engage the chain brake. ► Use a suitable tool to depress the stop (2).
11 Operating the Saw 11.6 English Sawing 1 2 2 1 0000-GXX-1245-A0 WARNING ■ If kickback occurs, the chainsaw can be thrown up in the direction of the operator. This may result in serious or fatal injury to the user. ► Always cut with the chain running at full speed. ► Do not cut with the upper quadrant of the guide bar nose. ► If the limb is under tension: Make the relieving cut (1) at the compression side and then per‐ form the bucking cut (2) from the tension side.
English Basic information on felling cut Ø G C Felling notch The felling notch determines the direction of fall. D Hinge The hinge helps control the falling tree. The width of the hinge is 1/10 of the trunk diame‐ ter. E Felling cut The tree is felled with the felling cut. The fell‐ ing cut is 1/10 of the trunk diameter (at least 3 cm) above the bottom of the felling notch. F Stabilizing strap The stabilizing strap supports the tree and helps prevent it from falling prematurely.
11 Operating the Saw English 0000-GXX-1253-A0 ► Shout a warning. ► With outstretched arms, cut through the stabi‐ lizing strap horizontally from outside at the same level as the felling cut. The tree falls. 2 1 1 Normal tree A normal tree is vertical and has an even crown. 11.8.8 Felling normal, large diameter tree A normal tree is felled with a felling cut and stabi‐ lizing strap. This felling cut must be performed if the tree diameter is greater than the guide bar’s length. ► Shout a warning.
English 11.8.9 12 After Finishing Work Felling a small diameter leaner A leaner is felled with a felling cut and holding strap. This felling cut must be performed if the tree diameter is less than the guide bar’s length. ► Shout a warning. 1. 0000-GXX-1258-A0 2. ► Hold the saw horizontally and swing it into the felling cut as far as possible. ► Enlarge felling cut in direction of hinge. ► Enlarge felling cut in direction of holding strap. ► Move to the other side of the tree.
14 Storing English Carrying the saw ► Carry the saw by holding the front handle in your right hand with the guide bar pointing to the rear. Transporting the saw in a vehicle ► Secure the saw to prevent turnover and move‐ ment. Storing the Chainsaw ► Shut off the engine and engage the chain brake. ► Fit the scabbard so that it completely covers the guide bar. ► Observe the following points when storing the saw: – Saw is out of the reach of children. – The saw is clean and dry. 15 15.1 15.
English 16 Maintenance WARNING ■ Cleaning agent may cause irritation if it con‐ tacts the skin or eyes. ► Observe the information supplied with the cleaning agent. ► Avoid contact with cleaning agents. ► In case of contact with the skin: Wash affec‐ ted areas with plenty of water and soap. ► In case of contact with the eyes: Rinse eyes with plenty of water for at least 15 minutes and seek medical advice.
17 Repairing 16.2 English Deburring the Guide Bar ► File each cutter with a round file so that the following points are observed: – Round file matches the chain pitch. – File from the inside to the outside of the cut‐ ter. – Hold the file at right angle to the guide bar. – Maintain a filing angle of 30°. A burr can build up on the outer edge of the guide bar. ► Remove burr with a flat file or a STIHL guide bar dressing tool. ► If you have any queries: Contact your STIHL servicing dealer. 16.
English 18 Troubleshooting Condition Engine stops while idling Poor acceleration Cause Remedy Carburetor is iced up. ► Allow saw to warm up to +10°C. The chain is over-ten‐ sioned. Chain lubrication sys‐ tem is supplying insufficient chain oil. Engine does not Saw is not correctly reach maximum tuned to ambient con‐ RPM. ditions. Saw chain does not The chain brake is rotate when throttle is engaged. opened. The chain is over-ten‐ sioned. Bar nose sprocket is blocked.
19 Specifications English 19.4 0000-GXX-A380-A0 2 ► Press the spark plug boot (2) firmly home. ► Fit the filter cover (1). 19 19.1 – – – – – – – – Specifications STIHL MS 661 C-M Chainsaw Displacement: 91.1 cc Engine power to ISO 7293: 5.4 kW (7.3 bhp) Idle speed to ISO 11681: 2,900 ± 50 rpm Approved spark plug: NGK BPMR7A from STIHL Electrode gap: 0.5 mm Dry weight without guide bar and chain 7.3 kg Dry weight without guide bar and chain – MS 661 C‑M: 7.
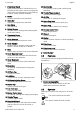
English Pitch 21 Spare Parts and Accessories Drive link Length gauge/groove width Guide Bar Nose sprocket teeth Number of drive links Saw chain 36 RS (Type 3621) 36 RS3 (Type 3626) Duromatic E 72 36 RM (Type 3652) Rollomatic E 36 RS (Type 11 50 cm Rollomatic ES 3621) Rollomatic ES 36 RM (Type 11 72 light 3652) 36 RS (Type 3621) 55 cm Rollomatic ES 11 76 36 RS3 (Type 3626) Duromatic E 84 36 RM (Type 3652) Rollomatic E 36 RS (Type 11 63 cm Rollomatic ES 3621) Rollomatic ES 36 RM (Type 11 84 light 3652)
22 Disposal 22 Disposal 22.1 ANDREAS STIHL AG & Co. KG Disposing of Chainsaw Information on disposal is available from STIHL servicing dealers. ► Dispose of the chainsaw, guide bar, saw chain, fuel mix, gasoline, two-stroke engine oil, accessories and packaging in accordance with local regulations and environmental require‐ ments. 23 English Dr. Jürgen Hoffmann, Head of Product Data, Regulations and Licensing EC Declaration of Con‐ formity 23.1 STIHL MS 661 C-M Chainsaw ANDREAS STIHL AG & Co.
English 30 23 EC Declaration of Conformity 0458-759-0121-D. VA0.A21.
23 EC Declaration of Conformity 0458-759-0121-D. VA0.A21.
0458-759-0121-D *04587590121D* www.stihl.