STIHL MS 261 C-M 2 - 43 Instruction Manual
English 7 8 9 31 32 33 34 35 36 37 38 Please contact your dealer or our sales company if you have any queries concerning this product. Your Dr. Nikolas Stihl 1 Guide to Using this Manual This Instruction Manual refers to a STIHL chain saw, also called a machine in this Instruction Manual. 1.1 Pictograms Pictograms that appear on the machine are explained in this Instruction Manual. Depending on the machine and equipment ver‐ sion, the following pictograms may appear on the machine.
2 Safety Precautions Actuate manual fuel pump 1.2 Symbols in text WARNING Warning where there is a risk of an accident or personal injury or serious damage to property. NOTICE Caution where there is a risk of damaging the machine or its individual components. 1.3 Engineering improvements STIHL's philosophy is to continually improve all of its products. For this reason we may modify the design, engineering and appearance of our products periodically.
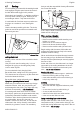
English 2 Safety Precautions Wear suitable safety shoes – with cutretardant material, non-slip soles and steel toe caps. 2.6 WARNING To reduce the risk of eye injuries, wear tight-fitting safety goggles con‐ forming to standard EN 166 or a face shield. Make sure that the safety gog‐ gles and the face shield fit correctly. Wear "personal" hearing protection – for exam‐ ple, ear defenders. Wear a hard hat wherever there is any risk of falling objects.
2 Safety Precautions Before Starting Work To reduce the risk of personal injury, do not operate your saw if it is damaged or not properly assembled. 2.9 Starting the chain saw Always work on a level surface. Ensure a firm and secure footing. Hold the machine securely – the chain must not touch any objects or the floor – danger of injury due to the rotating saw chain. Your chain saw is a one-person saw. Do not allow other persons to be in the working area – not even while starting.
English No smoking when working with or near the chain saw - risk of fire! Combustible fuel vapour may escape from the fuel system. Examine the saw chain periodically at short inter‐ vals and as soon as you note any tangible changes: – Switch off the engine; wait until the saw chain is stationary – Check condition and secure fitting – Check sharpness Never touch the saw chain when the engine is running.
3 Reactive Forces English described in the Instruction Manual. All other work should be carried out by a servicing dealer. Regularly check that the clutch drum is in perfect working condition. STIHL recommends that maintenance and repair work be carried out only by authorised STIHL dealers. STIHL dealers receive regular training and are supplied with technical information. Always store fuel and chain lubricant only in the specified type of containers and ensure they are correctly labelled.
English 3.3 4 Working Techniques 3.6 Quickstop chain brake: Pushback (B) 3.4 To reduce the risk of kickback – Work cautiously and avoid situations which could cause kickback. – Hold the saw firmly with both hands and main‐ tain a secure grip. – always cut at full throttle. – Be aware of the location of the guide bar nose at all times. – do not cut with the bar nose. – Take special care with small, tough limbs, they may catch the chain. – never cut several limbs at once. – do not overreach.
4 Working Techniques 4.1 English Sawing Do not operate your saw with the starting throttle lock engaged. Engine speed cannot be control‐ led with the throttle trigger in this position. that you ask the responsible forestry office about the current fire hazard. Work calmly and carefully – in daylight conditions and only when visibility is good. Ensure you do not endanger others – stay alert at all times.
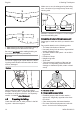
English 4 Working Techniques 1 2 Maintain a distance of at least 2 1/2 tree lengths from the next felling site. ► Make relieving cut at the compression side (1) ► Make bucking cut at the tension side (2) Be wary of pushback when making bucking cut from the bottom upwards (underbuck). NOTICE Do not cut a lying log at a point where it is touch‐ ing the ground because the saw chain will other‐ wise be damaged.
4 Working Techniques English Preparing work area at base of tree – First clear the tree base and work area from interfering limbs and brush to provide a secure footing. – Carefully clear the base of the trunk (e.g.
English 4.4 4 Working Techniques Sapwood cuts – With rotten trunks, leave a wider strip Sapwood cuts in long-fibered softwood help pre‐ vent sapwood splintering when the tree falls. Make cuts at both sides of the trunk at same height as bottom of felling notch to a depth of about 1/10 of trunk diameter. On large diameter trees, cut to no more than width of guide bar. Do not make sapwood cuts if wood is diseased. Basic information on felling cut C C 1/10 Ø E G 3. 2.
4 Working Techniques English Select suitable felling wedges dependent on the trunk diameter and the width of the kerf (ana‐ logue to felling cut (E)). Contact the STIHL dealer for the selection of the felling wedge (suitable length, width and height). 4.6 Selecting the appropriate felling cut The selection of the appropriate felling cut is dependent on the same tree characteristics that must be noted when determining the direction of fall and the escape paths.
English 4 Working Techniques – Do not cut into the stabilizing strap – Cut horizontally – Do not cut into the holding strap. The felling cut must be continued on the oppo‐ site side of the trunk. 001BA266 KN Ensure that the second cut is at the same level as the first cut.
5 Cutting Attachment English Shout a second warning immediately before the tree falls. ► With outstretched arms, cut through the hold‐ ing strap at a downward angle from outside. Cutting Attachment Depending on the model, the scabbard exten‐ sion either comes standard with the saw or is available as a special accessory. 2 5.2 001BA248 KN 3 – The pitch (t) of the saw chain (1), chain sprocket and the nose sprocket of the Rollo‐ matic guide bar must match.
English 6 Mounting the Bar and Chain (side chain ten‐ sioner) 6.3 Fitting the chain Removing the chain sprocket cover 5902BA020 KN 143BA003 KN 6.1 6 Mounting the Bar and Chain (side chain tensioner) WARNING Wear work gloves to protect your hands from the sharp cutters. ► Fit the chain – start at the bar nose. ► Rotate the captive nuts counterclockwise until they hang loosely in the sprocket cover. ► Remove the sprocket cover with captive nuts.
7 Mounting the Bar and Chain (quick chain tensioner) 7.1 Mounting the Bar and Chain (quick chain ten‐ sioner) 1 4 Removing the chain sprocket cover 3 5 133BA026 KN 1 3 2 ► Position the tensioning gear (1) against the guide bar (3) so that the stud (4) projects through the upper hole and the short guide peg (5) locates in the lower hole. ► Pull the hinged handle (1) out (until it engages) ► Turn the wingnut (2) counterclockwise until it hangs loose ► In the sprocket cover (3).
English Fitting the saw chain 172BA013 KN 7.4 7 Mounting the Bar and Chain (quick chain tensioner) ► Guide the drive link into the bar groove (see arrow) and turn the tensioning gear to the left as far as possible WARNING Wear work gloves to protect your hands from the sharp cutters. ► Fit the chain – start at the bar nose. Pay atten‐ tion to the position of the tensioning gear and the cutting edges. ► Turn the tensioning gear (1) clockwise as far as stop.
8 Tensioning the Saw Chain (side chain tensioner) Tensioning the Saw Chain (side chain tensioner) 10 Retensioning during cutting work: ► Shut off the engine. ► Loosen the nuts. ► Hold the bar nose up. ► Use a screwdriver to turn the tensioning screw (1) clockwise until the chain fits snugly against the underside of the bar. ► While still holding the bar nose up, tighten down the nuts firmly. ► Go to "Checking Chain Tension". ► Shut off the engine. ► Wear work gloves to protect your hands.
English 11.2 12 Fueling Mixing Fuel NOTICE Unsuitable fuels or lubricants or mix ratios other than those specified may result in serious dam‐ age to the engine. Poor quality gasoline or engine oil may damage the engine, sealing rings, hoses and the fuel tank. 11.2.1 STIHL MotoMix may be stored for up to 2 years without any problems. ► Thoroughly shake the mixture in the canister before fueling your machine.
12 Fueling 12.2 English 12.3 Opening Filling Up with Fuel Take care not to spill fuel while fueling and do not overfill the tank. 001BA236 KN STIHL recommends you use the STIHL filler noz‐ zle for fuel (special accessory). ► Fill the fuel tank. 12.4 Closing 001BA232 KN 001BA234 KN ► Raise grip to vertical position. Grip must be vertical: ► Fit the cap – marks on tank cap and fuel tank must line up. ► Press the cap down as far as stop.
13 Chain Lubricant 001BA235 KN 001BA239 KN English ► Place the cap on the opening and rotate it counterclockwise until it engages the filler neck. ► Continue rotating the cap counterclockwise (about a quarter turn) – this causes the bottom of the cap to be turned to the correct position. ► Turn the cap clockwise and lock it in position – see section on "Closing". 001BA241 KN ► Fold the grip down. Tank cap is locked. 12.
14 Filling Chain Oil Tank English 15 WARNING Do not use waste oil. Renewed contact with waste oil can cause skin cancer. Moreover, waste oil is environmentally harmful. Checking Chain Lubrica‐ tion NOTICE 14 The saw chain must always spin off a small amount of oil. NOTICE Preparations Never operate your machine without chain lubri‐ cation. If the saw chain runs dry, the cutting attachment may very quickly be damaged beyond repair.
English 17 Winter Operation due to kickback: Saw chain is blocked - and stops running. Part-time use: occasional use: 16.2 17 Disengage the chain brake. every six months annually Winter Operation 17.1 Preheating the carburetor 17.1.1 At temperatures below +10°C 143BA012 KN ► Remove the shroud – see "Shroud". ► Pull the hand guard back towards the front handle.
18 Electric Handle Heating English 18.1 NOTICE Switching on handle heating (depending on model) This is important to reduce the risk of engine run‐ ning problems and overheating. 17.2 At temperatures below -10°C The cover plate (special accessory) helps pre‐ vent snow being sucked into the machine. ► Move the switch to F – move switch back to 0 to switch off. When the cover plate is fitted, the shutter must be in the winter position.
English 19.2 19 Starting / Stopping the Engine Adjust Master Control lever To move the Master Control lever from the run position F to start }, depress the trigger lockout and the throttle trigger and hold them in that position – set the Master Control lever to start } and let go of the throttle trigger and trigger lock‐ out. ► Hold the front handle firmly with your left hand – your thumb should be under the handle. 19.
19 Starting / Stopping the Engine English WARNING 001BA186 KN Bystanders must be well clear of the general work area of the saw. 1 2 4 3 5902BA047 KN 4 ► Push the hand guard (1) forward – the chain is locked. The Master Control lever (4) is in the normal run position F. ► If the engine is cold: Press down the trigger lockout (2) and pull the throttle trigger (3) at the same time.
English 20 Operating Instructions There is possibly a non-combustible fuel-air mix‐ ture in the combustion chamber of the engine that is too rich– the engine has flooded. ► Remove the spark plug – see "Spark Plug". ► Dry the spark plug ► Keep the chain saw on the ground ► Push the Master Control lever as far as stop in direction of STOP or † and hold it there. WARNING An ignition spark may occur if the Master Control lever is not held against STOP or †.
22 Taking Care of the Guide Bar English 23 Use the adjusting screw (1) (on underside of machine) to vary the oil feed rate as required. 23.1 Ematic position (E), medium oil flow rate – ► turn the adjusting screw to "E" (Ematic posi‐ tion). Shroud Removing the Shroud ► To switch off the engine, move the Master Control lever in the direction of STOP or † – when released, the Master Control lever springs back to the run position F. ► Push the hand guard forward – the chain is locked.
English 25 Cleaning the Air Filter ► Rinse outside of filter under warm running water. ► Synthetic fabric filter: For use in severe condi‐ tions, e.g. extreme wintry operating conditions - such as powdery or drifting snow. Less suita‐ ble for very dusty conditions. – Allow air filter to dry without using any external source of heat. – Do not impregnate the filter with oil. ► Allow air filter to dry. ► Install the air filter. 25.1.3 STIHL filters have a long service life in dry oper‐ ating conditions.
26 M-Tronic English ► If the STIHL M‑Tronic version is lower than 3.0: “Speeding up automatic adaptation of the chain saw”. ► If the STIHL M‑Tronic version is 3.0 or higher: “Calibrating the chain saw”. 26.1 Speeding Up Automatic Adap‐ tation of the Chain Saw ► Carry out five uniform cuts to length at full throttle. 26.2 Calibrating the Chain Saw To calibrate the chain saw, carry out the follow‐ ing steps: 30-60 s B > 30 s C ► Fully depress throttle trigger and hold it there.
English 27 27 Spark Arresting Screen in Muffler Spark Arresting Screen in Muffler 28.1 Removing the Spark Plug ► Remove the shroud – see "Shroud". To reduce the risk of fire caused by hot particles escaping from the machine, never operate the machine without a spark arresting screen, or with the spark arresting screen damaged. Do not modify the muffler or spark arresting screen.
29 Storing the Machine English – Unfavorable running conditions. ► If you use a biological chain and bar lubricant, e.g. STIHL BioPlus, completely fill the chain oil tank. ► Store the machine in a dry, high or locked location, out of the reach of children and other unauthorized persons. 1 000BA045 KN 30 WARNING ► Remove chain sprocket cover, saw chain and guide bar. ► Release chain brake – pull hand guard against the front handle 30.1 Arcing may occur if the adapter nut (1) is loose or missing.
English 31 Maintaining and Sharpening the Saw Chain 31 5 31.
31 Maintaining and Sharpening the Saw Chain English 31.4 The diameter of file to be used depends on the chain pitch – see table "Sharpening tools". File holder The angles of the cutter must be maintained dur‐ ing resharpening. Sharpening and side plate angles 689BA025 KN 31.3 A 689BA021 KN ► Use a file holder B A Sharpening angle STIHL saw chains are sharpened with a 30° sharpening angle. Ripping chains, which are sharpened with a 10° sharpening angle, are exceptions.
English 31 Maintaining and Sharpening the Saw Chain 31.
31 Maintaining and Sharpening the Saw Chain English mark) is lowered at the same time as the depth gauge of the cutter. WARNING 689BA051 KN The rest of the humped drive link must not be filed; otherwise, this could increase the tendency of the chain saw to kick back.
English 32 Maintenance and Care Sharpening tools (special accessories) Chain pitch Round file Round file File holder File gauge Taper square Sharpening file ^ set1) Inches (mm) mm (Inches Part number Part number Part number Part number Part number ) 1/4P (6.35) 3.2 (1/8) 5605 771 5605 750 0000 893 0814 252 5605 007 3206 4300 4005 3356 1000 1/4 (6.35) 4.0 (5/32) 5605 772 40065605 750 43271110 893 40000814 252 33565605 007 1027 3/8 P (9.32) 4.
As required If damaged If faulty X check Annually Chain catcher Monthly X Weekly Checking the chain ten‐ sion sharpen Guide bar Check (wear, damage) Clean and turn over Deburr replace Chain sprocket check Air filter Clean replace Anti-vibration elements check Have replaced by serv‐ icing dealer1) Air intake on fan housing Clean Cylinder fins Clean Carburetor Check idle adjustment – saw chain must not rotate If the saw chain contin‐ ues moving when the engine is idling, have your chainsaw checked a
English 33 33 Main Parts Main Parts 22 Fuel filler cap 23 Master control lever 24 Throttle trigger 14 8 25 Throttle trigger lockout 15 2, 3 26 Rear handle 4 27 Rear hand guard # 5 1 6 # Serial number 11 7 12 10 8 34 13 9 34.
35 Ordering Spare Parts Groove width: Sprocket nose: 34.6.2 English 1.3 mm 10 tooth Rollomatic Guide Bars Bar lengths (pitch .325"): 40, 45, 50 cm Groove width: 1.3 mm Sprocket nose: 11 tooth 34.6.3 Rollomatic Light 04 guide bars Bar lengths (pitch .325"): 35, 40, 45, 50 cm Groove width: 1.6 mm Sprocket nose: 10 tooth 34.6.4 Rollomatic Guide Bars Bar lengths (pitch .325"): 32, 37, 40, 45 cm Groove width: 1.6 mm Sprocket nose: 11 tooth 34.6.5 Duromatic guide bars Bar lengths (pitch .
English 37 Disposal Make: Series: user manual. All other repairs must be carried out by a servicing dealer. STIHL recommends that you have servicing and repair work carried out exclusively by an author‐ ized STIHL servicing dealer. STIHL dealers are regularly given the opportunity to attend training courses and are supplied with the necessary technical information. When repairing the machine, only use replace‐ ment parts which have been approved by STIHL for this power tool or are technically identical.
38 EC Declaration of Conformity 0458-153-8321-C English 43
0458-153-8321-C *04581538321C* www.stihl.