
Instruction Manual


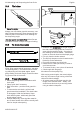

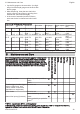

Table Of Contents
- STIHL MS 171, 181, 211
- 1 Guide to Using this Manual
- 2 Safety Precautions
- 3 Reactive Forces
- 4 Working Techniques
- 5 Cutting Attachment
- 6 Mounting the Bar and Chain (side chain tensioner)
- 7 Mounting the Bar and Chain (quick chain tensioner)
- 8 Tensioning the Saw Chain (side chain tensioner)
- 9 Tensioning the Saw Chain (quick chain tensioner)
- 10 Checking Chain Tension
- 11 Fuel
- 12 Fueling
- 13 Chain Lubricant
- 14 Filling Chain Oil Tank
- 15 Checking Chain Lubrication
- 16 Chain Brake
- 17 Winter Operation
- 18 Starting / Stopping the Engine
- 18.1 Positions of the master control lever
- 18.2 Adjusting the master control lever
- 18.3 Fuel pump
- 18.4 Holding the chain saw
- 18.5 Starting
- 18.6 Starting the chain saw
- 18.7 When the engine has turned over for the first time
- 18.8 Once the engine is running
- 18.9 At very low temperatures
- 18.10 Switch off the engine
- 18.11 If the engine does not start
- 19 Operating Instructions
- 20 Taking Care of the Guide Bar
- 21 Shroud
- 22 Air Filter System
- 23 Cleaning the Air Filter
- 24 Adjusting the Carburetor
- 25 Spark Arresting Screen in Muffler
- 26 Spark Plug
- 27 Engine Running Behavior
- 28 Storing the Machine
- 29 Checking and Replacing the Chain Sprocket
- 30 Maintaining and Sharpening the Saw Chain
- 31 Maintenance and Care
- 32 Main Parts
- 33 Specifications
- 34 Ordering Spare Parts
- 35 Maintenance and Repairs
- 36 Disposal
- 37 EC Declaration of Conformity

30 Maintaining and Sharpen‐
ing the Saw Chain
30.1 Sawing effortlessly with a prop‐
erly sharpened saw chain
A properly sharpened saw chain cuts through
wood effortlessly even with very little pushing.
Never use a dull or damaged saw chain – this
leads to increased physical strain, increased
vibration load, unsatisfactory cutting results and
increased wear.
► Clean the saw chain
► Check the saw chain for cracks and damaged
rivets
► Replace damaged or worn chain components
and adapt these parts to the remaining parts in
terms of shape and level of wear – rework
accordingly
Carbide-tipped (Duro) saw chains are especially
wear-resistant. For an optimal sharpening result,
STIHL recommends STIHL servicing dealers.
WARNING
Compliance with the angles and dimensions lis‐
ted below is absolutely necessary. An improperly
sharpened saw chain – especially depth gauges
that are too low – can lead to increased kickback
tendency of the chain saw – risk of injury!
30.2 Chain pitch
689BA027 KN
a
The chain pitch marking (a) is embossed in the
area of the depth gauge of each cutter.
Marking (a) Chain pitch
Inches mm
7 1/4 P 6.35
1 or 1/4 1/4 6.35
6, P or PM 3/8 P 9.32
2 or 325 0.325 8.25
3 or 3/8 3/8 9.32
4 or 404 0.404 10.26
The diameter of file to be used depends on the
chain pitch – see table "Sharpening tools".
The angles of the cutter must be maintained dur‐
ing resharpening.
30.3 Sharpening and side plate
angles
A
B
689BA021 KN
A Sharpening angle
STIHL saw chains are sharpened with a 30°
sharpening angle. Ripping chains, which are
sharpened with a 10° sharpening angle, are
exceptions. Ripping chains have an X in the des‐
ignation.
B Side plate angle
The correct side plate angle results automatically
when the specified file holder and file diameter
are used.
Tooth shapes Angle (°)
A B
Micro = semi-chisel tooth, e. g.,
63 PM3, 26 RM3, 36 RM
30 75
Super = full chisel tooth, e. g.,
63 PS3, 26 RS, 36 RS3
30 60
Ripping chain, e. g., 63 PMX,
36 RMX
10 75
The angles must be identical for all cutters in the
saw chain. Varying angles: Rough, uneven run‐
ning of the saw chain, increased wear – even to
the point of saw chain breakage.
English 30 Maintaining and Sharpening the Saw Chain
36 0458-533-8321-E