
Instruction Manual
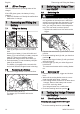
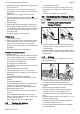
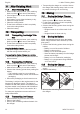

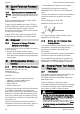
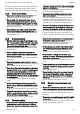
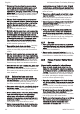
Table Of Contents
- STIHL HSA 56
- 1 Introduction
- 2 Guide to Using this Manual
- 3 Overview
- 4 Safety Precautions
- 5 Preparing Hedge Trimmer for Operation
- 6 Charging the Battery, LEDs
- 7 Removing and Fitting the Battery
- 8 Switching the Hedge Trimmer On/Off
- 9 Testing the Hedge Trimmer and Battery
- 10 Operating the Hedge Trimmer
- 11 After Finishing Work
- 12 Transporting
- 13 Storing
- 14 Cleaning
- 15 Maintenance
- 16 Repairing
- 17 Troubleshooting
- 18 Specifications
- 19 Spare Parts and Accessories
- 20 Disposal
- 21 EC Declaration of Conformity
- 22 General Power Tool Safety Warnings

6.5 LED on Charger
The LED indicates the operating status of the
charger.
If the LED glows green, the battery is being
charged.
► If the LED flashes red: Rectify the malfunction.
Malfunction in charger.
7 Removing and Fitting the
Battery
7.1 Fitting the Battery
1
2
3
0000-GXX-1452-A0
► Insert the battery (1) in the battery compart‐
ment (2) and press it home until you hear a
click.
Arrows (3) on battery (1) are still visible and
battery (1) is held securely in battery compart‐
ment (2). There is no electrical contact
between the hedge trimmer and battery (1).
► Push the battery (1) into the battery compart‐
ment (2) as far as stop.
The battery (1) engages with a second click
and is flush with the hedge trimmer’s housing.
7.2 Removing the Battery
► Stand the hedge trimmer on a level surface.
2
1
0000-GXX-1453-A0
► Press the locking lever (1).
The battery (2) is unlocked and can be
removed.
8 Switching the Hedge Trim‐
mer On/Off
8.1 Switching On
WARNING
■ The motor accelerates and the cutting blades
run regardless of the sequence in which the
switch lever and trigger are depressed. If you
depress the trigger first and then the switch
lever, you may lose control of the hedge trim‐
mer. This can result in serious injuries.
►
Depress the switch lever first and then the
trigger.
1
2
3
4
0000-GXX-1454-A0
► Depress the switch lever (1) and hold it in that
position.
► Push the retaining latch (2) with your thumb to
position
.
► Depress the trigger lockout (3) with your hand
and hold it there.
► Pull the trigger (4) with your index finger and
hold it there.
The motor accelerates and the cutting blades
run.
8.2 Switching Off
► Release the switch lever, trigger and lockout
lever.
► Wait until the cutting blades come to a com‐
plete standstill after about 1 second.
► If the cutting blades continue to run after about
1 second: Remove the battery and contact
your STIHL servicing dealer.
Your hedge trimmer has a malfunction.
►
Push the retaining latch into position
.
9 Testing the Hedge Trimmer
and Battery
9.1 Checking the Controls
Retaining latch, trigger lockout and trigger
► Remove the battery.
►
Push the retaining latch into position .
English 7 Removing and Fitting the Battery
12 0458-714-0121-C