
User Manual

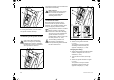
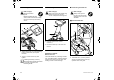
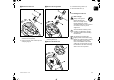
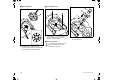
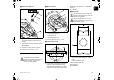
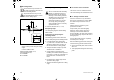
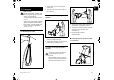
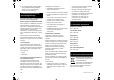
Table Of Contents
- 1. Table of contents
- 2. Notes on the instruction manual
- 3. Machine overview
- 4. For your safety
- 5. Description of symbols
- 6. Standard equipment
- 7. Preparing the machine for operation
- 8. Notes on working with the machine
- 9. Safety devices
- 10. Operating the machine
- 11. Maintenance
- 11.1 Cleaning the machine
- 11.2 Service intervals
- 11.3 Installing the feed chute
- 11.4 Removing the feed chute
- 11.5 Blade set service intervals
- 11.6 Removing the blade set
- 11.7 Installing the blade set
- 11.8 Wear limits of the blades
- 11.9 Sharpening shredding blades
- 11.10 Electric motor and wheels
- 11.11 Storage and winter break
- 12. Transport
- 13. Minimising wear and preventing damage
- 14. Standard spare parts
- 15. Environmental protection
- 16. Technical specifications
- 17. Troubleshooting
- 18. Service schedule

EN
25
0478 201 8314 C - EN
4 Fasten the blade set
● Attach clamping ring (7) and secure
along with retaining washer (8) and
bolt (9).
● Tighten bolt (9) using assembly tool (U)
(45 - 50 Nm).
● Fold back locking device (2) again.
● Install the feed chute. (Ö 11.3)
11.8 Wear limits of the blades
1 Blade overview
– 1 combination blade (1)
– 3 wing blades (2)
– 2 shredding blades (3)
● Remove the blade set. (Ö 11.6)
2 Combination blade
● Hold a ruler (5) against the reference
edge (4) of the combination blade.
The distance (A) between the cutting
edge and the ruler indicates the wear.
Maximum wear limit (A) for combination
blade (1):
A = < 5 mm
3 Wing blade
● The blade width should be measured at
two or three points along the cutting
edge.
Use the smallest value.
Minimum blade width (B)
Wing blade (2):
B = > 40 mm
The blades must be replaced
before the specified wear limits are
reached. STIHL recommends
STIHL specialist dealers.
The measurement procedure and
the value specified are the same for
all three wing blades.
Asymmetrical wear may occur at
the wing blades due to uneven use
of the cutting edges.