
User Manual

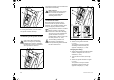
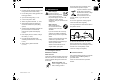
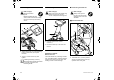
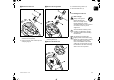
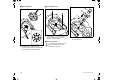
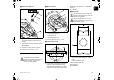
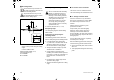
Table Of Contents
- 1. Table of contents
- 2. Notes on the instruction manual
- 3. Machine overview
- 4. For your safety
- 5. Description of symbols
- 6. Standard equipment
- 7. Preparing the machine for operation
- 8. Notes on working with the machine
- 9. Safety devices
- 10. Operating the machine
- 11. Maintenance
- 11.1 Cleaning the machine
- 11.2 Service intervals
- 11.3 Installing the feed chute
- 11.4 Removing the feed chute
- 11.5 Blade set service intervals
- 11.6 Removing the blade set
- 11.7 Installing the blade set
- 11.8 Wear limits of the blades
- 11.9 Sharpening shredding blades
- 11.10 Electric motor and wheels
- 11.11 Storage and winter break
- 12. Transport
- 13. Minimising wear and preventing damage
- 14. Standard spare parts
- 15. Environmental protection
- 16. Technical specifications
- 17. Troubleshooting
- 18. Service schedule

EN
23
0478 201 8314 C - EN
2 Detach the blade set
● Loosen bolt (3) using assembly tool (U)
and unscrew completely.
● Remove bolt (3), lock washer (4) and
clamping ring (5).
3 Remove the wing blades
● Remove wing blade (6), wing blade (7)
and wing blade (8).
4 Remove the blade disc
● Fold back locking device (2).
● Remove blade disc (1).
11.7 Installing the blade set
Risk of injury!
Always wear gloves!
Before attaching the
blade set, visually check
that the blade disc and all
shredding blades are OK and have
no notches, cracks or pieces
chipped out.
Clean the blade mounting on the
machine, the blade disc and the
shredding blade before attaching
the blade set.
The blade disc including the
chipping blade and the three wing
blades are equipped with a toothed
blade mounting. This prevents
incorrect installation of the entire
cutting unit, as the blades can only
be attached to the blade mounting
when in the correct position.