
User Manual
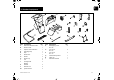
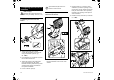
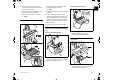
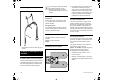

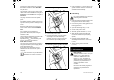


Table Of Contents
- 1. Table of contents
- 2. Notes on the instruction manual
- 3. Machine overview
- 4. For your safety
- 5. Description of symbols
- 6. Standard equipment
- 7. Preparing the machine for operation
- 8. Notes on working with the machine
- 9. Safety devices
- 10. Operating the machine
- 11. Maintenance
- 12. Transport
- 13. Minimising wear and preventing damage
- 14. Standard spare parts
- 15. Environmental protection
- 16. Technical specifications
- 17. Troubleshooting
- 18. Service schedule

EN
17
0478 201 8315 B - EN
11.1 Cleaning the machine
Maintenance interval:
After each use
Clean the machine thoroughly each time it
has been used. Care of the machine will
protect it against damage and extend its
service life.
Electric motors are splashproof.
Protect shredding tools, incl. the shredding
chamber using a commercially available
anti-corrosion agent (e.g. rapeseed oil).
It is only permitted to clean the machine in
the position shown.
● Remove the feed chute. (Ö 11.2)
Remove dirt from the cooling air guide
(inlet slots) on the motor housing to ensure
that the motor is adequately cooled.
Never spray water onto
motor or engine components,
seals, bearing points or
electrical parts such as
switches. This would result in
expensive repairs.
If you are unable to remove
the dirt and accumulated
deposits with a brush, a damp
cloth or a stick, STIHL recommends the
use of a special cleaner (e.g. STIHL
special cleaner).
Do not use aggressive cleaning agents.
Clean the blade discs regularly.
11.2 Removing the feed chute
● Loosen both closure screws (1) until
they turn freely. The screws are captive
and remain in the feed chute.
● Pivot feed chute (2) to the rear and
remove.
11.3 Installing the feed chute
● Attach feed chute (1) to the fastening
hooks on basic unit (2) and pivot
forwards.
● Tighten both closure screws (3)
simultaneously.
11.4 Locking the blade disc
The locking device must always be
tilted back and secured with the
bolt after installation of the blade
disc and before operating the
machine again (see illustration).