
User Manual
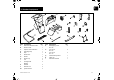
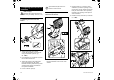
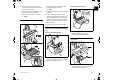
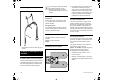

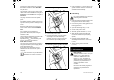


Table Of Contents
- 1. Table of contents
- 2. Notes on the instruction manual
- 3. Machine overview
- 4. For your safety
- 5. Description of symbols
- 6. Standard equipment
- 7. Preparing the machine for operation
- 8. Notes on working with the machine
- 9. Safety devices
- 10. Operating the machine
- 11. Maintenance
- 12. Transport
- 13. Minimising wear and preventing damage
- 14. Standard spare parts
- 15. Environmental protection
- 16. Technical specifications
- 17. Troubleshooting
- 18. Service schedule

0478 201 8315 B - EN
12
7.1 Attaching the wheel axle and
wheels
● Attach wheel axle (F) to wheel
carrier (B) with bolts (J) and nuts (K)
using combination spanner (Q)
(4 - 6Nm).
● Push washers (L) and wheels (G) onto
the mounted wheel axle.
● Attach the wheels to the wheel axle
using quick fasteners (M). Quick
fasteners must be pushed on only to the
extent that the wheels can still turn
freely after installation.
● Press on wheel caps (H).
7.2 Installing the ejection chute
extension and chassis
● Place basic unit (A) with the chute
facing downwards onto a level, clean
surface.
● Engage hooks (1) of ejection chute
extension (C) into the openings on the
rear of basic unit (A) and tilt so that the
front part of the basic unit is precisely
inserted in the opening of the ejection
chute extension.
● Install screws (P) in hooks (1) as shown
(1 - 2Nm).
7. Preparing the machine for
operation
Risk of injury:
Observe the safety instructions in
the "For your safety" section. (Ö 4.)
Quick fasteners (M) have to be
broken to remove them.