
Instruction Manual
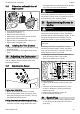


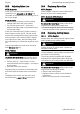

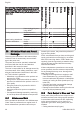

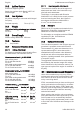

Table Of Contents
- STIHL FS 91, 91 R
- 1 Guide to Using this Manual
- 2 Safety Precautions and Working Techniques
- 2.1 Clothing and equipment
- 2.2 Transporting the machine
- 2.3 Refueling
- 2.4 Before starting
- 2.5 Starting the engine
- 2.6 Holding and guiding the machine
- 2.7 While working
- 2.8 Using mowing heads
- 2.9 When using metal cutting attachments
- 2.10 Vibrations
- 2.11 Maintenance and Repairs
- 2.12 Symbols on Deflectors
- 2.13 Shoulder Strap/Harness
- 2.14 Mowing Head with Nylon Line
- 2.15 STIHL Polycut Mowing Head with Polymer Blades
- 2.16 Risk of Kickout (Blade Thrust) with Metal Cutting Attachments
- 2.17 Grass Cutting Blade
- 2.18 Brush Knife
- 2.19 Circular Saw Blade
- 3 Approved Combinations of Cutting Attachment, Deflector, Handle and Harness
- 4 Approved Power Tool Attachments
- 5 Mounting the Bike Handle
- 6 Mounting the Loop Handle
- 7 Adjusting the Throttle Cable
- 8 Fitting the Carrying Ring
- 9 Mounting the deflector
- 10 Mounting the Cutting Attachment
- 10.1 Placing power tool on the ground
- 10.2 Mounting Hardware for Cutting Attachments
- 10.3 Blocking the Shaft
- 10.4 Removing the Mounting Hardware
- 10.5 Mounting the Cutting Attachment
- 10.6 Fitting Mowing Head with Screw Mounting
- 10.7 Remove the mowing head.
- 10.8 Mounting Metal Cutting Attachments
- 10.9 Removing the Metal Cutting Attachment
- 11 Fuel
- 12 Fueling
- 13 Fitting the Harness
- 14 Balancing the Machine
- 15 Starting / Stopping the Engine
- 16 Transporting the Unit
- 17 Operating Instructions
- 18 Replacing the Air Filter
- 19 Adjusting the Carburetor
- 20 Spark Arresting Screen in Muffler
- 21 Spark Plug
- 22 Engine Running Behavior
- 23 Lubricating the Gearbox
- 24 Storing the Machine
- 25 Sharpening Metal Cutting Blades
- 26 Maintaining the Mowing Head
- 27 Maintenance and Care
- 28 Minimize Wear and Avoid Damage
- 29 Main Parts
- 30 Specifications
- 31 Maintenance and Repairs
- 32 Disposal
- 33 EC Declaration of Conformity

27 Maintenance and Care
The following intervals apply for normal operating
conditions. The specified intervals must be short‐
ened accordingly when working for longer than nor‐
mal or under difficult cutting conditions (extensive
dust, etc.).
Before starting work
At the end of work and/or daily
Whenever tank is refilled
Weekly
Monthly
Annually
If faulty
If damaged
As required
Complete machine Visual inspection (condi‐
tion, leaks)
X X
Clean X
Replace any damaged
parts
X X
Control handle Function test X X
Air filter Visual inspection X X
Replace
2)
X
Manual fuel pump (if
present)
check X
Have repaired by a spe‐
cialist dealer
1)
X
Fuel pickup body in fuel
tank
Have checked by
dealer
1)
X
Have replaced by serv‐
icing dealer
1)
X X X
Fuel tank Clean X X
Carburetor Check idle adjustment,
cutting attachment must
not turn
X X
Adjust idle speed X
Spark plug Set electrode gap X
Replace after every 100
hours of operation
Cooling air intakes Visual inspection X
Clean X
Cylinder fins Have cleaned by
dealer
1)
X
Valve clearance If power is low or crank‐
ing effort very high, have
valve clearance checked
and, if necessary, adjus‐
ted by dealer
1)
X
Spark arresting screen in
muffler
Check if installed X
Check or replace
1)
X
All accessible screws,
nuts and bolts (not
adjusting screws)
Tighten X
Anti vibration elements
(rubber buffers, springs)
Check X X X
27 Maintenance and Care English
0458-426-8321-B 35