
Instruction Manual


Table Of Contents
- 1 Introduction
- 2 Guide to Using this Manual
- 3 Main Parts
- 4 Safety Symbols on the Product
- 5 IMPORTANT SAFETY INSTRUCTIONS
- 6 Maintenance, Repair and Storage
- 7 Before Starting Work
- 8 Charging the Backpack Battery
- 9 LED Diagnostics and Acoustic Signals
- 10 Turning the Bluetooth® Interface On and Off
- 11 Assembling the Backpack Battery
- 12 Adjusting the Backpack Battery
- 13 Connecting the Backpack Battery to the Power Tool
- 14 During Operation
- 15 After Finishing Work
- 16 USB Port
- 17 Transporting
- 18 Storing
- 19 Cleaning
- 20 Inspection and Maintenance
- 21 Troubleshooting Guide
- 22 Specifications
- 23 Replacement Parts and Equipment
- 24 Disposal
- 25 Limited Warranty
- 26 Trademarks
- 27 Addresses
- 1 Introducción
- 2 Acerca de este manual de instrucciones
- 3 Componentes importantes
- 4 Símbolos de seguridad en el producto
- 5 INSTRUCCIONES IMPORTANTES DE SEGURIDAD
- 6 Mantenimiento, reparación y almacenamiento
- 7 Antes de empezar a trabajar
- 8 Carga de la batería tipo mochila
- 9 Diagnóstico por LED y señales acústicas
- 10 Cómo activar y desactivar la interfaz de Bluetooth®
- 11 Armado de la batería tipo mochila
- 12 Ajuste de la batería tipo mochila
- 13 Conexión de la batería tipo mochila a la herramienta eléctrica
- 14 Durante el funcionamiento
- 15 Después de completar el trabajo
- 16 Puerto USB
- 17 Transporte
- 18 Almacenamiento
- 19 Limpieza
- 20 Inspección y mantenimiento
- 21 Guía de solución de problemas
- 22 Especificaciones
- 23 Piezas y equipos de repuesto
- 24 Eliminación
- 25 Garantía limitada
- 26 Marcas comerciales
- 27 Direcciones
0458-820-8621-A
15
English
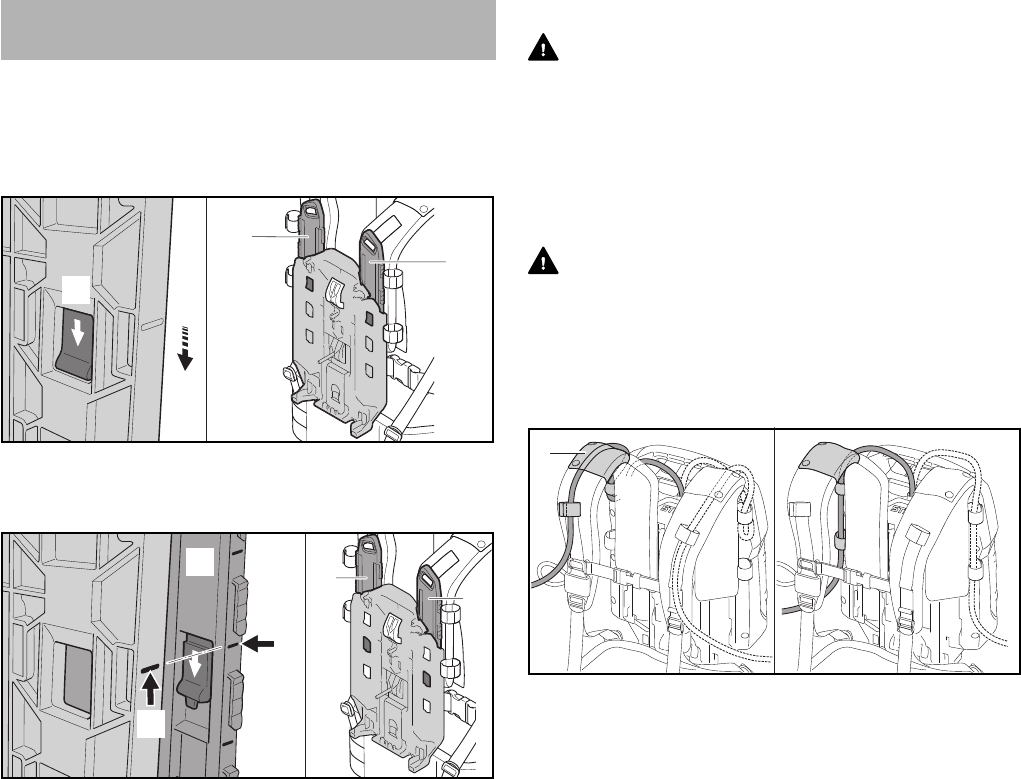
12 Adjusting the Backpack Battery
12.1 Adjusting the Battery Harness to Suit the
Operator’s Height
The battery harness can be set to positions S, M or L to suit
the operator’s height.
► Depress the locking tab (1) and push it in the direction of
the arrow.
► Remove the slide (2).
► Line up mark (3) with mark (4).
► Insert the slide (2).
► Pull the slide up (opposite the direction of the arrow).
It will engage with a click.
► Adjust the slide at the left and right shoulder straps to the
same position.
12.2 Positioning the Connecting Cord
WARNING
To reduce the risk of injury from tripping on the connecting
cord or losing control of the power tool, always secure the
connecting cord with the hook and eye fasteners as
described below. Always position and secure the connecting
cord so that it will not interfere with the proper working
technique as described in the instruction manual for the
power tool you are using, or your ability to maintain control
of the power tool.
WARNING
Manage the cord to prevent it from contacting the
cutting/working attachment or catching on objects, which
could cause you to lose balance or control of the power tool,
resulting in serious personal injury and property damage.
The connecting cord can be secured in different positions
and adjusted to suit the height and reach of the operator.
The connecting cord can run through the guide (1) on the
shoulder strap (Illustration A), or along the back
plate (Illustration B). Secure the connecting cord to the
harness with the hook and eye fasteners (2). Always secure
the connecting cord using the guide or hook and eye
fasteners on the side of the body on which the power tool is
held and controlled. Do not allow the connecting cord to
swing across your body or hang at your side.
12 Adjusting the Backpack Battery
1
2
2
0000-GXX-A271-A0
S
M
L
4
3
2
2
2
0000-GXX-A272-A1
1
2
2
2
2
A B
0000-GXX-9303-A0