
Owner's Manual


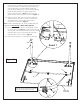
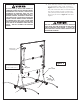
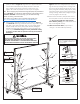
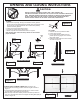
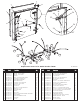

Table Of Contents

6
8. Screw U-support tube (#21) to Strut Tubes (#17) with two Screws
(#33) as shown in Figure 5. Align holes in U-support with holes
in Strut Tubes and thread screw (#33) into hole in Strut Tube
(#17) Tighten screws all the way but be careful not to over
tighten. You could strip threads on screws if you over tighten.
9. Attach Hinges (#18) to Strut Tubes (#17) as shown in Figure 5
and Detail B. With hinge positioned as shown, align hole in hinge
with hole in Strut Tube and attach with ¼” Screw (#30), Plastic
Washer (#38) and Locknut (#34). Plastic Washer (#38) goes
between Strut Tube and Hinge. Tighten nut securely. Repeat for
other Hinge. CAUTION: Hinges must be positioned exactly
as shown or table will not operate correctly and could be
damaged.
12. With at least two adults, repeat steps 7
through 11 for other table top assembly..
10. Attach Linkages (#16) to Leg (#19) as shown in
Figure 5. Pivot one Linkage (#16) up and pivot
Leg out from top and align hole in Linkage with
hole in Leg (#19). Attach Linkage (#16) to Leg
(#19) using Hex Head Bolt (#24), Spacer (#37)
and Locknut (#34). Spacer (#37) goes between
Linkage and Leg. Attach other Linkage to Leg the
same way. Tighten nuts securely.
11. Attach Corner Protector (#40) to table corners.
Push snap tabs on Corner Protector into holes in
rails. Be sure that tabs are aligned with
holes before pushing. You could break tabs if
they are not aligned correctly.
DO NOT OPEN THE TABLE TO PLAYING POSITION UNTIL
BOTH TOPS ARE INSTALLED! DO NOT LEAVE TABLE
STANDING UNATTENDED. IT COULD BE KNOCKED OVER
CAUSING SERIOUS BODILY INJURY OR PROPERTY DAMAGE.
Figure 5
CAUTION: Position hinges exactly as
shown in Detail B or table will not
operate correctly and could be damaged.
34
38
30
18
17
18
17
Detail A
Detail B
Shipping position
of hinge
Assembly
position of hinge
40
18
16
16
30
38
34
37
24
21
18
34
30
38
24
37
34
17
33
33
19
19
16
34
Spacer (#37) goes
between Linkage (#16)
and Leg (#19)
Plastic Washer goes
between Strut Tube
(#17) and Hinge (#18)
17
ATTENTION: If hinge is positioned as
shown below (Detail A), Rotate the hinge
as shown in Detail B. Do not take the
hinge off the table.
Note:
shown in Detail A, you will have to rotate the hinge to the position shown
in Detail B. DO NOT unscrew the hinge, you can rotate the hinge
without unscrewing it from the table.
Due to shipping requirements the hinge (#18) may be positioned as
If you want to see a video on how to position hinge (#18) go to:
http://www.escaladesports.com/customer-service/videos.html
In the correct position
Hinge #18 will look like a
“V” when attached to Strut
Tube (#17).