
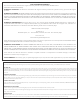
Owners manual


12
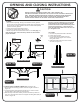
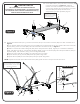
24.Attach Hinges (#18) to Strut Tubes (#17) as shown in Figure 11 &
Detail N. With hinge positioned as shown, align hole in hinge with hole
in Strut Tube and attach with ¼” Screw (#30), Plastic Washer (#38) and
Locknut (#34). Plastic Washer (#38) goes between Strut Tube and
Hinge. Tighten nut securely. Repeat for other Hinge. CAUTION:
Hinges must be positioned exactly as shown or table will not
operate correctly and could be damaged.
25. With at least two adults, repeat steps 20 through 24 for other
table top assembly.
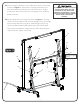
DO NOT OPEN THE TABLE TO PLAYING POSITION UNTIL
BOTH TOPS ARE INSTALLED! DO NOT LEAVE TABLE
STANDING UNATTENDED. IT COULD BE KNOCKED OVER
CAUSING SERIOUS BODILY INJURY OR PROPERTY DAMAGE.
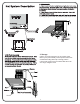
Note:
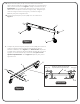
rotate the hinge to the position shown in Detail N. DO NOT unscrew the
hinge, you can rotate the hinge without unscrewing it from the table.
If hinge (#18) is positioned as shown in Detail M, you will have to
Figure 12
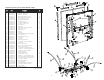
16
18
Hinge Assembly
18
Hinge Assembly
21
17
17
38
Plastic Washer goes
between Strut Tube
(#17) and Hinge (#18)
30
38
34
30
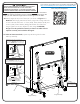
If you want to see a video on how to position hinge (#18) go to:
http://www.escaladesports.com/customer-service/videos.html
Or
Scan with your smartphone:
CAUTION: Position hinges exactly as
shown in Detail N or table will not
operate correctly and could be damaged.
34
38
30
18
17
18
17
Detail M
ATTENTION: If hinge is positioned as
shown below (Detail M), Rotate the hinge
as shown in Detail N. Do not take hinge
off.
Detail N
Incorrect position
of hinge
Correct position
of hinge
In the correct position
Hinge #18 will look like a
“V” when attached to Strut
Tube (#17).