
User Manual
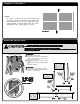

CAUTION
AT LEAST TWO ADULTS ARE NEEDED TO COMPLETE THEAT LEAST TWO ADULTS ARE NEEDED TO COMPLETE THE
AT LEAST TWO ADULTS ARE NEEDED TO COMPLETE THEAT LEAST TWO ADULTS ARE NEEDED TO COMPLETE THE
AT LEAST TWO ADULTS ARE NEEDED TO COMPLETE THE
FOLLOWING STEPS! DO NOT LEAVE TABLE UNATTENDED UNTILFOLLOWING STEPS! DO NOT LEAVE TABLE UNATTENDED UNTIL
FOLLOWING STEPS! DO NOT LEAVE TABLE UNATTENDED UNTILFOLLOWING STEPS! DO NOT LEAVE TABLE UNATTENDED UNTIL
FOLLOWING STEPS! DO NOT LEAVE TABLE UNATTENDED UNTIL
ASSEMBLY IS COMPLETE!ASSEMBLY IS COMPLETE!
ASSEMBLY IS COMPLETE!ASSEMBLY IS COMPLETE!
ASSEMBLY IS COMPLETE!
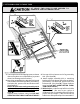
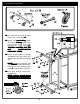
2. ATTACHING NAME PANELS TO LEGS
6.6.
6.6.
6.
With a helperWith a helper
With a helperWith a helper
With a helper
, hold top halves about 15 ½, hold top halves about 15 ½
, hold top halves about 15 ½, hold top halves about 15 ½
, hold top halves about 15 ½
inches apart. inches apart.
inches apart. inches apart.
inches apart. Attach only
one halfone half
one halfone half
one half of name
panels #8 to upright assemblies #11 as shown
above. Use
ONLY TWOONLY TWO
ONLY TWOONLY TWO
ONLY TWO bolts #25 and locknuts
#29
on each name panel.on each name panel.
on each name panel.on each name panel.
on each name panel.
(
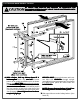
Two other bolts #27 and nuts #29 will be used in
the next section to attach the other half of the
name panels and linkages #24 at the same time.
See next page.
)
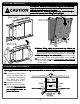
Do not tighten these locknutsDo not tighten these locknuts
Do not tighten these locknutsDo not tighten these locknuts
Do not tighten these locknuts
completely tight yetcompletely tight yet
completely tight yetcompletely tight yet
completely tight yet.
HELPFUL HINT: HELPFUL HINT:
HELPFUL HINT: HELPFUL HINT:
HELPFUL HINT: Start at the bottom and insert
two bolts #25
UPWARDUPWARD
UPWARDUPWARD
UPWARD through upright
assemblies #11 and name panel #8. Then attach
the upper name panel #8. Insert bolts #25
DOWNWARDDOWNWARD
DOWNWARDDOWNWARD
DOWNWARD.
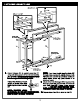
NOTE: Be sure that top halves #1 lock intoNOTE: Be sure that top halves #1 lock into
NOTE: Be sure that top halves #1 lock intoNOTE: Be sure that top halves #1 lock into
NOTE: Be sure that top halves #1 lock into
the safety latches on each name panel.the safety latches on each name panel.
the safety latches on each name panel.the safety latches on each name panel.
the safety latches on each name panel.
7.7.
7.7.
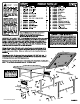
7. Slide caps #22 onto ends of safety latches. (See
Detail E)
3