
User Manual
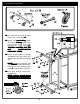

1. ATTACHING LEGS TO TABLE TOPS
CAUTION
AT LEAST TWO ADULTS ARE NEEDED TO
COMPLETE THE FOLLOWING STEPS!
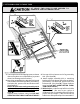
1. Leave top halves #1 in shipping carton as shown
above or lay them on a carpeted floor (
to protect
them from damage and scratches
).
2. Attach leg assembly #10 to brackets #6 located
on the bottom of the first top half #1. (See above).
Use bolts #26, spacers #20 and locknuts #28.
(See Detail A).
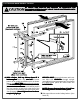
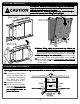
NOTE: Be sure brace on leg assembly #10 is
against table and hole in the middle of leg
assembly #10 is nearer the top of tube. (See
Detail B).
Tighten these locknuts snug but DO NOT
OVERTIGHTEN THEM. JOINT MUST MOVE!
3. Put caps #21 on bottom end of leg assembly
#10. (See Detail C).
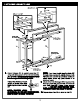
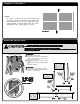
4. Attach upright assembly #11 to remaining
brackets #6 on the bottom of the first top half #1.
(See above). Use bolts #26, spacers #20, and
locknuts #28. (See Detail D). Tighten locknuts
snug but DO NOT OVERTIGHTEN THEM.
JOINT MUST MOVE!
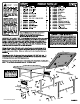
5. With a helper, set the first top half #1 on its side
against a wall. (
Be sure to put a piece of
cardboard, cloth, or carpeting on the floor first to
protect the top's edges.
) Turn the second top
half #1 over and repeat steps 2-4 to assemble it.
2