
Product Warranty
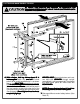


3. ATTACHING LINKAGE TO LEGS
NOTE:NOTE:
NOTE:NOTE:
NOTE: If you have trouble inserting bolts #27
through name panels #8, slightly loosen bolts
#25 (that you used in the previous section to
attach name panels #8). (See Section 2 on
previous page).
9.9.
9.9.
9. Attach other end of linkages #24 to leg assembly
#10 using bolts #26, spacers #20, and locknuts
#28. (See Detail
GG
GG
G). Tighten these locknuts
snug, but
DO NOT OVERTIGHTEN THEM.DO NOT OVERTIGHTEN THEM.
DO NOT OVERTIGHTEN THEM.DO NOT OVERTIGHTEN THEM.
DO NOT OVERTIGHTEN THEM.
THIS JOINT MUST BE ABLE TO MOVE!THIS JOINT MUST BE ABLE TO MOVE!
THIS JOINT MUST BE ABLE TO MOVE!THIS JOINT MUST BE ABLE TO MOVE!
THIS JOINT MUST BE ABLE TO MOVE!
10.10.
10.10.
10.Repeat steps 8 and 9 on other top half #1.
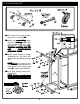
8.8.
8.8.
8. Attach linkages #24 to upright assembly #11
using bolts #27, spacers #18, and locknuts #29.
(See Detail
FF
FF
F).
The lip on step spacers #18 fitThe lip on step spacers #18 fit
The lip on step spacers #18 fitThe lip on step spacers #18 fit
The lip on step spacers #18 fit
into the larger hole in linkages #24.into the larger hole in linkages #24.
into the larger hole in linkages #24.into the larger hole in linkages #24.
into the larger hole in linkages #24.
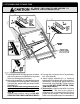
Helpful Hint: Hold your wrench
upright as shown here while
tightening the locknut on bolts
#27.
NOTE: TIGHTEN LOCK-NOTE: TIGHTEN LOCK-
NOTE: TIGHTEN LOCK-NOTE: TIGHTEN LOCK-
NOTE: TIGHTEN LOCK-
NUTS SNUG, BUT DO NOT OVERTIGHTEN.NUTS SNUG, BUT DO NOT OVERTIGHTEN.
NUTS SNUG, BUT DO NOT OVERTIGHTEN.NUTS SNUG, BUT DO NOT OVERTIGHTEN.
NUTS SNUG, BUT DO NOT OVERTIGHTEN.
JOINTS MUST BE ABLE TO MOVE!JOINTS MUST BE ABLE TO MOVE!
JOINTS MUST BE ABLE TO MOVE!JOINTS MUST BE ABLE TO MOVE!
JOINTS MUST BE ABLE TO MOVE!
4