
Instruction Manual
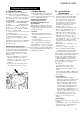
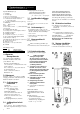
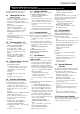

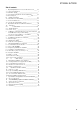
Table Of Contents
- D
- ®
- H
- 1.1 Gerätebeschreibung
- 1.3 Einstellungsempfehlung Thermostat-Armatur
- 1.4 Sicherheitshinweis
- 1.5 Wichtiger Hinweis
- 1.6 Erste Hilfe bei Störungen
- 1.7 Wartung und Pflege
- 1.8 Gebrauchs-und Montageanweisung
- 2.1 Auf einen Blick
- 2«2 Temperatur einstellen
- 2.4 ECO - Funktion
- 3.1 Funktionstaste mit Einstellmöglichkeiten
- H
- JOU
- JUJ
- JU J
- 10.5
- JUJ
- IjnC'^ lU J
- inc
- D
- ®
- ®
- H
- ©
- ©
- Clock
- Display lighting
- 4. Installation instructions for concraceors
- 5« Standard installation fai*CDrttractor&
- General installation information
- 5.2 Place of installation
- 5.3 Equipment preparation for installation
- bracketTn
- 5.5 Trimming the power cable to size
- 5.6 ^uipment installation
- 5.7 Water connection (S
- 5.8 Electrical connection
- 5.9 Completing the installation
- 5.10 Initial start-up
- 6.5 Installation of cable grommet
- 6.6 Priority control B
- 6.9 Installation of back-wall base
- 6.10 Offset installation for tiled surfaces
- 7« Specification and application areas for contractors
- 10. special accessories
- 11« Environment and recycling
- 12« Guarantee
- D
- ®
- ®
- H
- a
- et de montage
- 2.1 D*un seul coup d‘œil
- 2.2 Réglage de la température
- 2.3 Témoins d*alar*me
- 2.4 Fonction ECO
- 3»1 Touches de fonctions avec possibilité de réglage
- J.2 Deuxième affichage pour infor*nnation
- 3.3 Réglage des fonctions de confort
- Touche de fonctions
- 4. Instructions de montage pourle professionnel
- 4.1 Description
- 10. Accessoires hors>séne
- 11. Environment et recyclage
- 12. Garantie
- D
- a
- ®
- 30 JO J
- DCrp
- JU.U
- JU.J
- 3.2 Tweede display voor* opvpaagmogelijlclieden
- 3.3 Comfortfurtcties instellen
- Funktietoets
- 4.1 Beknopte beschrijving
- 4.2 Belangrijke aanwijzingen
- 4.3 Voorschriften en bepalingen
- 7.1 Technische gegevens
- 7«2 Inzetbereiken
- 10. speciale toebehoren
- 11. Milieu en
- recycling
- 12. Garantie
- D
- ®
- ®
- H
- i»-
- ©
- 0y0,
- ©
- ®
- H
- 2.1 Na pierwszy rzut oka
- 2.2 Nastdwianie temperatury
- 2.3 Wskazania ostrzegawcza
- 3.1 Przyoisk fiinkcjonalny z mozliwosciami nastaw
- 3.2 Drugi wskaznik do odczytywania wartosci
- 3.3 Nastawianie funkcji komfortowych
- Przycisk funkcyjny
- Automatyka Mosci wc>dy
- ©
- D
- ©
- ©
- H
- ■V
- 4.3 Nornny a pfedpísy
- 5. Standardni montáz pro odbornika
- Technicka data a rozsahy pouziti pro odbomika
- rt
- D
- ®
- JUJ
- 105
- IjnC'^ lU J
- me
- D
- ®
- H
- 3/PE - 400V
- 2.1 с един поглед
- 2.2 Настройка на температурата
- » 20доводе
- 2.3 Првдупредителни показания
- Э.1 Функционални бутони о възможности за регулиране
- 3.2 Второ показание за запитващи възможности
- 3.3 Настройване на функциите за комфортност
- Автоматика на водного количество
- ©
- Второ пока:^нио
- Осветление на показанията
- 4. Монтажна инструкция заслеииалисг
- 4.1 Кратко описание
- 4.2 Важни указания
- 4.3 Предписания и разпоредби
- окачване [Е'
- 6.1 Монтажните алтернативи са регисзрирани на фигури Ш
- 6.2 Електровключване - АР
- Елек^овключване •
- гор« В
- 6.4 Завъртян ко)кух (кожух)
- на уреда
- 6.5 Монтаж на набелен маншет
- 6.6 Изходна схема \Ö\
- 6.7 АР-Арматури
- 6.9 Монтаж на долната част на задната стена
- 6.10 Монтаж - Разместване на плочки
- 8. Отстраняване на неизправности чрез потребигел и специалист
- 10. Специални принадлежности
- 11. Околна среда и рециклиране
- 12.Гаранция
- D
- H
- ®
- ®
- 30С“с
5. Standardmontage flit* d e n F achm an n
E iektm : U P • unten; W a sser*: U P
Legende Abbildung lA . |G|
1 ß:^!li(:ril(;i
2 G ei'ätekr.ppe
3 R ücc > v<*.nd-Jrrte i“fe il
4 W < *.rn’vv< *.5 S fei'-S diiv.u b a '-< c'- uss
5 K ? .ltvv35 5 e rS chr3 u b ?.n 5C 'lus5
^3 -'vV egs-A bsp e rpj
6 l^.b e to lle (elek trisch e Z u e n u n g u m e r.j;
7 N:ilAlcn*7i(:
B I u fM l-i y )^:r•. i.iil
9 E le< t cH k
10 S ic^^erlie rssch -H er ^ .¡i; R "d < S ietzL i5tt
11 h e te yste rr
12 Durchflusiei‘iiiss*jhj? (DF^
13 S ce ckposrio n vcti S o l w ertgeber-K ?.bel
14 11 n- D H|i. ::iv:<n*:)(:l’*‘
15 B:iicsli|rii;:cvk":i!K:l
16 S : i: k( :r• vf: t i F-; i\ I-m : • I c ; i! k T<ni >: 'i
17 Sic':e-'fef:5-Ternpe'3tu'begren2er rSTB’i
18 A u sla.f-S e.hso r(N 7q
19 P oiiT hake n fü r B a^j^r^p p e ^t'^^r (S er^icej;
20 G e räte-T yp e n sch i d
21 A ufh^n g « ; e iste
22 Si( :l) i; rK;i I sst :•-?•( I • raw ’ss hl.. \'-
23 lonrisl.!:k
LEO* Oiagnoseam peL
• OOI iOt Icuthict bei Störune
iplh leiichlet !>ei Heiräptne!>
oo«i
i-rün blinkl: Gerjlüiii Nel¿
SA Allgemeine
Montagehinweise
D as G erä t is t w crkscie ig für ein e
S ta n d ard* Insta lla tion vo rbere itet
(sie h e A bb.fC l • ГП ):
♦ O bei"tisch G erä te iTiO htj^ (a )
♦ vV *>sehahsch! ^ ss U nte ro irz S ch rie Ь ал •
S ch luss [fil (4 5 У
♦ E ie c^*n sch luss -L - 'te ф ^tz irr untere n
G erä te b e h e ich E (6)
♦ А 'и сЬ ^ssleirt^h ^ 21 <W b e 'n
O H E '8 /2 '/2 ^ S U
5»2 Montageort
D er D H E .. S U ii^: s« ' brecht j? e n *ß A bbil
c*ung [C ](a -Ü bertii;ch oderb IJh te rtisch) im
fTii;cfh e ie n R 3u iri zu nontiereh.
5.3 Gerätemontage
vorbereiten
♦ Gciiil ftll- :v Й :
я KIh : )|)(! " h v( ):t i /к ;h( ;r i.
b 1<1й:)|)(! "A(\i un.:^n •:i'*hcri.
c ¡;r.."g4Si.htrtijh(; 1ом;п.
d fici'Hlck^pp:^ H:jnchiv:v..
♦ 4üco .v3nc-U ntertei! аЬ пеЬ гге^ E
а B e ide Р л ^яг^гке п dnü c^e n .
b Ч й со.'/зпс Jnteriei! n a ch \<orr.e
abnehrre h.
♦ B e fe sd g jh^jji^A bel E (IS ) e n t'e ineh .
5.4 Aufhängeleiste befesti
gen E
♦ B c h •; G C h & ■ fij' d e A ufhängeleisie rr г
H ife d e ' be liegenden M ontagesc':< *.b lone
dm en .
r;
' /V:l"iin;r(; :iiv|(! in'l V Fc l f>i..h(:n i.n:l
3..:j!iln (|r(;hórx:ri nk /um I i(:’(:ri.riUi'.j}¡
••ind :in '|: !"'hcn(l :k:rri W(:r-;'-l()’'‘(/:T
¡sr.. -^^w<r :l•//hIk.v ’: h:.íí(;s ij^cn.
5.5 AnscHlusskabel abiängen
' Ansí • luxihcl abla^ge'
H '•vv^e « .
<.ip je (a ) dient < *.ls '^onf.^h K e ce s A n-
sd iLss'o b e s.
5.6 Gerätemontage IñJ
♦ D as E le ktro a n sch L ss^a b e c^rch die
K a be tvile (6) führe n u n d d ie P ,üco .v¿ n d
übe'd e ' G ew in c e b o lze n d e rA uM hj?e
le ste c rücke'.
« G erä t n o rrtie 'e'.ce' B efedg.'g soie be l
(15) c-e fe s:ige h .
5.7 Wasseranschluss !&
W ich tige H in w eise;
i^ltw asse rzu leitu n g g ründlich s p ü *
^lenl
D as m it^lie fe rce S ie b u n d F orm stüc k (2 2
und 23. Beutel an KW-Anschluss) muss
immer in dem KW-Schraiibanschluss ein
gebaut werden. Bei Austauscli-lnsull%tion
ist das Vorhandensein des Siebes zu prüfen.
D ie 3 -W cgc-A bsp crrung (5 ) <farf nicht
zu m D ro sseln d e s D urd xfiu sses verw end e t
w erd e n '
5.8 Elektrischer Anschluss
* D zs E lektro a '.sch usskabel zn die
•«Ü e'n rrleiin:« anschl'eß e n (sie'e E le ^tx
schatda' ffl).
Wichtige Hinweise:
/\ D ie S ch u tzart IP 25 (strahlw asscrge-
schützt) ist nur bei sa chgem äß m on*
tie rte r lO ib e ltülle E ein e rA b d ich*
tung am K abelm an te l gew ährleistet.
Das Geiat muss an den SchuQleiter ange-
schlossen weiden.
5.9 Montage abschließen
1. ^W:c!>Ahs|)crrti. :g (K'hcn E (S)-
2. P .vC kw a'd U nte rte il m o rrJeren E (3 )
5.10 Erstinbetriebnahme
(d/tf i nurdijit'; eine;: I a: hrr Hiin ::r{r:-lg(;ri!l
O befülien und entlüften.
AchtungTrockengan^efahrt
Alle angcschlos&cncn ^pfvcntilc so
lange mchi*fach öffnen und schließen,
bis das Leitungsnetz und das Gerät
luftf.'ci &ind. Luft siehe Hinweis
„4.2 Wichtige Hinweise*^
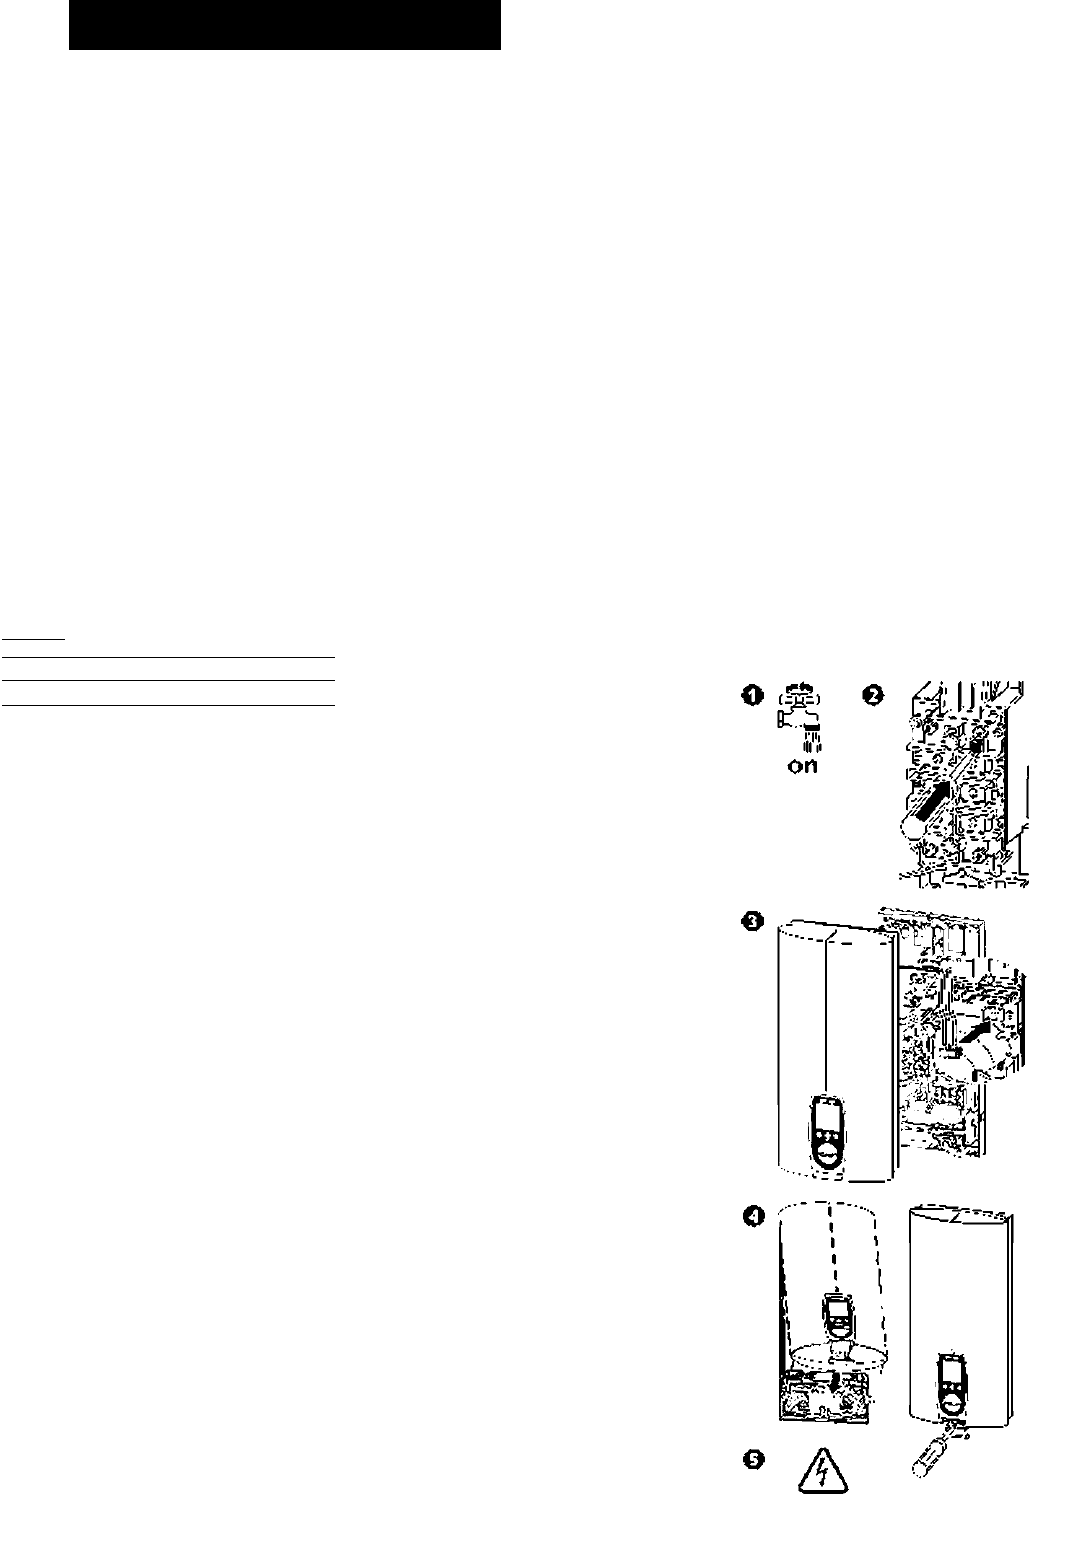
0 S icherheicssc h aJ ter akd vie re n t
Der DHE ...SLi electronic comfort
wird mit ausgelöstem Sicherheitsschal*
ter (AE 3) ausgeliefert (Rücksetztaste
eindrückenl.
^ Stecker vom SollwcregcbcHtabcl
auf die Elektronik stecken!
O Gerätelutppe montieren und mit
Schraube befestigen!
O Netzspannung cinschaltcn!
0 Arbeitsweise des Durchlauferv
hitzers prüfen!
01 S ch u e zfotie vom B e die n te n
abziehen.
Uber^^be des Gerätes!
I3c*ri Rcfiul/iTilic hinkl'f:-" (ics fic;?!:«
(:rkxrx:n und ri I ilcir. Gcbm..: h ••Ai'l aiil
nw "V.
W ich tige H in w eise:
* 3(:n lk:"..lA:r Hu"fTi-:)gi(hc Ci::i«lifx:;:
I li • \vx :is( !f I (V( :r: in'il ii i; :c.
* '3 niO; An%v::i'-..ng /..rsn^gliil igc" A..i-
I x;\VH • • r.: • g ..: i:.:rv n:n.
on