
Instructions / Assembly


www.stiebel-eltron-usa.com Accelera® 220-300 E | 31
ENGLISH
INSTALLATION
Maintenance and cleaning
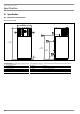
16.5 Descaling the electric booster element
Only descale the flange of the electric booster element after re-
moving it, and never treat the interior of the DHW tank and the im-
pressed current anode with descaling agents. The electric booster
element is screwed into the appliance at a central point at the top.
D0000034799
1
1 Electric booster element with protective anode
16.6 Protective anode
The flange of the electric booster element is equipped with a
protective anode that protects the appliance from corrosion while
it is connected to the power supply. The protective anode is a
maintenance-free impressed current anode.
If a fault code in the display indicates that the protective anode is
faulty, proceed as follows:
f Remove the controller of the electric booster element.
f Check the protective anode connector and its wiring.
f Refit the controller of the electric booster element.
16.7 Valves
Regularly check the system's valves (safety valve, pressure reduc-
ing valve, drain valve, vacuum breaker, mixing valve), to ensure the
operational reliability of the appliance. The amount of lime-scale
deposits depends on local water quality.
f Check all valves in the system and remove lime-scale
deposits.
f Replace the valves if necessary.
f Check the function of the valves.
16.8 Replacing the power cable
WARNING Electrocution
If the power cable is faulty, replace it with a new one.
The power cable should only be replaced by a qualified
contractor. Please contact Stiebel Eltron at 800.582.8423
16.9 Fitting the casing ring
WARNING Electrocution
f Reconnect the ground wire to the casing ring.
D0000034814
f Fit the upper casing ring. The casing ring overlaps along the
joint. A tab on one end clips into the recess on the other end
of the casing ring.
f Secure the casing ring with fixing screws.
f Fit the pipe collar of the condensate drain and the conden-
sate drain bend.
16.10 Fitting the appliance cover
WARNING Electrocution
f Reconnect the ground wire to the appliance cover.
f Place the lid back on the appliance top.
f Connect the ground cable to the signed ground terminal.
f Connect the cable linking the control with the appliance ECB
to the back of the panel.
f Insert the control panel.
f Secure the appliance cover and the control panel using the
screw at the top of the control panel.