
Instructions / Assembly


www.stiebel-eltron-usa.com Accelera® 220-300 E | 23
ENGLISH
INSTALLATION
Installation
11. Installation
!
WARNING Injury
Incorrect installation can lead to serious personal injury
or material losses.
Before any work, ensure sufficient clearances for the
installation.
Handle sharp-edged components carefully.
11.1 Water connection
!
Material losses
Carry out all water connection and installation work in
accordance with local plumbing regulations.
!
Material losses
The corrosion protection provided by the anode can only
be guaranteed when the electrical conductivity of the do-
mestic hot water is within the limits stated in the chapter
17.3, “Data table”, pg. 35.
The following material combinations are approved for pipework
installations:
Cold water inlet DHW outlet
Copper pipe Copper pipe
Steel pipe Steel pipe or copper pipe
PEX tubing PEX tubing
f Thoroughly flush the pipework before connecting the ap-
pliance. Foreign bodies, such as welding pearls, rust, sand
or sealant can impair the operational reliability of the
appliance.
!
Material losses
To protect the connection nipples against corrosion the
water tube connection must be made with plumber’s
thread seal tape (PTFE). The use of hemp on nipple
threads is not permissible due to risk of corrosion.
11.1.1 Safety valve
The appliance is a sealed unvented DHW tank. The appliance is
supplied with a temperature and pressure relief valve that has
been factory installed and leak-tested.
f Install a type-tested safety valve in the cold water supply
line. The response pressure of the safety valve must be below
or equal to the permissible operating pressure of the DHW
tank.
The safety valve protects the appliance against unacceptable ex-
cess pressure.
f Ensure that the expansion water escaping from the safety
valve can drip into a drain, e.g. a tank or sink.
Ensure the drain cannot be shut off.
f Size the drain in a way that water can drain off unimpeded
when the safety valve is fully opened.
f Ensure that the discharge pipe of the safety valve is open to
atmosphere.
f Fit the discharge pipe of the safety valve with a constant
downward slope and in a room free from the risk of frost.
11.1.2 Pressure reducing valve
Note
A 70 psi (4.8 bar) pressure reducing valve must be in-
stalled to ensure the pressure of the incoming water line
never exceeds 70 psi (4.8 bar).
11.1.3 Check valve
Install a check valve in the cold water line (after the pressure re-
ducing valve if installed). This check valve is necessary to prevent
water from flowing backwards into the cold water piping.
11.1.4 Drain valve
Install a suitable drain valve at the lowest point in the cold water
inlet line.
11.1.5 Thermal insulation
Insulate the DHW line against heat loss in accordance with locally
applicable regulations.
11.1.6 Recirculation loop
Stiebel Eltron advises against the installation of this appliance in
any recirculation loop. If a recirculation loop is required, you may
plumb the return line of the recirculation loop back in through the
T&P valve port of the appliance. The T&P valve may not be omitted
so a Tee must be used in this configuration. Be sure that the T&P
valve probe is submerged sufficiently.
Always install a recirculation loop with a thermostat cut-off or a
timer. Installation without these devices will cause the appliance
to run continuously, resulting in high electricity use and extended
compressor run times which will reduce the life of the appliance
and void the warranty.
Note
The Accelera energy efficiency will drop when installed
with a recirculation loop due to the reduction in thermal
stratification of the tank. Contact Stiebel Eltron technical
support for additional questions.
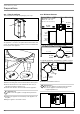
11.2 Condensate drain
Install a condensate drain hose to remove the condensate which
forms.
f Connect the condensate drain included in the standard deliv-
ery to the “condensate drain” connection.
f Connect a condensate drain hose to the condensate drain
bend.