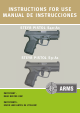
Instructions for Use Manual de instrucciones STEYR PISTOL S40-A1 STEYR PISTOL S9-A1 IMPORTANT READ BEFORE USE! ImportanteFavor leer antes de utilizar!
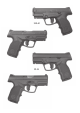
S40-A1 S9-A1
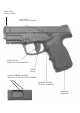
STEYR S40-A1 REAR SIGHT ALZA TRASERA DISASSEMBLY LEVER PALANCA DE DESMONTAJE ACCESSORY MOUNT SOPORTE PARA ACCESORIO LIMITED ACCESS LOCK WITH KEY PULSADOR PARA LLAVE
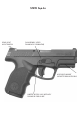
FRONT SIGHT PUNTO DE MIRA SLIDE CATCH PALANCA DE RETENCIÓN TRIGGER SAFETY SEGURO DE REINICIALIZACIÓN TRIGGER GATILLO LOADED CHAMBER INDICATOR INDICADOR DE CARTUCHO EN RECAMARA MAGAZINE RELEASE RETÉN DEL CARGADOR MAGAZINE CARGADOR
Dear Customer, STEYR Pistols have the highest standards in performance, safety and reliability. Advanced safety features, perfect ergonomics and a revolutionary sight are part of the unique STEYR pistol design. Highest quality standards are assured by STEYR MANNLICHER’s certification according to the Quality standard ISO 9001. Apreciado cliente, Las pistolas STEYR satisfacen los requisitos de calidad mas elevada en cuanto a su performance, seguridad y confianza.
ENGLISH Owner’s Manual STEYR PISTOLS This manual and the warnings contained herein must be read and understood before using your pistol. This manual familiarizes the user with the function and the handling of the pistol and warns of the potential dangers of misuse that may lead to accidents or injuries. This manual should always accompany this firearm and be transferred with it upon change of ownership, or when the firearm is loaned or presented to another person.
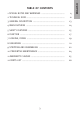
1 SPECIAL NOTES AND WARNINGS ....................................... 4 2 TECHNICAL DATA ............................................................... 11 3 GENERAL DESCRIPTION ..................................................... 13 4 MAIN FEATURES ................................................................ 14 5 SAFETY FEATURES ............................................................ 15 6 FUNCTION .........................................................................
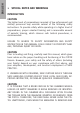
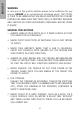
ENGLISH 1 SPECIAL NOTES AND WARNINGS INTRODUCTION CAUTION The higher level of preparedness required of law enforcement and military personnel may override several of the following safety instructions. To provide safety while operating at a higher level of preparedness, proper oriented training and a reasonable amount of periodic training, which stresses safe tactical procedures, is recommended.
YOU MUST VERIFY THAT THE CHAMBER IS ALSO EMPTY BEFORE FIELD STRIPPING THE FIREARM FOR CLEANING OR ANY OTHER REASON. WARNING IF THE STEYR PISTOL OR ANY OTHER FIREARM IS CARELESSLY OR IMPROPERLY HANDLED, THE USER COULD CAUSE AN UNINTENTIONAL DISCHARGE, WHICH COULD RESULT IN DEATH, SERIOUS INJURY AND/OR PROPERTY DAMAGE. SAFETY INSTRUCTIONS We want you to enjoy shooting your STEYR pistol, but we want you to enjoy it safely.
ENGLISH WARNING In case any of the pistol’s safeties proves to be ineffective for any reason, DANGER of an unintentional discharge exists. THE PISTOL IS THEN TO BE IMMEDIATELY UNLOADED AND RESTRICTED FOR ANY FURTHER USE. MAKE SURE THAT YOUR PISTOL IS PROPERLY REPAIRED AND CHECKED BY STEYR AUTHORIZED PERSONNEL BEFORE USING IT AGAIN! GENERAL PRECAUTIONS 1 ALWAYS HANDLE YOUR PISTOL AS IF IT WERE LOADED SO THAT YOU NEVER FIRE ACCIDENTALLY. 2 NEVER POINT YOUR PISTOL AT ANYTHING YOU DO NOT INTEND TO SHOOT.
9 ALWAYS BE ABSOLUTELY SURE OF YOUR TARGET AND THE AREA BEHIND IT BEFORE YOU SQUEEZE THE TRIGGER. A BULLET COULD TRAVEL THROUGH OR PAST YOUR TARGET UP TO 2 MILES (APPR. 3 KM). IF IN DOUBT DO NOT SHOOT. 10 ALWAYS PUT A RESPONSIBLE AND COMPETENT PERSON IN CHARGE TO MAINTAIN SAFETY DISCIPLINE AND CONTROL WHEN A GROUP IS FIRING ON A RANGE, TO REDUCE THE LIKELIHOOD OF ACCIDENTS. 11 ALWAYS CARRY YOUR PISTOL EMPTY AND OPEN WHILE ON A PUBLIC OR CLUB RANGE UNTIL PREPARING TO FIRE.
ENGLISH INDENT ON PRIMER APPEARS NORMAL (IN COMPARISON WITH SIMILAR PREVIOUSLY FIRED ROUNDS) ASSUME FAULTY AMMUNITION. SEPARATE ROUND FROM OTHER LIVE AMMUNITION AND EMPTY CASES, RELOAD AND CARRY ON FIRING. NOTE: Dispose of misfired rounds in accordance with ammunitionmanufacturer’s instruction. 16 NEVER FIRE YOUR PISTOL NEAR AN ANIMAL UNLESS IT IS TRAINED TO ACCEPT THAT NOISE, AN ANIMAL’S STARTLED REACTION COULD INJURE IT, OR CAUSE AN ACCIDENT.
23 ALWAYS KEEP CLEAR AND KEEP OTHERS CLEAR OF THE EJECTION PORT, AS SPENT CARTRIDGES ARE EJECTED WITH ENOUGH FORCE TO CAUSE INJURY. NEVER PLACE FINGERS IN EJECTION PORT OR ON HOT SLIDE OR BARREL DURING OR AFTER FIRING, AS THEY COULD BE BURNED BY HOT METAL. 24 NEVER PLACE FINGERS IN THE EJECTION PORT. THEY COULD BE INJURED BY THE SLIDE MOVING FORWARD UNINTENTIONALLY. 25 ONLY USE HIGH QUALITY COMMERCIALLY MANUFACTURED AMMUNITION IN EXCELLENT CONDITION AND IN THE CALIBER OF YOUR PISTOL.
ENGLISH CAUTION TO MINIMIZE RISK OF AN UNINTENTIONAL DISCHARGE (AND DAMAGE), LOAD LIVE AMMUNITION INTO THE PISTOL ONLY WHEN YOU ARE ABOUT TO SHOOT. 1 ALWAYS STORE YOUR PISTOL AND AMMUNITION IN SEPARATE LOCKED RECEPTACLES, OUT OF SIGHT AND REACH OF CHILDREN. 2 NEVER LEAVE YOUR PISTOL UNCONTROLLED. UNAUTHORIZED PERSONS, ESPECIALLY CHILDREN, COULD BELIEVE THE WEAPON IS A TOY AND FIRE IT. 3 ALWAYS STORE AND TRANSPORT YOUR PISTOL UNLOADED WITH ACTIVATED LIMITED ACCESS LOCK ENGAGED.
ENGLISH 2 TECHNICAL DATA S 9-A1 Caliber 9 x 19mm Magazine capacity 10 Weight (without magazine) 23,43oz / 664g Weight of empty magazine 2,64oz / 75g Length/slide 6,55inch / 166,5mm Height 4,84inch / 123mm Width 1,18inch / 30mm Length of sight 5,85inch / 148,5mm Barrel length 3,62inch / 92mm Barrel profile 6 lands and grooves, Right handed Trigger system Reset Action System (special double action system) 0,15 inch / 4 mm Trigger travel (constant) Trigger pull (constant) 5,51 lb Rese
ENGLISH S40-A1 Caliber .
The semi automatic STEYR pistols are mechanically locked, recoil-operated handguns featuring the following: • • • • • • Compact dimensions Ergonomically shaped synthetic grip frame Reset-action trigger system Individual selection of safety condition Loaded chamber indicators Triangular/trapezoid sight S40-A1 13 ENGLISH 3 GENERAL DESCRIPTION
ENGLISH 4 MAIN FEATURES GRIP The synthetic grip features a grip angle designed for optimal pointing, an ergonomical shape for perfect comfort in operation and handling, as well as devices for the mounting of accessories onto Picatinny rail. SLIDE The slide boasts an extremely low height, positively affecting recoil and aiming characteristics of the pistol. Among others, it features two loaded chamber indicators showing whether a cartridge is loaded in the chamber.
• • • • • • • • • 1 Pistol with magazine 1 Spare magazine 2 Keys for the integrated limited access lock 1 Owner’s Manual 1 Basic Rules of Safety 1 Firearms Safety Awareness Form 1 Warranty Business Reply Card 2 Padlocks with Keys 1 Pistol box 5 SAFETY FEATURES The pistol features 2 SAFETY CONDITIONS. With these safety options the user can choose a safety condition to his personal requirements.
ENGLISH SAFETY CONDITION 1 Reset Action Safety (Trigger, drop, and indirect firing pin safety) These safeties can only be deactivated upon depressing the trigger in its rearmost position. SAFETY CONDITION 2 Integrated limited access lock with key This lock is activated and deactivated by using a separate key. In locked position, it will lock the trigger, and prevents disassembly of the pistol. However, this safety can only be engaged after the action has been moved.
ENGLISH 6 FUNCTION PISTOL LOADED – SAFETY CONDITION 1 The pistol is loaded, i.e. a cartridge is located in the barrel, the firing pin is cocked, the trigger is in foremost position, the Reset Action Safety System with trigger, drop, and indirect firing pin safety are activated. The loaded chamber indicator is visibly and can be felt with the hand/finger. To fire a shot, press the trigger to its rear most position, using the trigger finger.
ENGLISH PISTOL LOADED – SAFETY CONDITION 2 With the pistol in SAFETY CONDITION 1 or in SAFETY CONDITION 2 integrated limited access lock is activated by inserting a key into the openings, press, and lock by turning the key towards the letter „S“ (Safe) on the grip frame. This will block the trigger system and prevent disassembly of the pistol. To deactivate the functional key lock, press the inserted key and unlock by turning it towards the letter „F“ (Fire) on the grip frame.
To fill the magazine, press each cartridge into the magazine from the front - with the cartridge bottom first - against the force of the magazine spring. Insert the magazine into the magazine shaft until the magazine release lock catches. Hold the pistol with the firing hand, pull slide fully back with the other hand and release again to return it into initial position. While doing so, the trigger finger of the firing hand must be kept away from the trigger. The pistol is in SAFETY CONDITION 1.
ENGLISH After having fired the last cartridge the slide will remain in open position. Press the magazine release to remove the empty magazine from the pistol. Insert new magazine as described above and either press slide catch lever down to release slide and return it into its original position, OR pull the slide back until the slide stops, the same way as for loading, and release it again to return it to its original position. The pistol is again in SAFETY CONDITION 1.
Remove the magazine by pressing the magazine release. Retract slide to eject the cartridge lodged in the barrel. Check to make sure that no cartridge is lodged in the barrel. Release slide to return it into its original position. The pistol may also be unloaded in SAFETY CONDITION 2.
ENGLISH 9 STRIPPING AND ASSEMBLING For cleaning, strip the pistol as follows: Remove magazine. Check to make sure that no cartridge is lodged in the barrel. Pull trigger. 1. Press functional key lock with the thumb of your firing hand and hold pressed. 2. Swing disassembling lever down. 3. Pull off the slide.
Hold barrel on bolt lock, lift and remove from slide by pulling it up and back. To reassemble proceed in the reverse order of stripping. Main parts for cleaning. 23 ENGLISH Lift closing spring and remove slide.
ENGLISH 10 PREVENTIVE MAINTENANCE After firing, it is recommended to clean the main parts of the pistol, slide, rails especially the barrel, and the area of the slide catch must be free of dirt and residues (refer to illustrations beside). Before assembling the pistol, a thin film of gun oil shall be applied on the firing pin, bolt lock guides, and the outside of the barrel in the front area (refer to illustration beside).
Any disassembly of the pistol by the purchaser or third parties beyond that described in these Instructions for Use resulting in damage or functional failure, due to inexpert handling or incomplete reassembly and with consequential failure of safety devices, will invalidate any guarantee and liability claims of the purchaser for resulting material damage or personal injuries. Any modification of the basic design will automatically invalidate any guarantee claims.
ENGLISH 12 PARTS LIST ITEM DENOMINATION STANDARD QUANTITY 1 BARREL 1 pcs. 2 FRAME 1 pcs. ASSY A MAGAZINE RELEASE ASSEMBLY 1 pcs. 3 * MAGAZINE RELEASE 1 pcs. 4 * MAGAZINE RELEASE REST 1 pcs. 5 * MAGAZINE RELEASE SPRING 1 pcs. ASSY B MULTIFUNCTION ELEMENT WITH EJECTOR 1 pcs. 6 * MULTIFUNCTION ELEMENT 1 pcs. 8 * EJECTOR 1 pcs. 9 * EJECTOR/DROP SAFETY LEVER ISO 8748 - 2,5x6 ST 2 pcs. 7 DISASSEMBLY LEVER 1 pcs. 10 CATCH 1 pcs. 11 LEVER 1 pcs.
DENOMINATION STANDARD QUANTITY ASSY D KEY LOCK ASSEMBLY 1 pcs. 23 * KEY LOCK 1 pcs. 24 * KEY LOCK SPRING 1 pcs. 30 SLIDE CATCH 1 pcs. 31 SLIDE CATCH SPRING 1 pcs. 32 DROP SAFETY 1 pcs. 33 SLIDE 1 pcs. 34 FRONT SIGHT 1 pcs. 35 REAR SIGHT 1 pcs. ASSY G EXTRACTOR ASSEMBLY 1 pcs. 39 * EXTRACTOR 1 pcs. 40 * EXTRACTOR PIN 1 pcs. 41 * EXTRACTOR SPRING 2 pcs. 42 SLIDE PLATE 1 pcs. 43 FIRING PIN 1 pcs. 44 FIRING PIN SPRING GUIDE 1 pcs.
Instrucciones de funcionamiento ESPAÑOL PISTOLA STEYR Antes de utilizar esta pistola debe leer y entender este manual y las advertencias contenidas en el mismo. Este manual familiariza al usuario con el funcionamiento y el manejo de la pistola y le previene frente a peligros potenciales debidos a la utilización incorrecta que puede provocar accidentes o lesiones.
1 NOTAS ESPECIALES Y ADVERTENCIAS .................................. 30 2 DATOS TÉCNICOS ................................................................. 39 3 DESCRIPCIÓN GENERAL ....................................................... 41 4 CARACTERÍSTICAS PRINCIPALES .......................................... 42 5 DISPOSITIVOS DE SEGURIDAD ............................................. 43 6 FUNCIONAMIENTO ................................................................ 45 7 CARGAR Y DÍSPARAR .....
1 NOTAS ESPECIALES Y ADVERTENCIAS INTRODUCCIÓN ESPAÑOL PRECAUCION La cada vez mayor disponibilidad para entrar en acción que se exige de las fuerzas policiales, los servicios de seguridad y el personal militar puede implicar que algunas de las siguientes disposiciones e instrucciones de seguridad no puedan respetarse.
CUANDO SE QUITA O INSERTA UN CARGADOR LLENO O VACÍO, ES POSIBLE QUE HAYA UNA BALA EN LA RECAMARA. ESTA BALA QUE SE ENCUENTRA EN LA RECAMARA SE DISPARARÁ EN EL MOMENTO DE PRESIONAR EL GATILLO CON EL CARGADOR INSERTADO O FUERA DE LA PISTOLA.
ESPAÑOL ADVERTENCIA LAS PISTOLAS STEYR CUENTAN CON DISTINTOS DISPOSITIVOS INTERNOS Y, OPCIONALMENTE, CON UN SEGURO MANUAL PARA EVITAR CUALQUIER DISPARO ACCIDENTAL EN CASO DE QUE LA PISTOLA CAIGA O RECIBA UN FUERTE GOLPE EN LA BOCA O EN SU PARTE DELANTERA O TRASERA. PARA MINIMIZAR EL RIESGO DE ACCIDENTES, EL USUARIO DEL ARMA DEBERÁ ACTUAR CON LA MÁXIMA PRECAUCIÓN Y CUMPLIR ESTRICTAMENTE LAS INSTRUCCIONES DE SEGURIDAD Y TODAS LAS DEMÁS INSTRUCCIONES CONTENIDAS EN ESTE MANUAL.
PRECAUCIONES GENERALES 2 NO APUNTE NUNCA SU PISTOLA A NINGUNA COSA A LA QUE NO PRETENDA DISPARAR. 3 NO CREA NUNCA EN LA PALABRA DE ALGUIEN QUE LE DIGA QUE SU ARMA ESTA DESCARGADA. COMPRUEBELO USTED MISMO CON LOS DEDOS FUERA DEL GATILLO Y EL ARMA APUNTADA EN UNA DIRECCION SEGURA. 4 ASEGURESE SIEMPRE DE QUE EL CAÑÓN Y EL DISPOSITIVO DE ACCIONAMIENTO ESTEN LIBRES DE OBSTRUCCIONES. LIMPIE INMEDIATAMENTE LAS OBSTRUCCIONES PARA QUE LA PISTOLA FUNCIONE CORRECTAMENTE Y DE FORMA SEGURA.
ESPAÑOL 8 ANTES DE INICIAR SU PRÁCTICA DE TIRO, ASEGÚRESE SIEMPRE DE QUE SU TOPE DE RETENCIÓN SEA ADECUADO PARA PARAR Y CONTENER BALAS, PARA QUE NO IMPACTE CONTRA NADA QUE SE ENCUENTRE FUERA DEL AREA DE DISPARO. 9 ESTÉ SIEMPRE SEGURO DE SU BLANCO Y DEL ESPACIO DETRÁS SUYO ANTES DE APRETAR EL GATILLO. UNA BALA PUEDE ATRAVESAR Y LLEGAR HASTA 2 MILLAS (APROX. 3 KM) DETRÁS DEL BLANCO. EN CASO DE DUDA, NO DISPARE.
NOTA: Elimine las balas que no se hayan disparado correctamente de acuerdo con las instrucciones del fabricante de la munición. 16 NO DISPARE NUNCA SU PISTOLA CERCA DE UN ANIMAL, A MENOS QUE HAYA SIDO ENTRENADO PARA HABITUARSE A ESTE RUIDO. LA REACCIÓN DE SOBRESALTO DEL ANIMAL PUEDE HERIRLO O PROVOCAR UN ACCIDENTE. 17 NUNCA CAMINE, ESCALE, SIGA UN COMPAÑERO O CAZE CON SU PISTOLA A PUNTO PARA SER DISPARADA, FUERA DE SU FUNDA.
ESPAÑOL CAPACIDAD DE RAZONAMIENTO PUEDEN VERSE SERIAMENTE ERJUDICADOS, POR LO QUE EL MANEJO DE SU ARMA SERA INSEGURO. 20 SI ESTA MEDICANDOSE, CONSULTE SIEMPRE A SU MÉDICO, PARA GARANTIR QUE ESTÁ PREPARADO PARA DISPARAR Y MANEJAR SU PISTOLA DE FORMA SEGURA. 21 CUANDO DISPARE LLEVE SIEMPRE PROTECCIÓN PARA LOS OIDOS, SOBRE TODO DENTRO DE UN CAMPO DE TIRO.
25 UTILICE UNICAMENTE MUNICIÓN DE ALTA CALIDAD, FABRICADA COMERCIALMENTE EN CONDICIONES EXCELENTES Y DEL CALIBRE DE SU PISTOLA. EL USO DE MUNICIÓN RECARGARDA ANULARÁ LA GARANTÍA, DEBIDO AL HECHO DE QUE NO HAY FORMA DE VERIFICAR LAS NORMAS (SAMI/CIP) A LAS QUE UNO SE HA ADHERIDO, DEBIDO A QUE LAS RECARGAS O LA MUNICIÓN DE MALA CALIDAD, EN OCASIONES, NO REQUIERE ESPECIFICACIONES (SAMI/CIP), EXCEDE LOS LÍMITES Y PUEDE SER NO SEGURA.
PRECAUCIÓN ESPAÑOL PARA MINIMIZAR EL RIESGO DE DISPARO INVOLUNTARIO (Y DE DAÑOS) CARGUE LA PISTOLA ÚNICAMENTE CUANDO ESTÉ A PUNTO DE DISPARAR. PRECAUCIONES ESPECIALES EN LAS CONDICIONES DE S GURIDAD 3 RELATIVAS A NIÑOS 1 GUARDE SIEMPRE SU PISTOLA Y MUNICIÓN EN RECIPIENTES SEPARADOS Y CERRADOS, FUERA DE LA VISTA Y ALCANCE DE LOS NIÑOS. 2 NO DEJE NUNCA UNA PISTOLA SIN VIGILAR; ALGUIEN, ESPECIALMENTE UN NIÑO, PUEDE DISPARARLA, CREYENDO QUE ES UN JUGUETE.
DATOS TÉCNICOS S 9-A1 Calibre 9 x 19 mm Capacidad del cargador 10 Peso (sin cargador) 23,43 oz / 664 g Peso del cargador vacío 2,64 oz / 75 g Longitud/corredera 6,55 inch / 166,5 mm Altura 4,84 inch / 123 mm Anchura 1,18 inch / 30 mm Longitud del sistema de 5,85 inch / 148,5 mm puntería for Distancias entre miras Longitud del cañón 3,62 inch / 92 mm Tipo de estriado 6, Caras poligonale Sistema de accíón de reinicializació Sistema de accionamiento „Reset“ (sistema de doble accíon especia
S40-A1 Calibre .
3 DESCRIPCIÓN GENERAL • Medidas compactas. • Empuñadura de polímero con forma ergonómica. • Mecanismo de disparo Reset Action (acción de reinicialización). • Estado de seguridad individualmente personalizada. • Indicador de bala en recamara. • Dispositivo para aparatos de puntería.
4 CARACTERÍSTICAS PRINCIPALES ESPAÑOL EMPUÑADURA La empuñadura de plástico presenta un práctico ángulo de agarre que permite apuntar el arma con toda seguridad, una forma ergonómica para una mejor sujeción y una mayor comodidad de uso, así como algunos dispositivos para el montaje de accesorios mediante un carril Picatinny. CORREDERA El eje de corredera y cañón de poca altura reduce considerablemente el retroceso y facilita la puntería.
• • • • • • • • • 5 1 pistola con cargador 1 cargador adicional 2 llaves para de bloqueo 1 manual del usuario 1 Basic Rules of Safety 1 Firearmes Safety Awareness Form 1 Warranty Business Reply Card 2 Padlocks with Keys 1 caja de transporte DISPOSITIVOS DE SEGURIDAD La pistola dispone de 2 opciones de seguridad. El usuario puede adecuar el estado de seguridad de la pistola a sus necesidades personales.
ESPAÑOL ESTADO DE SEGURIDAD 1 Seguro “Reset Action“ (Seguros de gatillo, seguro indirecto de percutor y seguro contra caídas) Estos seguros se desactivan automáticamente al presionar la lengueta central del gatillo. Posibilitando un disparo rápido y seguro. ESTADO DE SEGURIDAD 2 Bloqueo integrado de funciones mediante llave Este bloqueo se activa o desactiva mediante una llave y evita, en el estado bloqueado, la acción de disparo y el desmontaje de la pistola.
6 FUNCIONAMIENTO ARMA CARGADA – El arma está cargada, es decir, en el cañón hay un cartucho, el percutor está tensado, el gatillo se encuentra en su posición más adelantada, los seguros de gatillo, caída y percutor están activados. El indicador del estado de carga sale de forma visible y perceptible hacia atrás. El disparo se produce cuando el dedo del gatillo del disparo lleva al gatillo a su posición más posterior y, con ello, desactiva simultáneamente los seguros de gatillo, caída y percutor.
ESPAÑOL ARMA CARGADA ESTADO DE SEGURIDAD 2 Con la pistola en los posiciones de seguridad 1 ó 2 el mecanismo de acceso integrado se activa insertando la llave en las aberturas, presionando y girando en direccion a la letra ”S” (seguro) imposibilitando el disparo y el desmontaje de la pistola. Para desactivar el bloqueo introduzca la llave presione y gire en el sentido de la letra ”F” (fuego).
7 CARGAR Y DISPARAR Introduzca el cargador dentro de su alojamiento, hasta que se enclave en la retención del cargador. Agarre el arma con la mano que va a disparar y con la otra mano tire hacia atrás de la corredera hasta el tope y deje que se adelante hasta la posición de salida. Durante este procedimiento, el dedo del gatillo de la mano que va a disparar se encuentra fuera del área del gatillo. El arma se encuentra en el ESTADO DE SEGURIDAD 1.
ESPAÑOL Tras el último cartucho, la corredera queda retenida en la posición abierta. Quite el cargador vacío presionando la retenida del cargador hacia fuera del arma. Introduzca el cargador nuevo, tal como se ha descrito, y, o bien presione hacia abajo la traba de la corredera y, con ello, se deja avanzar la corredera hasta la posición de salida, O BIEN tire hacia atrás la corredera hasta el tope, como en el procedimiento de carga, y déjela avanzar hasta la posición de salida.
8 DESCARGAR ESPAÑOL Saque el cargador presionando su retención. Tire hacia atrás la corredera para expulsar el cartucho que se encuentra en el cañón. Compruebe que no haya ningún cartucho más en el cañón. Deje avanzar la corredera hasta la posición de salida y accione el gatillo.
9 DESMONTAJE Y MONTAJE ESPAÑOL El desmontaje para la limpieza debe efectuarse de la forma siguiente: Quite el cargador. Compruebe que no haya ningún cartucho en el cañón. Presione el gatillo. Presione hacia abajo, manteniendo la presión, el dispositivo de bloqueo del funcionamiento mediante llave con el pulgar de la mano de disparo. Haga girar hacia abajo el eje de desmontaje. Deslice la corredera hacia delante, desde la empuñadura.
ESPAÑOL Levante la guía y resorte de la corredera y extráigala de la misma. Agarre el cañón por el enclavamiento, levántelo y tírelo hacia atrás y arriba. El montaje se realiza en orden inverso. Componentes principales para la ejecución de la limpieza.
ESPAÑOL 10 MANTENIMIENTO Tras efectuar disparos hay que limpiar los componentes principales del arma, especialmente el cañón, la corredera y el entorno de la pieza de retención, que deben estar libres de suciedades y de restos (véa las figuras adjuntas). Antes del montaje debe aplicarse a las piezas siguientes una película fina de aceite para armas: percutor, guía del cierre y la parte exterior del cañón, en el área delantera. (Véa la figura adjunta).
INDICACIONES RELATIVAS A LA SEGURIDAD Y A LA GARANTÍA Cualquier desmontaje de la pistola por parte del comprador o por parte de terceros efectuado más allá de lo descrito en estas Instrucciones de funcionamiento, que provoque daños o fallo en el funcionamiento debido a un manejo inexperto o un ensamblado incompleto con fallos resultantes de los dispositivos de seguridad, invalidará toda garantía y reclamaciones de responsabilidad por parte del comprador en cuanto a daños materiales o lesiones personales re
12 LISTA DE PIEZAS DE REPUESTO POS. DENOMINACIÓN NORMA NÙMERO ESPAÑOL 1 CAÑÓN 1 Unid. 2 FRAME O EMPUÑADURA 1 Unid. CONJUNTO A CONJUNTO DE RETÉN DE CARGADOR 1 Unid. 3 * RETÉN DE CARGADOR 1 Unid. 4 * SOPORTE DE RETÉN DE CARGADOR 1 Unid. 5 * RESORTE DE RETÉN DE CARGADOR 1 Unid. CONJUNTO B ELEMENTO MULTIFUNCIONAL CON EYECTOR 1 Unid. 6 * ELEMENTO MULTIFUNCIONAL 1 Unid. 8 * EYECTOR 1 Unid. 9 * PERNOS DE EYECTOR Y SEGURO DE CAÍDAS ISO 8748 - 2,5x6 ST 2 Unid.
POS. DENOMINACIÓN NORMA NÙMERO 30 RETENCIÓN DE LA CORREDERA 1 Unid. 31 RESORTE DE RETENCIÓN DE LA CORREDERA 1 Unid. 32 SEGURO CONTRA CAÍDAS 1 Unid. 34 GUIÓN 1 Unid. 35 ALZA 1 Unid. GRUPO F CONJUNTO DE INDICADOR DE CARTUCHO EN RECÁMARA 1 Unid. 36 * INDICADOR DE CARTUCHO EN RECÁMARA 1 Unid. 37 * ARANDELA DE RETENCIÓN DIN 6799-1,9-ST 1 Unid. 38 * RESORTE DE INDICADOR DE CARTUCHO EN RECAMARA 1 Unid. CONJUNTO G CONJUNTO DE EXTRACTOR 1 Unid. 39 * EXTRACTOR 1 Unid.
MAINTENANCE NOTES: PERSONAL NOTES:
Edition US 01 STEYR MANNLICHER GmbH & Co KG Ramingtal 46 4442 Kleinraming Austria office@steyr-mannlicher.com www.steyr-mannlicher.