
Installation Guide

EXTERIOR DOOR
INSTALLATION
INSTRUCTIONS AND
WARRANTY
INSTALLATION INSTRUCTIONS
Thank you for purchasing a Steves & Sons Exterior Door. This document covers
recommended installation for our basic door congurations: Single prehung,
prehung with sidelites, double prehung, center hinge and french patio doors.
Please read instructions completely prior to installation of door. The instructions
work with most applications when installing our doors. Any changes made to
installation process is done at installers risk and may void warranty. A copy of
the installation instructions should be provided to home owner and remain on
site for nal building code inspection.
Not all door types can be installed in all locations. We recommend you contact
building code compliance in your area prior to installation to verify product
meets code for your application and location.
Coastal areas may require different products and additional anchoring
methods. Information on coastal products and installation requirements can
be located at www.tdi.texas.gov or www.oridabuilding.org
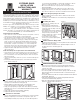
• Measure height of rough opening on both sides. We recommend the
opening be 1/2” taller than door unit. (Figure A)
• Measure width of rough opening at top, center and bottom. We
recommend opening be 1” wider than door unit. (Figure A)
• Verify your rough opening is square. This can be done by measuring
diagonally from corner to corner. Maximum allowable deviation should
not exceed 1/4”.
• Verify rough opening is level and plumb. (Figure B)
• Verify threshold is level and clear of debris.
• Remove shrink wrapping from door and inspect for cosmetic or freight
damages. Verify that you received the correct product, style, size,
color, handing and swing. If you have any concerns with the product
you received DO NOT INSTALL. Contact point of purchase to discuss
options or contact Steves & Sons, Inc. at 1-800-617-8586
• We recommend a minimum of 2 people when removing door from
pallet and installing.
• Follow instructions attached to pallet to remove door. Remove all
shipping materials such as corner, hinge, and sill protectors. Select
doors have wood protector on bottom of sill which must be removed.
• Apply 3 continuous 3/8” beads of silicone caulk across the sill of the
opening. (Figure B)
• If installing on wood suboor, we recommend using a sill pan prior to
installing door unit.
Inspect Rough Opening
Remove Door from Pallet
Prepare Rough Opening for Door Unit
Figure A Figure B
1
2
3
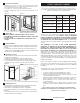
• Work from hinge side using a 4-foot level, plumb the side of frame and
tighten the 2-1/2” trim screws.
• Doors with sidelites and double doors, plumb and tighten screws on
the hinge side of door unit rst. (Figure D)
Plumb and Fasten Hinge Jamb
Single Door Unit Single Door with
Sidelites Unit
Double Door
Unit
• Work from lockset side using a 4-foot level plumb and square the
lockset side of door and check weather-strip margins for consistent
contact to door slab.
• Shim the lockset jamb and secure with 2-1/2” trim screws.
• Once door is plumb, level, and secured in opening, make sure the gap
between frame and door viewed from inside is consistent from top to
bottom of door
• Doors with sidelites shim above mull post and install screws behind
weatherstrip. (Figure E)
• Patio and Center Hinge doors shim at astragal/mull and install
screws behind weatherstrip. (Figure E)
• Verify door with astragal is plumb and square in the opening.
Drill hole in header & sill for ush bolt.
Plumb and Fasten Lockset Jamb
Installing Door Unit
Figure D
4
5
6
astragal
Figure E
Single Door Unit
Single Door with
Sidelites Unit
Double Door Unit
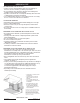
• This is a basic list of tools to install unit. All may not be required, conversely
others may be needed for specialty or custom applications
• Note all material used for installation must be followed in accordance with
manufacturer’s instructions. Failure to do so may void the warranty.
• Safety glasses, Safety mask, caulking gun, caulking exterior/interior paint
grade, 24” and 48” level, drill gun with multiple drill bits and screw bits,
framers Hammer, screw driver, berglass or low expansion window/door
foam insulation, composite or wood shims, 2 ½” screws, nishing nails
designed for exterior/ interior trim, framing square, tape measure, utility
knife, punch, wood saw putty knife pry bar Handle set and deadbolt
• Supplied: Insulation wedge pads instruction manual, 3” screws for
slab re-enforcement.
Required Tools & Hardware
• Detach and remove the existing unit. Make sure the structure frame is clear
of debris such as nails, screws, caulking berglass from prior installation.
• It is recommended to wear a safety mask and gloves when removing and
disposing of material.
• Check local municipality to make sure you are in accordance with disposal
ordinances
• If dealing with lead based product please consult www.epa.gov/lead for
proper methods of disposal.
Removal & Disposal of replaced door unit and material
Figure C
• With top edge of door tilted away from
opening, place bottom of door in center of
opening onto caulk. Then tilt top of door into
opening. (Figure C)
• Place shims behind each hinge and plumb
hinge jamb, then secure 2-1/2” trim screws
through each hinge and shims. If unit
includes 2 sidelites, place shims on outside
of sidelite on hinge side of unit.
• DO NOT drive screws completely in
because you may need to adjust to plumb
and square door.
For safety reasons, installing a door unit
requires two people.