
Installation & Assembly
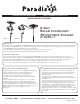

Plastic cap
Capuchon
en plastique
Adjustment
screw
Vis de
réglage
ON/OFF
Switch
Interrupteur
ON/OFF
Spike
Piquet
Small Spike
Petit piquet
Small Post
Petit poteau
Post
Poteau
Thumbscrew
Vis à main
Top Hole
Trou supérieur
Lens Cover
Couvercle
de la lentille
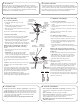
3. Fixture Assembly
3.1 Solar Panel Attached
• Insert the spike into the post of the
spotlight.
• Gently push the wire back into the head
of the unit through the top hole.
• Once the wire is retracted insert the solar panel
onto the head.
(See Section 4 for Ground installation tips)
3.2 Remote Solar Panel
• Insert the spike onto the post of the spotlight
• Remove the solar panel by pulling upward
• Using the included small spike & post, insert the
spike into the post and press them together
• Gently pull the wire attached to the solar panel
into the open slot on the base of the solar panel
Attention: Do not pull sharply on the wire as
this may damage the unit. Wire extends up
to 72”.
• Insert the solar panel onto the post by pressing
them together.
• IMPORTANT: use the plastic cap included
and press it into the hole where the wire
comes out of the spotlight head. This limits the
amount of water that enters the spotlight head.
(See Section 4 for Ground installation tips)
(To reinstall the Solar Panel to the head See section
3.1 )
*NOTE: To clean out debris, the lens cover of the
spotlight can be removed by turning it counter
clockwise.
If necessary, adjust the angle of the solar panel by
loosening the adjustment screw beneath the solar
panel and tilt the panel forward or back. Re-tighten
the screw once the desired angle is achieved.
To adjust the spotlight head, loosen the
thumbscrew and position the spotlight head to the
desired angle before retightening the thumbscrew.
Solar Panel
Panneau solaire
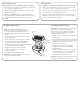
ATTENTION
SPIKE
IS INSERTED
IN POST
ATTENTION
LE PIQUET
EST INSÉRÉ
DANS LE POTEAU
ATENCIÓN
LA ESTACA
SE INSERTA
EN EL POSTE
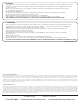
ATTENTION
SPIKE
IS INSERTED
IN POST
ATTENTION
LE PIQUET
EST INSÉRÉ
DANS LE POTEA
U
ATENCIÓN
LA ESTACA
SE INSERTA
EN EL POSTE
2. First time use
2. Première utilisation
If the solar panel is covered by a protective film, remove it before
using the product. Turn the ON/OFF switch located on the bottom of
the solar panel to the ON position. Place the solar light in a location
where it can receive a full 8 hours of sunlight to allow the recharge-
able battery to reach maximum capacity.
Si le panneau solaire est recouvert d’une fine pellicule protectrice,
retirez-la avant d’utiliser le produit. Placer l’interrupteur ON/OFF àsitué
sous le panneau solaire à la position ‘‘ON’’. Placer la lanterne solaire à
un endroit où elle peut recevoir 8 heures d’ensoleillement pour per
-
mettre de charger la (les) pile(s) à sa capacité maximale.
3.1 Panneau solaire attachés
• Insérer le piquet dans le poteau du projecteur
solaire.
• Pousser doucement le fil dans la tête de l’unité à
travers le trou.
• Une fois le fil rentré, insérer le panneau solaire sur
la tête.
(Voir la section 4 pour obtenir des conseils
d’installation au sol)
3.2 Panneau solaire à distance
• Insérer le piquet dans le poteau du panneau solaire.
• Retirer le panneau solaire en tirant vers le haut.
• À l’aide du piquet de plastique et poteau inclus,
insérer le piquet dans la tige en plastique et les
presser ensemble.
• Tirer doucement sur le fil attaché au panneau
solaire dans la fente ouverte sur la base du panneau
solaire.
Attention: Ne tirez pas fortement sur le fil car
cela pourrait endommager l’appareil. Fil s’étend
jusqu’à 72”.
• Insérer le panneau solaire sur le poteau en pressant.
• IMPORTANT : utiliser le capuchon en plastique
inclus et l’enfoncer dans le trou où le fil sort de la
tête du projecteur. Cela limite la quantité d’eau
qui pénètre dans la tête du projecteur.
(Voir section 4 pour obtenir des conseils
d’installation au sol)
* NOTE : Pour nettoyer les débris, le couvercle de la
lentille du projecteur peut être enlevée en tournant
dans le sens contraire des aiguilles d’une montre.
Si nécessaire, ajuster l’angle du panneau solaire en
desserrant la vis de réglage sous le panneau solaire et
incliner le panneau vers l’avant ou en arrière. Resserrer
la vis une fois l’obtention de l’angle désiré.
Pour ajuster la tête du projecteur solaire, desserrer la
vis et positionner la tête du projecteur à l’angle désiré
avant de resserrer la vis.
3. Méthode d’assemblage
Adjustment
screw
Vis de
réglage
Spike
Piquet
Post
Poteau
Thumb screw
Vis à main
Lens Cover
Couvercle
de la lentille
4. Installation Tips
4. Conseils d’installation
• If the soil is of a loose, sandy or organic type, grasp the post
with both hands near the spike and firmly push into the ground.
• If the soil is hard, pour some water onto the ground to soften it.
• If the soil is stony, soften the ground with a rake or shovel and
remove large rocks. Dig a small hole, insert the fixture spike,
replace the soil and tap down.
• Never push fixture into the ground by the fixture head.
• Si le sol est mou, sablonneux ou organique, prendre le poteau
à deux mains près du piquet et l’enfoncer fermement dans
la terre.
• Si le sol est dur, verser de l’eau pour le ramollir.
• Si le sol est rocailleux, le ramollir avec un râteau ou une pelle et
retirer les grosses pierres. Creuser un petit trou, insérer le
piquet du luminaire, remettre la terre et tasser.
• Ne jamais faire pression sur le dessus de la lanterne pour
l’enfoncer dans le sol.