
Installation Guide


Mark
Level
Wall Jamb
x2
x2
1" (25 mm)
Only drill through the inside
wall.
1/8"
Inside of
Shower
Wall Jamb
#8-18 x 1/2"
x6
x6
Connector
Block
Nut
Lay flat.
Lay flat.
Screw
Nut
Connector Block
#8-32 x 1"
x2
Strike Side Only
1" (25 mm) Gap
1" (25 mm) Gap
Bulb Seal
3
1
2
x2
Top
Outside
of Shower
Water
Dam
Side View of the Bridge
Member Orientation
Bottom
Slots to
the inside.
Screws
#8-18 x 1-1/2"
x2
#8-18 x 1/2"
Screw
Screw
Top View Top View
Bridge Member
x4
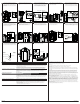
Masking Tape
100% Silicone Sealant
Assorted Drill Bits
Hex Wrench
Hinge Skin Pack
1160603**
Hinge Assembly
1158712-01**
Hardware Skin Pack
1098896**
Setscrew
1160604
Bridge Member
1109490-01**
Screw
#8-18 x 1-1/2"
1048208-C
Screw
#8-18 x 1/2"
1042520-E
Nut
1052901-A
Connector Block
1172133
Screw
#8-32 x 1"
1042862-E
Pivot Pin
1097909
Wall Jamb
1082128-01**
Hinge Plate
1112301**
Sleeve
1013445
Screw
#8-32 x 3/8"
1042871-A
Plug
1088418
Screw
#8-18 x 1/2"
1042520-E
Jamb Seal
1089071-01**
Fixed Panel
1085684-02**
Jamb Seal
1089071-01**
Door Panel
1075279-01**
Bulb Seal
1096489**
Plug
1088418
Screw
#8-32 x 1"
1042862-E
Nut
1052901-A
Nylon Washer
1052892-A
Pivot Pin
1097910
Threshold Seal
1014086-02
Connector Block
1172133
Bridge Member
1109490-01**
Fixed Panel
1085684-02**
Handle Assembly
1019899*
Hinge Assembly
1158712-01**
Hinge Gasket
1101374
Anchor
1077762
Wall Jamb
1082128-01**
Screw
#8-18 x 1/2"
1042520-E
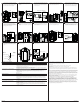
3/4" (19 mm) 3/4" (19 mm)
Strike
Side
24-7/8"
(632 mm)
120˚
Right Pivot
Left Pivot
120˚
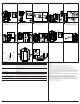
Determine whether the door will swing to the
right or the left.
NOTE: The illustrations and instructions
in this guide are for a right-pivot door. Left
pivot installations will be opposite of what is
illustrated unless specific directions are given.
Mark the location of the wall jambs. The front
edge should be 3/4” (19 mm) from the front edge
of the threshold.
Align the front edge of the wall jambs with the
marks. Plumb the wall jambs. Mark the wall
jamb holes.
Remove the wall jambs. Drill 5/16” holes into the
walls and insert the anchors.
Reposition both wall jambs, slots to the inside of
the shower. Use three screws to secure each wall
jamb.
Trim the bulb seal to be 2” (51 mm) shorter than
the length of the panels. On the strike side only
(opposite the pivot), slide the bulb seal into the
slot. Center the bulb seal vertically with a 1” (25
mm) gap at the top and bottom.
At the top and bottom of each panel, insert a
connector block tab into each of the four fixed
panel grooves. Secure each connector block with
a screw and nut.
Slide the strike and pivot panels into the wall
jambs. Confirm the panels are correctly located.
From inside, mark the wall jamb slot at the top,
bottom, and center. Drill at the marks. Loosely
attach the panels.
Install the top and bottom bridge members with
the water dam facing the outside of the shower.
Slide the bridge members onto the connector
blocks. Spread the fixed panels apart temporarily
if needed.
Ensure that the bridge members are flush with
the fixed panel before tightening. On the inside
of the shower, secure the top and bottom bridge
members to the fixed panel with the self-drilling
screws.
SP2375 Series Neo-Angle Shower Doors
IMPORTANT! Do not cut the top track the same length as the bottom track.
Walls must be within 3/8” (10 mm) of plumb.
Cover the drain with tape to avoid loss of small parts.
Follow the silicone sealant manufacturer’s instructions for application and
curing time.
NOTICE: This shower door is designed to be paired with a Sterling shower
module. Check the specifications to use this door with other installations.
NOTICE: The shower enclosure and finished wall material should be
installed before beginning the shower door installation.
NOTICE: The shower door can be installed with the door opening to
either the right or left. Install the door with the pivot side away from the
showerhead for best results.
To watch this installation online; visit the product page at
www.sterlingplumbing.com.
For care and cleaning and other information; visit
www.sterlingplumbing.com/care-and-cleaning.
Neo-Angle Shower Doors
11178458-2-D
USA/Canada: 1-800-STERLING (1-800-783-7546)
México: 001-877-680-1310
1178458-2-D
Installation and Care Instructions
*Call Customer Care Center to order replacement parts.
**Finish/color code must be specifi ed when ordering.
Retain this document for future servicing.
Record model number from box for reference.
Model Number:______________
Required Tools Parts Identifi cation
2 3 4
7 86 9
1 5
10
WARNING: Risk of serious injury. Damage prior to installation can
result in glass shattering. Inspect the glass and all parts for damage
before installation.
WARNING: Risk of serious injury. Improper installation can result
in glass shattering. Follow all installation instructions.
WARNING: Risk of serious injury. Do not cut tempered glass.
Tempered glass will shatter if cut.
WARNING: Risk of serious injury. Shower door and side panels
can shatter. Regularly inspect the glass and all parts for damage,
missing, or loose parts.
WARNING: Risk of serious injury. Always wear safety glasses
while cutting and drilling.
NOTICE: Do not touch the edges of the tempered glass with tools or any
other hard objects. Do not set the unframed tempered glass directly on the
floor or any hard surface.
IMPORTANT! Leave this manual for the end user.
Read these instructions before installing or using this product.
SterlingPlumbing.com