
User Guide


Page 107
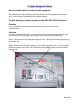
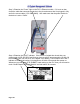
Step 5: If all of the previous steps have been satisfied, then examine the “LINK” light on
the Ethernet module. It should be green. If it is not then first make sure that the
Ethernet cable is hooked up at both ends. Remember that you must use straight
through standard CAT5 cables when going between the blender and a hub or switch. If
you are trying to go directly from the blender to a PC without using a hub or switch, then
you need to use a Crossed Ethernet cable. At this point you more than likely have a
cable problem and should test this. To test, purchase a standard CAT5 cable that
already has the ends connected and a standard hub or switch (this can be purchased
from Best Buy, Circuit City, CompUSA, or Radio Shack). When powering the blender
up, connect the hub and the blender (using the new cable) to one of the middle ports on
the hub (say port 3 on a 4-port hub). Examine the LINK light and if it is on now, then the
problem is definitely in your original cabling. This same test can be performed on the
PC and PC cable. All PC Ethernet cards have a LINK light as well. Establish the LINK
light on all devices before proceeding.
Step 6: If you have LINK lights on all units (including the PC) and no fault lights, but you
still cannot establish communications then we need to check the PC’s network
properties. If this computer resides on your plant network and was set up by your IT
department, then you will need to involve them for further assistance with your problem.
Instruct your IT department that the blenders must have a fixed IP, but the PC can have
a dynamic IP. All subnet masks for the PC and the blenders need to be 255.255.255.0.
They might not have the startup script correct for your PC. If the blenders and PC all
reside on a separate network that has nothing to do with your plants LAN then we need
to check the PC’s network properties (see “Chapter 1 Networking instructions for the
newer AB OS/OA Blender” for step-by-step).