
Installation Guide


Roughing-In (cont.)
the thickness of the firewall material. Stud opening dimensions must be measured toward the exposed
side of the wall material. Dimensions given in the rough-in information are crucial for proper installation.
Construct the framing and plumbing accurately.
If installing this whirlpool with a shower door, refer to the shower door manufacturer’s instructions for any
special framing considerations.
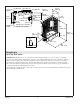
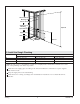
1. Construct New Framing
NOTE: Refer to the ″Roughing-In″ section for dimensions.
WARNING: Risk of product and property damage. The whirlpool must be supported by the
subfloor.
Framing Provisions
A subfloor must be installed. The whirlpool must be positioned to allow clearance for drainage
through the floor joists or slab and to allow convenient plumbing installation.
NOTE: If the wall surrounds will be installed to a masonry wall, make provisions for plumbing
connections. For the plumbing end wall, construct a separate frame wall a minimum of 6″ (15.2 cm) from
the masonry wall. For the remaining walls, use 2x2 furring strips to provide stud locations.
Ensure that the outer stud is positioned with the vertical wall flanges: 7614 and 7624 series 31-1/4″
(79.4 cm) from the back wall, 7615 series 33-1/4″ (84.5 cm) from the back wall, 7616 series 37-1/4″
(94.6 cm) from the back wall. The outer edge of the stud should align with the edge of the wall
flange.
IMPORTANT! Accessories that require backing or support are not recommended for this installation.
Installing these accessories could void the warranty.
If installing this unit with a shower door, refer to the shower door manufacturer’s instructions for
any special framing considerations. It may be appropriate to add studs for pivot shower door
support.
Ensure fiber or other soft insulation does not drop down into the water channel. Cover or seal any
loose material. Failure to do so may cause wicking of water from the water channel into the
insulation which may induce mold, leakage, or mildew. Ensure the channels are free of debris after
installation.
IMPORTANT! Construct the floor of plywood. If whirlpool is installed over material other than plywood,
friction may cause squeaking over time.
Ensure that the outer stud is positioned with the vertical wall flanges:
•
7614 and 7624 series 31-1/4″ (79.4 cm) from the back wall,
•
7615 series 33-1/4″ (84.5 cm) from the back wall,
•
7616 series 37-1/4″ (94.6 cm) from the back wall.
The outer edge of the stud should align with the edge of the wall flange.
IMPORTANT! Accessories that require backing or support are not recommended for this installation.
Installing these accessories could void the warranty.
If installing this unit with a shower door, refer to the shower door manufacturer’s instructions for
any special framing considerations. It may be appropriate to add studs for pivot shower door
support.
Ensure fiber or other soft insulation does not drop down into the water channel. Cover or seal any
loose material. Failure to do so may cause wicking of water from the water channel into the
insulation which may induce mold, leakage, or mildew. Ensure the channels are free of debris after
installation.
Sterling 7 1070292-2-E