
Installation Guide


Thank You For Choosing Sterling
We appreciate your commitment to Sterling value. Please take a few minutes to review this manual before
you start installation. If you encounter any installation or performance problems, please don’t hesitate to
contact us. Our phone numbers are listed within this manual. Thanks again for choosing Sterling.
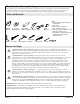
Tools and Materials
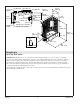
Before You Begin
CAUTION: Risk of product damage. Install the whirlpool on an adequately supported, level
subfloor. The basin area requires no additional support when the subfloor is level and square with
the stud framing. Use shims for additional support if the subfloor is uneven. Do not install the
whirlpool over open floor joists.
CAUTION: Risk of property damage. Only apply 100% silicone sealant to the areas where
instructed to do so. Do not add silicone sealant to any other areas. The inappropriate use of silicone
sealant may trap moisture and could result in mold, leakage, or mildew. For whirlpool-only
installations, 100% silicone sealant is required at the seams of the walls and the whirlpool. We
recommend using colored 100% silicone sealant to match the color of the product. Use of latex
based or other caulks is not recommended. If a shower door will be added, you will be instructed
to apply silicone sealant where the front edges of the end wall surrounds will meet the whirlpool.
This will prevent water from passing through the shower door extrusion to the back side of the
wall. Follow the shower door and silicone sealant manufacturer’s instructions.
CAUTION: Risk of product damage. Do not lift the whirlpool using the apron brace. Lift the
whirlpool by the rim at multiple points. Whirlpool units in a single carton are shipped with apron
braces in the closed position. Connect the apron braces to the apron before removing the unit from
the carton(s).
CAUTION: Risk of product damage. To avoid rust marks on your product, ensure the roofing nails
or non-tapered flathead screws are galvanized or plated. If using galvanized or plated non-tapered
flathead screws, do not overtighten the screws. Excessive tightening can damage the wall flange.
Consult local building codes to determine if the screws or nails must be galvanized or plated.
IMPORTANT! The whirlpool cannot be installed without the wall surrounds.
IMPORTANT! If your whirlpool is shipped with a liner, keep the liner in place until construction is
complete to prevent surface damage to the unit. If a liner is not available, place a clean drop cloth or
similar material in the bottom of the whirlpool.
Clear 100%
Silicone Sealant
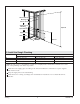
• Conventional woodworking tools
and materials
• Drop cloth
• Mortar cement (optional)
• 2x2s and 2x4s or 2x6s
• Hole saw or jigsaw with fine tooth
blade (32 teeth per inch)
• Galvanized or plated roofing nails
or galvanized non-tapered
flathead screws
Pencil
Square
Claw Hammer
Level
Pliers
Drill
2" (5.1 cm)
Masking Tape
Plus:
Tape
Measure
Safety
Glasses
Tin Snips
Pipe Wrench
Adjustable
Wrench
Sterling 3 1070292-2-E