
Installation Guide


11. Cut the Holes for Valves and Spout
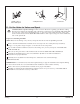
CAUTION: Risk of product damage. Failure to follow directions regarding your blade’s cutting
direction may damage the plumbing end wall finish. Cut the holes from the front side of the wall
for: hole saws, rotary tools, hand-held jigsaws, or other saws with a blade that cuts on the push
stroke. Cut the holes from the back side of the wall for other reciprocating saws with a blade that
cuts on the pull stroke.
Prepare the Plumbing End Wall
NOTE: Holes for the mixing valve, shower, and spout must be cut into the plumbing end wall.
Refer to the trim manufacturer’s instructions for necessary hole sizes. Verify that any escutcheon,
flange, or cover plate is large enough to cover the hole for the component.
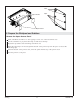
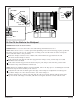
Lay out and mark the centerline location for the mixing valve, shower, and spout on the back side
of the end wall. (1)
Drill 1/4″ (6 mm) pilot holes at the marked locations from the back side of the end wall. (2)
Carefully cut the fitting holes to the correct diameter. (3) Refer to the trim manufacturer’s
instructions for proper diameter.
Carefully clean any debris from the whirlpool to reduce the risk of surface damage.
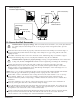
Optional Accessories
IMPORTANT! Do not install accessories that require backing or support. Installations that require drilling
into the wall surrounds are not recommended. Such installation could void the warranty.
Refer to the accessory manufacturer’s instructions for proper installation.
If drilling is required, mark and drill the mounting locations for your accessory on the back side of
the wall. Do not secure the accessory at this time.
2. Drill pilot holes.
3. Cut holes.
1. Mark center of
valves and spout.
Sterling 17 1070292-2-E