
Installation Guide


10. Pre-Fit the Walls to the Whirlpool
IMPORTANT! Install the back wall first.
IMPORTANT! Do not secure the walls to the stud framing until instructed to do so.
NOTE: If the shower valves or controls prevent the plumbing wall section from being properly positioned
before the necessary holes are cut, cut the holes according to the ″Cut the Holes for Valves and Spout″
section and then return to this procedure.
Ensure the whirlpool surface is free of debris. This will minimize the gaps between the wall
surrounds and the whirlpool surface.
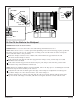
Position the back wall with the wall tabs engaged in the whirlpool slots, and the clips are locked
behind the back wall. (1)(2)
Position the end wall top pins into the back wall pivot joint and pivot the wall into position until
the retention clips lock behind the end wall. (3)
NOTE: If holes for plumbing fixtures need to be drilled, remove the clips prior to assembling the end wall.
Reattach the clips for final assembly of the wall set.
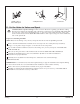
Verify that the end walls are flush against the edge of the whirlpool. If adjustment is needed, push
or pull the whirlpool to allow the end walls to rest on the whirlpool.
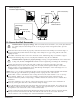
Push the whirlpool into position and verify that all walls are properly aligned with the studs at the
top and vertical wall flanges. If needed, add shims to bring the studs into contact with the walls.
(2)
(3)
Wall Tab
Slot
(1)
Pivot
Joint
Pin
Back Wall
End Wall
Bath
Clip
1070292-2-E 16 Sterling