
Installation Guide
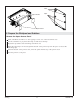


6. Position the Whirlpool
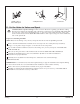
CAUTION: Risk of product damage. Do not lift or move the whirlpool by the apron or apron braces.
Verify that the apron braces are attached before installing the whirlpool, then lift the whirlpool by the rim
at multiple points.
NOTE: Keep a liner or drop cloth in place in the bottom of the whirlpool until construction is complete.
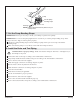
Install the drain and overflow assembly to the whirlpool according to the drain manufacturer’s
instructions.
IMPORTANT! Squeaking may develop if the whirlpool is installed over a subfloor other than plywood. In
order to prevent squeaking, place a pad between the whirlpool and the subfloor and positioned under the
whirlpool supports. We recommend that the pad be made of spun bonded polyester landscape fabric or
spun bonded house wrap material. Do not use roofing felt.
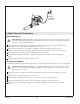
IMPORTANT! Do not remove the clips that are attached to the whirlpool. The clips are required to ensure
proper installation of the walls.
Position the pad under the whirlpool supports.
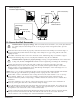
Position and adjust the whirlpool until its outside edge is flush with the framing.
Verify that the whirlpool is level and well supported by the subfloor.
If the whirlpool is not level, shim using metal, hardwood, or other durable material. Reposition and
shim the whirlpool until it is aligned with the framing and level.
If the whirlpool cannot be directly bonded to the subfloor or if decreased movement is desired,
consider installing an optional mortar cement bed.
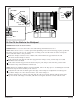
Install a Mortar Cement Bed (Optional)
Remove the whirlpool and pad from the alcove.
NOTE: Do not use plaster, gypsum cement, or drywall compound for this application, as they will not
provide adequate structural support.
NOTE: The whirlpool supports must rest directly on the subfloor.
Spread a 2″ (5.1 cm) layer of mortar cement on the subfloor, spreading it so that each area of the
whirlpool that will contact the subfloor has mortar cement. Do not spread the mortar cement
around the drain area. Allow room for the mortar cement to expand from the weight of the
whirlpool.
Immediately move the whirlpool into position.
Verify that the whirlpool is level and resting on all supports.
Verify that the bath is level.
Shim if necessary.
Studs
1070292-2-E 12 Sterling