
Installation Guide


18. Confirm Proper Operation
Please read these steps carefully before you operate your whirlpool.
Verify that all electrical connections are made.
Verify that the pump banding straps have been cut.
Close the circuit breaker for the whirlpool pump.
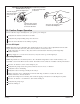
Fill the Whirlpool
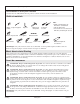
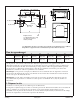
NOTE: The large jets are adjustable. The smaller back jets do not have a flow adjustment. Turn the trim
ring clockwise to reduce the flow, and counterclockwise to increase the flow.
Position the large jet nozzles so they face down toward the basin. Turn the jet trim rings fully
counterclockwise.
Fill the whirlpool to a water level at least 2″ (5 cm) above the top of the highest jet.
Operating Sequence
NOTE: If problems are encountered, refer to the ″Troubleshooting Table″ section in this manual, or an
expanded version in the Homeowners Guide. The Homeowners Guide also includes warranty information.
Press the air actuator to turn on the whirlpool jets.
Verify that the pump starts and operates without excessive noise or vibration.
Verify that water is circulating.
Verify that water is flowing normally from each jet.
Adjust each large jet for optimum flow. Turn the trim ring clockwise to reduce the flow, and
counterclockwise to increase the flow.
Operate the whirlpool for 5 minutes, then check the piping connections for leaks. Repair any leaks.
Press the air actuator a second time to turn off the whirlpool.
Verify that the pump stops.
Drain the whirlpool.
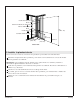
Turn the large jet
trim ring clockwise
to decrease the
flow.
Position the jet nozzles
to direct the water flow
as desired.
Turn the large jet trim
ring counterclockwise
to increase the flow.
Fill with water 2" (5 cm)
above the highest jet.
Press the air actuator to turn
on and off the whirlpool.
Sterling 21 1032207-2-C