
Installation Guide


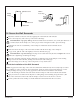


8. Cut the Pump Banding Straps
IMPORTANT! This step is necessary to make your whirlpool operate more quietly.
NOTE: Do not raise the pump higher than it was before you cut the pump banding straps. If the pump is
raised too high, it will not prime properly.
Use tin snips to cut the two pump banding straps from the whirlpool pump. Discard the banding
straps.
After the pump banding straps are cut, ensure that the pump is not in direct contact with the
whirlpool harness.
9. Install the Drain and Test Piping
CAUTION: Risk of property damage. Ensure a watertight seal on the whirlpool drain.
Connect the drain to the trap according to the manufacturer’s instructions.
Temporarily install the faucet handles and spout according to the manufacturer’s instructions.
Open the hot and cold water supplies.
Check the supply connections for leakage. Repair any leaks.
Run the water to flush any debris from the lines.
Check the drain connections for leakage. Repair any leaks.
Close the faucet valves.
If installing a shower, install the showerhead at this time. Test it for normal operation. When
complete, remove the showerhead and reinstall the pipe cap.
Close the hot and cold water supplies.
Remove the faucet trim and spout according to the manufacturer’s instructions.
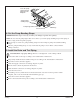
Suction Line
Pump
Pump Support Bracket
Drainage
Leave the pump
support bracket
attached to the
whirlpool.
Cut the pump
banding straps.
Sterling 13 1032207-2-C