
Installation Guide


Tools and Materials
NOTE: Clear silicone sealant is recommended. It is a superior product used to ensure against leaks. Use of
acrylic or other caulks is not recommended.
Thank You For Choosing Sterling
We appreciate your commitment to Sterling value. Please take a few minutes to review this manual before
you start installation. If you encounter any installation or performance problems, please don’t hesitate to
contact us. Our phone numbers and web site are listed on the back cover. Thanks again for choosing
Sterling.
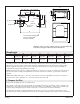
Before You Begin
CAUTION: Risk of product damage. The wall surround sections are backed with foam to bring the
back of the wall into contact with the stud framing. This foam is not packing material. Do not remove.
CAUTION: Risk of product damage. The two apron braces must be connected at all three bosses in
order to be effective. One boss is on the whirlpool. The other two are on the apron. Ensure that the
braces are properly connected before handling the unit. If necessary, glue the braces to the boss.
CAUTION: Risk of product damage. Do not install the whirlpool over open floor joists. The basin area
requires no additional support when the subfloor is level and square with the stud framing. Install the
whirlpool on an adequately supported, level subfloor. Use shims for additional support if the subfloor
is uneven.
CAUTION: Risk of property damage. Do not add silicone sealant unless directed otherwise. The
inappropriate use of silicone sealant on caulkless models may trap moisture and could result in
leakage, mold, or mildew.
NOTE: Clear silicone sealant is recommended. Use of acrylic or other caulks is not recommended.
Read all instructions before you begin.
Observe all local electrical, building, and plumbing codes.
This whirlpool is designed for alcove installations.
If remodeling, measure the existing framework before removing the old fixture to ensure the new
unit will fit. Verify that the drain is in the correct location.
Confirm that there is adequate mounting and connection space for the water supply and drain
chosen for the installation.
Upon receipt, check for shortages or damage. Report any damage or shortages immediately.
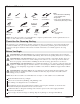
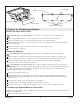
Pencil Square
Snip
Claw
Hammer
Masking
Tape
Clear Silicone
Sealant
DrillPliers
Adjustable
Wrench
Assorted
Screwdrivers
Tape
Measure
Level
Pipe WrenchSafety Glasses Strap Wrench
• Conventional woodworking
tools and materials
• Hole saw or jigsaw with fine
tooth blade (32 teeth per inch)
Plus:
• Drop Cloth
Sterling 3 1032207-2-C