
Installation Guide

7. Secure the Whirlpool to the Stud Framing
This unit is designed for installation into regularly spaced framing. If a gap exists between the edge of the
whirlpool and the stud, then add shimming to the stud in order to bring the stud into within 1/8″ (3 mm) of
the whirlpool.
The whirlpool can be attached to the framing using the attachment clips provided, or large-headed roofing
nails. Use the applicable section that follows.
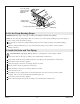
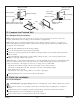
If Using Attachment Clips
Position the bottom lip of the clip at the side of the stud and under the edge of the whirlpool. Slide
the clip into place between the center of the stud and the whirlpool.
Use a pliers to bend the tab of the clip over the whirlpool flange.
Secure the attachment clip to the center of the stud using either large-headed roofing nails or
flathead screws.
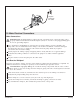
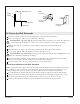
If Using Roofing Nails
IMPORTANT! Install the nail or screw above the flange. Do not nail or drill through the nailing-in flange.
Install flathead roofing nails or other large-headed fasteners over the top of the flange to pin the
flange to the studs.
Ensure that the fastener heads do not interfere with the installation of the wall surround or other
finished wall.
Nail
Stud
Bath
Wall
Stud
Roofing
Nail
Attachment
Clip
1032207-2-C 12 Sterling