
Installation Guide


5. Prepare the Whirlpool and Subfloor
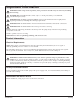
Remove the Apron Access Panel
CAUTION: Risk of product damage. Be careful not to scratch the surface of the whirlpool.
Insert a flat bladed screwdriver or other prying tool at each of the four screwdriver slots.
Use the screwdriver to pry each of the four bottom clips out and release the clip.
When all four bottom clips are released, pull the bottom of the panel away from the apron to release
the remaining clips.
When the bottom is clear, lower the panel until the top of the panel is clear.
Store the panel in a safe place.
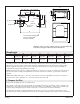
Prepare the Whirlpool
CAUTION: Risk of product damage. Be careful not to scratch the surface of the whirlpool.
If your whirlpool is shipped with a liner, keep the liner in place until construction is complete. If a
liner is not available, position a clean drop cloth or similar material in the bottom of the whirlpool.
Install the whirlpool drain and overflow to the unit according to the drain manufacturer’s
instructions. Do not connect the trap at this time.
CAUTION: Risk of property damage. Do not lift the whirlpool using the apron or apron braces.
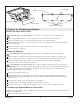
IMPORTANT! Use care to properly position the whirlpool in the recess. Clear all the material away from
the pump support bracket area and whirlpool supports. The pump support bracket and whirlpool
supports must rest directly on the subfloor.
Position the whirlpool in the alcove.
Verify that the whirlpool is properly positioned in respect to the intended finish wall. Depending
upon the installation, the outer edge of the whirlpool should be flush with the intended finish wall
at floor level.
Verify that the whirlpool is level and resting on all supports.
If required, remove the whirlpool and place shims under the supports.
When the whirlpool is leveled, consider whether or not to use an optional mortar/cement bed.
Installation with Optional Mortar or Cement Bed
NOTE: Do not use gypsum cement or drywall compound for this application, as they will not provide an
acceptable, durable bond.
Remove the whirlpool from the alcove.
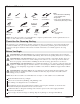
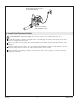
Clip
9 Clip Locations
4 Screwdriver Locations
Apron Panel
Center Clip
Apron Frame
1032207-2-C 10 Sterling