
Installation Guide

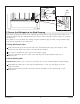


14. Secure the Wall Surrounds
Attach the end wall to the back wall by engaging the wall interlocks and wall tabs.
Remove the temporary nail at the top of the back wall flange.
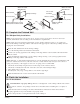
CAUTION: Risk of property damage. Wall surrounds must rest within 1/32″ (1 mm) (the thickness of
a credit card) from the whirlpool to ensure proper water management and to prevent leakage.
Verify that all walls are seated firmly on the whirlpool and that the back wall interlocks are
engaged.
Ensure that the front edges of the end walls are flush with the front edge of the whirlpool.
If a gap exists, pull the end walls slightly forward to eliminate the gap.
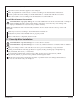
CAUTION: Risk of product damage. If using screws rather than nails, do not overtighten the screws.
Excessive tightening can damage the flange.
Secure the end walls with large-head roofing nails or flathead screws at the dimples on the nailing
flange. Secure the end walls first, starting from the bottom and working up.
Secure the flanges across the top of the wall panels at every stud location.
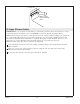
Finish the Installation of the Wall Surround
NOTE: A gap between the edge of the wall surround and the finished wall, when sealed, helps to reduce
the possibility of water seeping into the wall material. Apply the water-resistant wall material over the
nailing–in flanges leaving a 1/8″ (3 mm) gap between the wall surround and the wall material.
Cover the framing around the wall surrounds and the whirlpool with water-resistant wall material.
Apply clear silicone sealant from the drywall or nailing flange and extending along the first 4″ (10.2
cm) of the seam between the walls and the whirlpool at the front of the shower as shown.
Seal the joints between the whirlpool and the finished wall material with silicone sealant.
Roofing Nail
or Screw
Roofing Nail
or Screw
Shim if
necessary.
Bath Rim
Credit Card
Wall Surround
Nailing
Flange
1032207-2-C 18 Sterling