
Installation Guide


9. Pre-Fit the Wall Surrounds
IMPORTANT! Do not secure the walls to the stud framing until instructed to do so.
NOTE: If the shower valves or controls prevent the plumbing wall section from being properly positioned
before the necessary holes are cut, cut the holes according to the ″Cut Holes for the Valves and Spout″
section and then return to this procedure.
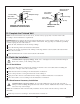
NOTE: When installing the back wall, fit the back wall tabs into the whirlpool alignment channels, as
shown.
Position the back wall on the whirlpool.
Temporarily secure the back wall over the whirlpool flange with a roofing nail or other fastener.
Install the fastener so that it can be removed easily. Do not drive the nail in so far that it prevents
the back wall from positioning properly when the end walls are installed.
Attach the two end walls to the back wall. Slide the end wall pins into the back wall interlock slots.
Verify that the assembled wall surround is resting properly on the whirlpool. If the wall surround
needs to be adjusted, remove the roofing nail at the back wall.
Verify that the end walls are flush with the edge of the whirlpool. If necessary, shift the end walls
until they are flush.
Verify that the wall sections are properly aligned with the studs at the upper and vertical wall
flanges.
End Wall Back Wall
End Wall
Whirlpool
Whirlpool
Alignment
Channel
Back Wall
Interlock
Slot
Roofing Nail
End Wall Pin
End Wall
Whirlpool
Back Wall/End Wall Tab
Back Wall Flange
Sterling 13 1016902-2-F