
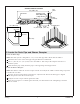
Installation Instructions
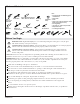


Tools and Materials
Before You Begin
WARNING: Risk of personal injury. Do not cut the tempered glass. If the glass is cut, the glass
will shatter and may cause personal injury.
CAUTION: Risk of property damage. Select panel adhesive recommended for use with polystyrene
surfaces. This will ensure that the wall panels properly adhere to the walls.
CAUTION: Risk of property damage. Select sealant recommended for use with polystyrene
surfaces. This will ensure that the side fixed panels and the lower bridge member seal to the
shower wall panels.
NOTICE: This shower door is designed to be specifically paired with a Sterling shower module. Do not
install this shower door if you do not have a Sterling shower module installed.
IMPORTANT! This door is designed to accommodate walls that are less than 3/8″ (1 cm) out of plumb.
Verify the area the door will be attached to is within 3/8″ (1 cm) or better of plumb. The door may not
function properly if the wall is more than 3/8″ (1 cm) out of plumb.
Check all local building codes prior to installation.
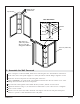
The shower walls can be installed directly to the studs or over water-resistant wall material.
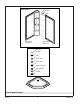
The shower door can be installed with the door opening to either the right or left. Install the door
with the pivot side away from the showerhead for best results.
The illustrations and instructions in this guide are for right pivot installations. Left pivot
installations will be opposite of what is illustrated and described unless specific directions are given.
Lay out and identify all of the parts. Inspect them for damage.
Return the glass panels to their packaging and place them in a safe area until they are needed.
If you are replacing an existing fixture, confirm the new model will fit before removing the old
fixture.
Do not install the shower over open floor joists.
Sterling reserves the right to make revisions in the design of products without notice, as specified in
the Price Book.
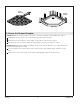
Shims
File
Caulk Gun
Center
Punch
Clear Mildew Resistant
100% Silicone Sealant
Panel Adhesive
Phillips
Screwdriver
Masking
Tape
Drill &
Assorted
Drill Bits
Plumbers
Putty
Foam
Adhesive
Ratchet &
11/32" Socket
Plus:
• Conventional woodworking tools
and material
• Drop cloth
• 2x4s
• Hole saw or jigsaw with fine tooth
blade (32 teeth per inch)
• Furring Strips
• (2) 1x2x 72" (182.9 cm) boards
• Drywall Screws
• Leveling Compound
1/4"
Hex Wrench
1100676-2-E 2 Sterling