
Installation Instructions
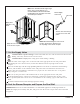
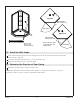

9. Install the Wall Surround
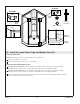
Install the Shower Wall Panels
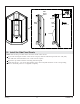
Carefully place the shower wall panels directly onto the shower receptor. Avoid scraping the sealant
off the joint.
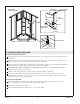
Ensure the wall surround is plumb and confirm the shower wall panels are evenly spaced on the
shower receptor, as this will play a critical role in door alignment.
If the walls are not plumb, attach furring strips to the studs as needed to ensure the wall installation
is plumb. Shim as needed. Repeat until the shower walls are plumb.
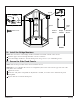
If installing the shower wall panels over wallboard, apply adhesive on the wallboard, covering
enough area to provide a secure bond.
Press the wall surround firmly into the corner against the studs or wallboard.
Starting from the outside edge and working toward the corner, secure the wall surround using
drywall screws every 12″ (30.5 cm) to 16″ (40.6 cm) along the nailing flange. Make sure the bottom
of the walls stay in place on the receptor.
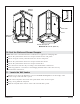
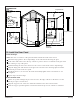
Install the Finished Wall
Install the wallboard with the factory edge (the paperbound edge) a maximum of 1/4″ (6 mm)
above the finished, concave surface of the shower wall panels.
Mud, tape, and finish the wallboard.
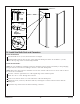
Finish the surrounding wall. The flange is 1/8″ (3 mm) thick.
Paperboard
Edge Down
1/4" (6 mm)
Max
2x4
Framing
Silicone
Sealant
Wallboard
Furring Strip
Nailing Flange
Screw
Plumb walls,
furring as needed
.
Sterling 13 1100676-2-E