
Installation Guide


INSTALLATION INSTRUCTIONS AND LIMITED 50 YEAR RESIDENTIAL WARRANTY
2G / FD CLICK PREFINISHED ENGINEERED PLANK
5
SF2GFDFI50 REV. CRB 3-16
Note: Larger rooms require additional expansion space. Add 1/16” to the width of the spacers for every 3’ the room extends beyond
25’. Dimensions exceeding 40’ require the use of a t-molding for expansion.
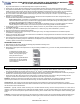
Step 2: POSITION THE FIRST ROW
Begin installing the first row by laying a plank flat over
the underlayment.
With the tongue side facing the wall align the end of the
second plank with the first and lock the end joints together
by pushing it straight down on top of the first plank.
Lock the ends of the planks together until the first row is
finished. Cut the last board in the row to the necessary
length. If leftover plank is 12” or longer use it to begin the next row
or use a shorter length board from the box.
If the starting wall is out of square, it will be necessary to scribe the first row to match the wall, allowing the opposite side if the row
to present a true square base for the rest of the floor. Then the first row is complete, you must have a straight, even base
established.
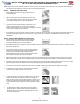
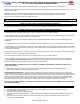
Step 3: INSTALLING THE REST OF THE FLOOR
Always stagger 12” between the end joints of adjacent
plank rows. The end joints should not repeat visually
across the installed floor and avoid “H” patterns.
●
After installing the first row of planks, Line up the first plank of the second row so the outside end is even with the outside end of the
first plank of the first row.
Lock the long side of the second row plank onto the plank on
the first row by inserting the tongue of the second plank into
the groove on the first plank while holding the plank
at a 45-degree angle from the floor. Press the second plank
down flat and the tongue will lock firmly into place.
●
After locking in place, lay the remaining planks in the row by first locking the long side in place and then tapping the end of the
plank to slide firmly into place at its end. (Gently tap down end joint with the light colored mallet to ensure they ends are locked).
●
The planks cannot be forced together. If they are not lying flat, then they will not align properly during locking. If this occurs, begin
again insuring the edges of both planks meet evenly while applying equal pressure while rotating the plank.
Once the third row has been clicked into place check for a tight fit on sides and ends and that the spacers are in place.
●
To install the rest of the flooring, continue placing the boards
from left to right, plank by plank, and row by row.
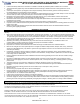
If under doorjambs or toe kicks of cabinets, there is not enough
clearance to achieve the 45 angle necessary to engage the
sides. The tongue portion of the sides should be cut away using
a wood chisel and the boards glued together using high quality
white wood (PVAC) glue. Remove any excess glue with a damp
cloth.
To disengage the planks, lift the long side to a 45-degree
Angle and remove. Slide the ends in opposite directions to
disengage. Do not pull upwards to disengage the short ends
so as not to break them.