
Installation Guide


INSTALLATION INSTRUCTIONS AND LIMITED 50 YEAR RESIDENTIAL WARRANTY
2G / FD CLICK PREFINISHED ENGINEERED PLANK
4
SF2GFDFI50 REV. CRB 3-16
The concrete slab should be sealed or painted with a good concrete sealer. Then the 3 in1 Underlayment or the 6 mil poly film should be
installed with ends butted together and taped with a clear 2” packaging tape to prevent any moisture from coming up through the seams.
The 3 in 1 underlayment or 6 mil poly film should be lapped up the wall 4” all the way around the room. This can be trimmed off after
moldings are installed. If you are using the 3 in1 underlayment, you are ready to begin the installation. However, if you have used the 6
mil poly film, roll out on top of the 6 mil poly film a 1/8” thick closed cell foam, butting the edges but not overlapping.
Note: Any pre-existing wood panels or strips that are floating or glued to the concrete slab must be removed before installation using the
floating method.
RADIANT HEAT SUB FLOORS:
ONLY PREFINISHED ELM, MAPLE OR BIRCH ARE APPROVED FOR USE ON RADIANT HEAT APPLICATIONS. DO NOT USE
OAK, AMERICAN CHERRY, HICKORY OR ANY EXOTIC SPECIES. WARRANTY WILL BE VOIDED IF ANTHING OTHER THAN
APPROVED SPECIES IS USED.
RADIANT HEATING SYSTEMS USED MUST BE DESIGNED AND CONTROLLED SPECIFICALLY FOR HARDWOOD
FLOORING BY THE SYSTEM MANUFACTURERE AND MUST INCLUDED AN OUTSIDE TEMPERATURE PROBE AND
SURFACE TEMPERATURE CONTROLS.
Follow the below grade instructions (above) for underlayment requirements and installation instructions. Most radiant heat installations
call for the requirements below when installing over radiant heat systems. Always refer to the manufacturer of the radiant heating system
for detailed instructions.
●
Newly installed water- heated-radiant- heat systems should be operational for a minimum of 4 weeks with the temperature set
between 64
o
-68
o
F to insure a dry subfloor with the proper moisture content.
●
Existing water- heated-radiant- heat systems must be operated a temperature of 64
o
F for a minimum of 4 days before installation of
hardwood flooring.
●
A pressure test must be performed and documented by prior to installation.
●
At the time of installation, sub floor must be 64
o
-68
o
F.
●
Use floating floor installation only. Do not use the glue down installation method on radiant heat flooring.
●
Use an adhesive approved by the system manufacturer for edge and end joints
●
After installation do not change the radiant heat settling for 48 hours.
●
Gradually increase the heat 3 - 5
o
increments daily to adjust the heating system temperature up or down to allow the flooring to
adjust to the temperature changes
●
The maximum temperature of sub floor under normal use should not exceed 85
o
F. (Check with heat system manufacturer).
●
For correct water temperature inside heating pipes, check with manufacturer’s suggested guidelines.
●
Heating pipes must be covered with 1 1/4” of concrete or minimum 1/8” below bottom side of plywood sub floor. In addition, for
plywood sub floor, heat transfer plates or insulation boards must be under pipes.
●
Room temperature should be maintained between 60-80
o
F and not vary more than 15
o
F from season to season.
●
Relative Humidity must be maintained in the range of 35-55% humidity in the home for radiant heated rooms.
IMPORTANT: DO NOT INSTALL CABINETS OR WALLS ON TOP OF THE FLOORING WHEN USING THE
FLOATING INSTALLATION METHOD.
Step 1: GETTING STARTED
Important: The flooring should be installed from several cartons at the same time to insure proper color, grain, and shade mix.
●
Before starting, first measure the width of the room, and then divide the room’s width by the width of the plank. If this means that
the last row of planks will be narrower than 2”, then you will need to cut the first row of planks to make it narrower. Cut in such a
way that both rows of planks (the first and last to be installed in the room) will have the same approximate width for an overall
continuous look. See installing the last row.
Note: To cut the boards, always saw with the teeth cutting down into the face or top of the board. Cutting from the top down helps protect
the surface.
●
The planks install easily without glue. Simply attach the tongue on one plank to the groove side on another plank and the planks will
lock snugly together.
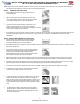
Begin the installation of the planks in the left hand corner of the room with the long direction parallel to the incoming sunlight source or
to the longest wall of the room (if this is possible). Be sure to install the first row of boards with the tongue side facing the wall.
Note: Slightly bowed boards can be installed and are not considered defective.
Use 3/8” or 1/2” expansion spacers (depending on the thickness of the flooring) to provide a gap for the seasonal expansion of the
flooring along the walls of the entire room. Always place expansion spacers against the wall where the two boards meet. This will
make maintaining a good square easier.