
Installation Guide


INSTALLATION INSTRUCTIONS AND LIMITED 50 YEAR RESIDENTIAL WARRANTY
2G / FD CLICK PREFINISHED ENGINEERED PLANK
3
SF2GFDFI50 REV. CRB 3-16
less per cubic foot, use only the floating installation method.
INSTALLATION on SUB-FLOORS OTHER THAN WOOD OR CONCRETE:
Do not install over carpets.
Note: Perimeter glued resilient vinyl and rubber tiles are unacceptable underlayments and must be removed.
Terrazzo, marble, tile and any other hard surfaces that are well bonded to sub floor, dry, structurally sound and level, as described
above, are suitable as a sub floor for this engineered hardwood flooring installation. As above, the surface must be sound, tight, and
free of paint, oil, existing adhesives, sealers, wax, grease, and dirt. Terrazzo, marble, and ceramic tile must be scuffed to assure
adhesion.
The flooring can be glued or floated directly over full spread permanently bonded acoustical cork. Density should be 11.4 lb. / cubic ft.
and installed according to cork manufacturer’s recommendations. Do not use foam underlayment when using the floating method over
cork.
ASBESTOS WARNING
! Do not sand existing resilient tile, sheet flooring, backing, or felt linings. These products may contain
asbestos fibers that are not readily identifiable. Inhalation of asbestos dust can cause asbestosis or other serious bodily harm. Check
with local, state, and federal laws for handling hazardous material before attempting the removal of these floors.
INSTALLATION ON RADIANT HEATED SUBFLOORS:
●
Use floating floor installation only. Do not use the glue down or staple installation method on radiant heat flooring.
●
Only Elm, Maple or Birch are approved for use on radiant heat applications. Do not use Oak, American Cherry, Hickory or
any Exotic Species.
●
Warranty will be voided if anything other than approved species or installation method is used.
●
The end consumer should be aware that minor gapping between wood planks during the heating season is a normal occurrence
with hardwood flooring installed over radiant heated systems.
●
Verify floor is level and structurally sound. Repair as needed. Sub floor irregularities may cause any wood flooring installation to
develop hollow spots between the flooring and the sub floor. These are not the result of any manufacturing defect.
●
Proper moisture testing is the key to determine readiness for installation.
●
Follow the NWFA guidelines for acclimation (www.nwfa.org ) on the job site and moisture equilibrium.
●
Undercut door casings
●
Remove any existing wall base, shoe molding, quarter round or doorway thresholds
●
Regardless of the installation method all floors should be racked.
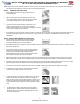
REQUIRED TOOLS AND ACCESSORIES
Tape Measure
Moisture Meter (wood / concrete)
Underlayment and Vapor Retarder (if needed)
Mallet (light colored)
Circular or Hand Saw
Miter or Table Saw
Drill with 1/16” bit
Tapping Block
Chalk Line and Chalk
Hammer
Safety Equipment (Goggles & Mask)
Utility Knife
3/8 “or 1/2” Spacers
Hardwood Flooring Cleaner
Broom
Foam Underlayment
6 mil polyethylene film
Clear Packing Tape
When installed using the floating installation method all sub floors should be covered with either a 3 in 1 Underlayment or an approved
1/8” thick closed cell foam underlayment following the instructions inside the packaging. When using a 1/8” thick closed cell foam
underlayment over a concrete sub floor, you must also use a 6 or 8 mil polyethylene film which acts as a vapor retarter.
All engineered products when installed using the floating installation method, can be installed below grade, on grade and above grade.
However, the following instructions must be followed for below grade installation.
FLOATING FLOOR INSTALLATION METHOD
JOB SITE PREPARATION