
User guide

AccuMeter Controller Chapter 12: Quick Startup and Calibration 81
Chapter 12: Quick Startup and
Calibration
This section describes the quick startup for a blender and controller that has been factory
programmed, mounted, and configured on a new unit.
Do not use this section if you are upgrading to the AccuMeter Control Logix platform from
either a C2, Covis, or OL controller. For retrofits refer to the Detailed Configuration
Parameters chapter.
Do not use this section if you are starting with a PLC or Display that has not yet been
programmed. Refer to the Initial Programming section for new PLCs or Displays.
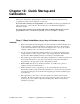
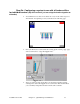
Step 1: Basic Installation (skip to Step 2 if blender is already
installed)
• Remove the blender from the shipping crate and mount unit on either mezzanine, feed
throat of machine, or blender stand based on application. Be sure to allow adequate
room around entire blender to allow removal of auger feeders. Also be sure to allow
adequate overhead room to accommodate vacuum receivers.
• In some cases the blenders Drive Panels will need to be mounted near blender with
enough clearance to remove augers. This is only on larger blenders. Most blenders
have the Drive Panel and PLC panel factory mounted to the blender frame.
• The weigh hoppers and/or feeders (depending on application) are shipped separate from
the load cells and blender. Locate these hoppers/feeders and mount each labeled
hopper/feeder to the appropriate location designated by a label.
• Plumb 60 PSI clean dry air to manifold on blender. You will need to provide a
regulator and any air treatment devices.
• Mount vacuum receivers to supply hoppers. No electrical interface between the
blender and vacuum system needed. The blender has it’s own reload section that will
reload the weigh hoppers as needed from the supply hoppers that the vacuum hoppers
are mounted to.
• Wire appropriate power source to each drive panel in accordance with electrical
schematic. In most cases this is the only power connection required. In some cases a
separate power source will be required for the PLC panel. Refer to the electrical
schematic for specifics.