
User guide

AccuMeter Controller Chapter 3: Installation 26
Note: Never weld on the blender’s frame, machine or mezzanine
without first removing the control panel and verifying that the
blender’s power is disconnected.
Mezzanine Mount
In a mezzanine mount application, review the following items before installation begins. First,
verify the blender mounting locations match the mezzanine supports. Verify that the mezzanine
is capable of supporting the blender with a full load of material and loading equipment
installed. If the unit is unstable in the vertical or horizontal plane, additional bracing of the
mezzanine floor or blender side bracing will be required. Remember that this is a precision
weighing system. It is only as accurate as the base it is mounted on.
If a blender is moving due to vibration, the weigh hoppers will tend to remain stationary due to
the laws of physics dealing with inertia. This causes the load cells to output erroneous weight
signals.
Note: While in operation, the blender applies both horizontal and vertical pressures to
the mezzanine mount location.
Second, verify ALL clearances to other equipment and structures. Insure motors, hoppers, and
control panels have proper clearance for operation, cleaning and maintenance.
Note: Auger assemblies require a minimum of 24 inches for proper cleaning and
maintenance.
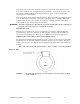
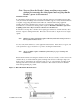
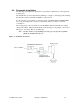
Ensure that the blender, if feeding the extruder from an offset (not exactly over the center of the
extruder throat), is mounted with the gravity discharge tube at least at a 60 degree angle (See
figure 7 below). This must be more than the angle of repose of the material or bridging in the
discharge tube will occur and the extruder could starve. The material connection should be
made with rigid tubing, if possible.
Figure 7: Offset Mezzanine Mount Position